
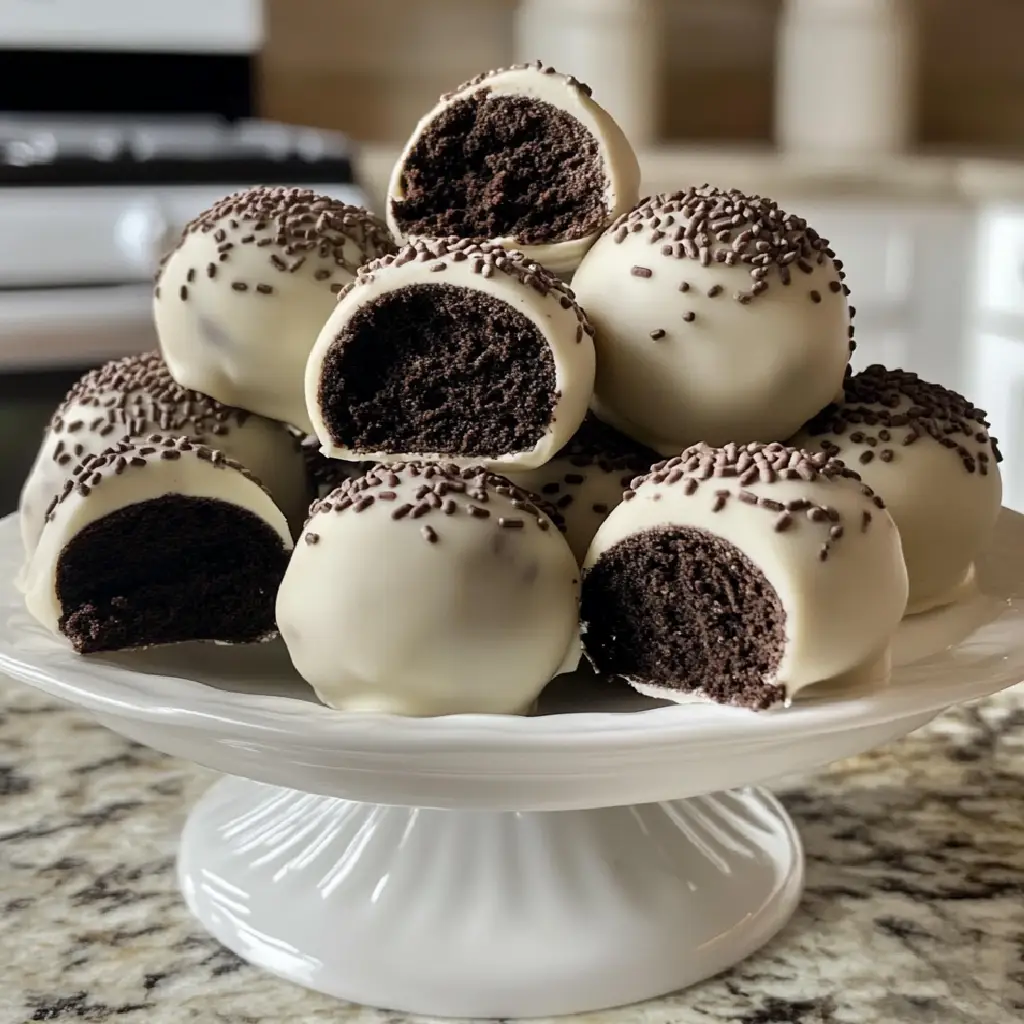
Introduction to Spring Oreo Truffles
As the flowers bloom and the sun shines brighter, I find myself drawn to the kitchen, eager to whip up something delightful. Spring is a season of renewal, and what better way to celebrate than with a sweet treat that captures the essence of this vibrant time? Enter my Spring Oreo Truffles—a delightful fusion of creamy goodness and crunchy cookie bliss.
These truffles are not just a dessert; they are a celebration of flavors and textures that dance on your palate. I remember the first time I made them for a spring gathering. The laughter of friends filled the air, and as I presented these little bites of joy, their eyes lit up with curiosity. The moment they took a bite, the room erupted in compliments. It was a magical experience that made me realize how food can bring people together.
What I love most about these Spring Oreo Truffles is their simplicity. With just a handful of ingredients, you can create something that looks and tastes like it came from a fancy bakery. Plus, they are incredibly versatile! You can customize them with different toppings or flavors, making them perfect for any occasion. Whether it’s a picnic in the park or a festive spring party, these truffles are sure to impress.
So, grab your apron and let’s dive into the world of Spring Oreo Truffles. I promise you, once you make them, they’ll become a staple in your springtime repertoire. Let’s get started on this delicious adventure!
Ingredients for Spring Oreo Truffles
Before we embark on our truffle-making journey, let’s gather our ingredients. I always believe that the quality of your ingredients can make a world of difference in the final product. So, let’s make sure we have everything we need to create these delightful Spring Oreo Truffles!
Main Ingredients
- 1 package (15.35 oz) of Oreo cookies: The classic chocolate cookies are the star of the show. You can use regular Oreos or even the spring-themed ones if you can find them!
- 8 oz cream cheese, softened: This creamy goodness binds everything together. I prefer using full-fat cream cheese for a richer flavor, but low-fat works too.
- 16 oz white chocolate or candy melts: This will be our coating. I love using high-quality chocolate for a smooth finish. If you’re feeling adventurous, you can also use dark chocolate!
Optional Add-ons
- Sprinkles: A splash of color can make your truffles pop! Choose pastel-colored sprinkles for that spring vibe.
- Crushed nuts: Chopped almonds or walnuts can add a delightful crunch and a nutty flavor.
- Flavored extracts: A drop of vanilla or almond extract can elevate the taste. Just be careful not to overpower the Oreo flavor!
- Food coloring: If you want to tint your white chocolate coating, a few drops of food coloring can create a fun and festive look.
Now that we have our ingredients ready, it’s time to roll up our sleeves and get to work! Remember, the beauty of these truffles lies in their simplicity and versatility. Feel free to mix and match the optional add-ons to make them your own. Let’s create something magical together!
How to Prepare Spring Oreo Truffles
Now that we have our ingredients all set, it’s time to dive into the fun part—making our Spring Oreo Truffles! I can’t tell you how much joy I get from this process. It’s like a little dance in the kitchen, and I’m excited to share each step with you. Let’s get started!
Step 1: Crush the Oreos
The first step is to crush those Oreos into fine crumbs. You can use a food processor for this, or if you’re like me and enjoy a little hands-on action, place them in a zip-top bag and crush them with a rolling pin. It’s a great way to relieve stress!
Tips for Crushing Oreos
- Make sure the bag is sealed tightly to avoid any cookie explosions!
- Don’t worry about getting them perfectly fine; a few larger pieces add texture.
Step 2: Mix with Cream Cheese
Next, we’ll mix the crushed Oreos with the softened cream cheese. This is where the magic happens! I like to use a large bowl and a spatula to combine them until it’s all well blended. You want it to be a thick, dough-like consistency.
Tips for Achieving the Right Consistency
- Make sure your cream cheese is at room temperature for easy mixing.
- If the mixture feels too dry, add a little more cream cheese until it’s just right.
Step 3: Form the Truffles
Now comes the fun part—shaping the mixture into truffles! I like to use a small cookie scoop to get even portions. Roll them into balls with your hands, and don’t worry if they aren’t perfect; each truffle has its own character!
Tips for Shaping Truffles
- Wet your hands slightly to prevent the mixture from sticking.
- Try to keep them about 1 inch in diameter for a perfect bite-sized treat.
Step 4: Chill the Mixture
Once you’ve shaped all your truffles, it’s time to chill them in the fridge for about 30 minutes. This helps them firm up, making them easier to dip in chocolate later.
Tips for Effective Chilling
- Place them on a parchment-lined baking sheet to avoid sticking.
- If you’re in a hurry, you can pop them in the freezer for about 15 minutes instead.
Step 5: Dip in Chocolate
Now, let’s melt that chocolate! I usually do this in a microwave-safe bowl, heating it in 30-second intervals and stirring in between. Once it’s smooth and melted, it’s time to dip those chilled truffles!
Tips for Melting Chocolate
- Be careful not to overheat the chocolate; it can seize up quickly.
- For a smoother finish, add a teaspoon of vegetable oil to the melted chocolate.
Step 6: Decorate the Truffles
Finally, it’s time to get creative! After dipping the truffles in chocolate, you can sprinkle them with your chosen toppings while the chocolate is still wet. This is where you can let your imagination run wild!
Tips for Creative Decoration
- Use a fork to drizzle contrasting chocolate over the top for a fancy touch.
- Get the kids involved! They love adding sprinkles and making a mess.
And there you have it! Each step brings us closer to those delightful Spring Oreo Truffles. I can already smell the sweetness in the air. Let’s keep this momentum going and gather our equipment next!
Equipment Needed for Spring Oreo Truffles
Before we dive into the truffle-making process, let’s gather our tools! Having the right equipment can make all the difference in creating those perfect Spring Oreo Truffles. Here’s what you’ll need:
- Food Processor or Rolling Pin: If you have a food processor, it’s a breeze to crush those Oreos. But if you prefer a more hands-on approach, a rolling pin and a zip-top bag work just as well!
- Mixing Bowl: A large mixing bowl is essential for combining the crushed Oreos and cream cheese. I love using a glass bowl so I can see the mixture come together.
- Spatula: A sturdy spatula helps in mixing and scraping down the sides of the bowl. It’s a must-have for ensuring everything is well combined.
- Cookie Scoop: This handy tool makes portioning the truffles a breeze. If you don’t have one, you can use your hands to shape them, just remember to keep them uniform!
- Parchment Paper: Line your baking sheet with parchment paper to prevent sticking. It makes cleanup a snap!
- Microwave-Safe Bowl: For melting the chocolate, a microwave-safe bowl is crucial. If you prefer, you can also use a double boiler on the stove.
- Fork or Toothpick: These are great for dipping the truffles into chocolate and for drizzling on any additional toppings.
And there you have it! With these tools in hand, you’re all set to create your Spring Oreo Truffles. Remember, if you don’t have a specific tool, don’t fret! Many kitchen items can serve multiple purposes, so get creative and make it work. Let’s keep the momentum going and move on to the next delicious step!
Variations of Spring Oreo Truffles
While I adore the classic Spring Oreo Truffles, there’s something so exciting about experimenting with different flavors and ingredients. Each variation brings a unique twist that can make your truffles even more delightful. Here are a few fun ideas to inspire your creativity:
- Mint Chocolate Oreo Truffles: Swap out regular Oreos for mint-flavored ones. The refreshing minty taste pairs beautifully with the creamy filling and chocolate coating.
- Peanut Butter Oreo Truffles: Mix in some creamy peanut butter with the cream cheese for a nutty flavor explosion. You can even use peanut butter Oreos for an extra kick!
- Carrot Cake Oreo Truffles: Use carrot cake-flavored Oreos and add a pinch of cinnamon and nutmeg to the cream cheese mixture. These are perfect for spring celebrations!
- Chocolate-Covered Strawberry Truffles: Incorporate crushed freeze-dried strawberries into the Oreo mixture. Dip in white chocolate and top with a sprinkle of crushed strawberries for a fruity touch.
- Rainbow Sprinkles Truffles: For a festive look, mix colorful sprinkles into the truffle mixture and use them as a topping. They’ll add a cheerful pop of color!
These variations are just the tip of the iceberg! Feel free to mix and match flavors and toppings to create your own signature Spring Oreo Truffles. The possibilities are endless, and I can’t wait to see what you come up with!
Cooking Notes for Spring Oreo Truffles
As I’ve journeyed through the delightful process of making Spring Oreo Truffles, I’ve picked up a few cooking notes that can help you achieve the best results. These little tips can make a big difference in your truffle-making adventure!
- Room Temperature Ingredients: Always ensure your cream cheese is at room temperature. This makes mixing easier and helps achieve that creamy texture we all love.
- Chilling Time: Don’t rush the chilling process! Allowing the truffles to chill properly helps them hold their shape when you dip them in chocolate.
- Chocolate Quality: The type of chocolate you use can affect the flavor and texture. I recommend using high-quality chocolate or candy melts for a smooth finish.
- Storage: Store your truffles in an airtight container in the fridge. They can last up to a week, but I doubt they’ll last that long—they’re just too delicious!
- Experimentation: Don’t be afraid to try new flavors or toppings! Each batch can be a new adventure, and you might just stumble upon your new favorite combination.
With these cooking notes in mind, you’re well on your way to creating the most scrumptious Spring Oreo Truffles. Remember, cooking is all about having fun and enjoying the process. Let’s keep the excitement going as we explore serving suggestions next!
Serving Suggestions for Spring Oreo Truffles
Now that our Spring Oreo Truffles are ready to dazzle, let’s talk about how to serve them! Presentation can elevate your treats from simple to spectacular, and I love getting creative with it. Here are some delightful serving suggestions that will make your truffles the star of any gathering:
- Truffle Platter: Arrange your truffles on a beautiful platter, mixing different flavors and colors. Add some fresh flowers or greenery around them for a springtime touch.
- Gift Boxes: Package your truffles in cute little boxes or mason jars tied with a ribbon. They make perfect gifts for friends and family, especially during spring celebrations!
- Picnic Treats: If you’re heading out for a picnic, pack your truffles in a cooler. They’re easy to transport and will be a hit among your friends.
- Party Favors: For a spring party, consider giving each guest a few truffles in a small bag as a sweet thank-you. It’s a lovely way to share your culinary creation!
- With Coffee or Tea: Serve your truffles alongside a warm cup of coffee or tea. The rich flavors of the truffles pair beautifully with a hot beverage, making for a cozy treat.
These serving suggestions not only enhance the visual appeal but also create memorable experiences for you and your loved ones. I can already picture the smiles on their faces as they indulge in these delightful bites. So, let’s keep the momentum going and explore some tips for making perfect Spring Oreo Truffles next!
Tips for Making Perfect Spring Oreo Truffles
As I’ve crafted my Spring Oreo Truffles over the years, I’ve gathered a treasure trove of tips that can help you achieve truffle perfection. These little nuggets of wisdom can make your truffle-making experience even more enjoyable and successful. Here are my top tips to keep in mind:
- Use Fresh Ingredients: Always check the expiration dates on your cream cheese and chocolate. Fresh ingredients make a world of difference in flavor and texture.
- Don’t Skip the Chilling: Chilling the truffles before dipping is crucial. It helps them hold their shape and makes the dipping process much easier.
- Experiment with Coatings: While white chocolate is a classic, don’t hesitate to try different coatings like dark chocolate or even colored candy melts for a fun twist.
- Keep It Clean: When dipping, use a fork or toothpick to avoid messy hands. It also helps create a smoother finish on your truffles.
- Have Fun with Toppings: Get creative with your decorations! From crushed cookies to edible glitter, the sky’s the limit. Let your personality shine through!
With these tips in your back pocket, you’re all set to create the most delightful Spring Oreo Truffles. Remember, the joy of cooking comes from the love and creativity you put into it. So, let’s keep the excitement alive as we break down the time needed for our truffle adventure!
Breakdown of Time for Spring Oreo Truffles
As we embark on our truffle-making journey, it’s helpful to know how much time we’ll need to dedicate to this delicious adventure. I always find that having a clear timeline makes the process smoother and more enjoyable. Here’s a quick breakdown of the time required for making your Spring Oreo Truffles:
- Prep Time: 20 minutes – This includes gathering your ingredients, crushing the Oreos, and mixing everything together. It’s a fun and engaging part of the process!
- Chilling Time: 30 minutes – Allowing the truffles to chill is essential for achieving the perfect texture. Patience is key here!
- Cooking Time: 15 minutes – This is the time spent melting the chocolate and dipping the truffles. It’s where the magic truly happens!
- Total Time: 1 hour and 5 minutes – In just over an hour, you’ll have a batch of delightful Spring Oreo Truffles ready to impress!
With this timeline in mind, you can plan your truffle-making session accordingly. I love to put on some music and enjoy the process, knowing that in just a little while, I’ll be rewarded with these sweet treats. Let’s keep the momentum going as we explore the nutritional information next!
Nutritional Information for Spring Oreo Truffles
As a passionate home cook, I always find it helpful to know the nutritional content of the treats I make. While these Spring Oreo Truffles are undeniably a sweet indulgence, they can still fit into a balanced diet when enjoyed in moderation. Here’s a quick overview of the nutritional information for one truffle, based on the ingredients listed:
- Calories: Approximately 120 calories
- Fat: 7g (Saturated Fat: 4g)
- Carbohydrates: 15g (Sugars: 10g)
- Protein: 1g
- Fiber: 0g
Keep in mind that these values can vary based on the specific brands of ingredients you use and any optional add-ons you choose to include. If you’re looking to lighten them up a bit, consider using reduced-fat cream cheese or dark chocolate for a slightly healthier twist. Regardless, these truffles are a delightful treat that can bring joy to any spring gathering. Just remember, a little sweetness goes a long way!
Frequently Asked Questions about Spring Oreo Truffles
As I’ve shared my love for Spring Oreo Truffles, I often get questions from fellow home cooks eager to try their hand at this delightful treat. I love connecting with others through food, and I’m here to help! Here are some of the most frequently asked questions about making these scrumptious truffles:
Can I use gluten-free Oreos for this recipe?
Absolutely! Gluten-free Oreos are a fantastic option for those with dietary restrictions. They taste just as delicious, and you won’t miss a beat in flavor or texture. Just make sure to check the packaging to ensure they are certified gluten-free.
How long do the truffles last?
When stored in an airtight container in the fridge, your Spring Oreo Truffles can last up to a week. However, I doubt they’ll stick around that long—they’re just too tempting!
Can I freeze the truffles?
Yes, you can freeze them! Just place the truffles in a single layer on a baking sheet until they’re firm, then transfer them to an airtight container or freezer bag. They can last up to three months in the freezer. When you’re ready to enjoy them, simply let them thaw in the fridge for a few hours.
What can I use instead of cream cheese?
If you’re looking for a dairy-free option, you can substitute cream cheese with vegan cream cheese or even nut butter for a different flavor profile. Just keep in mind that the texture may vary slightly, but it will still be delicious!
Can I make these truffles ahead of time?
Definitely! In fact, making them a day in advance can enhance the flavors as they sit. Just store them properly in the fridge, and they’ll be ready to impress your guests when the time comes.
These FAQs cover some common queries I’ve encountered while making Spring Oreo Truffles. If you have any more questions or need further assistance, feel free to reach out! I love sharing my culinary adventures and helping others create their own delicious memories in the kitchen. Now, let’s wrap up our delightful journey with a sweet conclusion!
Conclusion on Spring Oreo Truffles
As we wrap up our delightful journey into the world of Spring Oreo Truffles, I can’t help but feel a sense of joy and accomplishment. These little bites of bliss are not just a treat; they are a celebration of spring, creativity, and the joy of sharing with loved ones. The simplicity of the recipe, combined with the endless possibilities for customization, makes these truffles a must-try for any home cook.
Whether you’re hosting a spring gathering, surprising a friend, or simply indulging in a sweet moment for yourself, these truffles are sure to bring smiles and compliments. The creamy filling, crunchy cookie bits, and luscious chocolate coating create a symphony of flavors that dance on your palate. Plus, the fun of decorating them adds an extra layer of joy to the experience.
So, as you step into your kitchen to create your own batch of Spring Oreo Truffles, remember that cooking is about more than just the food. It’s about the memories you create, the laughter you share, and the love you pour into every bite. I hope these truffles become a cherished part of your springtime traditions, just as they have in mine. Happy cooking!


