
Introduction to Sopapilla Cheesecake Bars Recipe
As a passionate home cook, I often find myself on a delightful journey through flavors and textures. One of my favorite stops on this culinary adventure is the enchanting world of Sopapilla Cheesecake Bars. These bars are not just a dessert; they are a sweet embrace that wraps you in warmth and nostalgia. The first time I tasted them, I was transported to a cozy kitchen filled with laughter and the aroma of cinnamon wafting through the air.
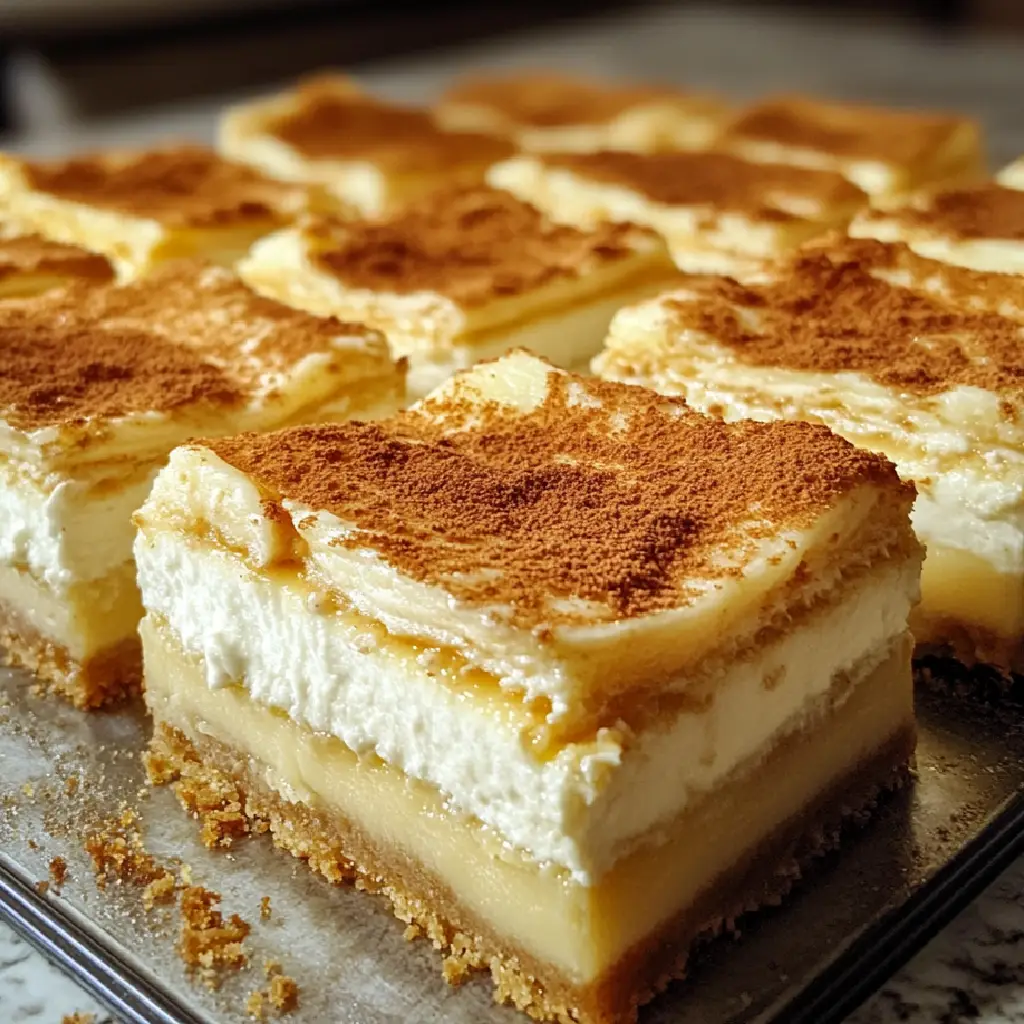
Imagine biting into a soft, flaky crust that cradles a creamy, dreamy cheesecake filling, all topped with a sprinkle of cinnamon sugar. It’s like a hug from your favorite dessert! I remember making these bars for a family gathering, and they disappeared faster than I could say “Sopapilla.” Everyone was raving about them, and I felt like a rock star in the kitchen.
What I love most about this recipe is its simplicity. With just a handful of ingredients, you can create a dessert that looks and tastes like it took hours to prepare. It’s perfect for both seasoned bakers and those just starting their culinary journey. Plus, it’s a fantastic way to impress friends and family without breaking a sweat!
So, if you’re ready to embark on this sweet adventure with me, grab your apron, and let’s dive into the delightful world of Sopapilla Cheesecake Bars. Trust me, your taste buds will thank you!
Ingredients for Sopapilla Cheesecake Bars Recipe
Before we dive into the magic of baking, let’s gather our ingredients. I always say that great dishes start with quality ingredients. For these Sopapilla Cheesecake Bars, you’ll need a few staples that you might already have in your pantry. Here’s what you’ll need:
Main Ingredients
- 2 cans of refrigerated crescent roll dough (I prefer the flaky kind for that perfect texture)
- 2 (8 oz) packages of cream cheese, softened (make sure it’s at room temperature for easy mixing)
- 1 cup of granulated sugar (this adds just the right amount of sweetness)
- 1 teaspoon of vanilla extract (a splash of this makes everything better)
- 1/2 cup of unsalted butter, melted (butter makes it richer and oh-so-delicious)
- 1 teaspoon of ground cinnamon (the star of the show, bringing warmth and flavor)
- 1/4 cup of powdered sugar (for that sweet finishing touch)
When I shop for ingredients, I always look for the freshest cream cheese and the best quality butter. It really makes a difference in the final taste of the bars!
Optional Add-ons
- Chopped nuts (like pecans or walnuts) for a delightful crunch
- Chocolate chips for a sweet twist (because who doesn’t love chocolate?)
- Fresh fruit, like berries, to add a pop of color and freshness
- Drizzle of caramel sauce for an extra layer of indulgence
Feel free to get creative with these optional add-ons! I once added a handful of chocolate chips, and let me tell you, it was a game-changer. The beauty of this recipe is that it’s versatile, allowing you to customize it to your taste. Now that we have our ingredients ready, let’s move on to the fun part—preparing these delicious bars!
How to Prepare Sopapilla Cheesecake Bars Recipe
Now that we have our ingredients ready, it’s time to roll up our sleeves and get baking! I find that the process of making Sopapilla Cheesecake Bars is just as enjoyable as eating them. Each step brings us closer to that sweet, creamy goodness. Let’s dive into the preparation!
Step 1: Preheat the Oven
The first step is to preheat your oven to 350°F (175°C). This ensures that your bars bake evenly and come out perfectly golden brown.
Tips for Preheating
- Make sure to set your oven timer for a few minutes before you start mixing your ingredients. This way, it will be hot and ready when you need it!
- Use an oven thermometer to check the temperature. Sometimes, ovens can be a bit off, and we want our bars to bake just right!
Step 2: Prepare the Cream Cheese Mixture
Next, we’ll whip up the creamy filling. In a mixing bowl, combine the softened cream cheese, granulated sugar, and vanilla extract. Beat them together until the mixture is smooth and fluffy.
Tips for Cream Cheese Preparation
- Make sure your cream cheese is at room temperature. This makes it easier to blend and prevents lumps in your filling.
- Use an electric mixer for the best results. It saves time and gives you that light, airy texture!
Step 3: Layer the Dough
Now comes the fun part—layering! Open one can of crescent roll dough and lay it flat in a greased baking dish. Make sure to pinch the seams together to create a solid base.
Tips for Layering
- Don’t worry if the dough doesn’t fit perfectly. Just stretch it a bit to cover the bottom of the dish.
- Spread half of the cream cheese mixture over the dough, then layer the second can of dough on top. Pinch the seams again!
Step 4: Bake the Bars
It’s time to bake! Place your layered masterpiece in the preheated oven and let it bake for about 30-35 minutes, or until it’s golden brown.
Tips for Baking
- Keep an eye on the bars as they bake. Ovens can vary, and you want to catch them before they get too brown.
- If the top is browning too quickly, you can cover it loosely with aluminum foil to prevent burning.
Step 5: Cool and Serve
Once baked, remove the bars from the oven and let them cool in the pan for about 10-15 minutes. Then, sprinkle the top with powdered sugar and a dash of cinnamon for that finishing touch!
Tips for Cooling
- Letting them cool slightly makes them easier to cut into squares without falling apart.
- For an extra treat, serve them warm with a scoop of vanilla ice cream on the side!
And there you have it! Your Sopapilla Cheesecake Bars are ready to be devoured. I can already imagine the smiles on everyone’s faces as they take that first bite. Let’s move on to the next section, where we’ll talk about the equipment you’ll need for this delightful recipe!
Equipment Needed for Sopapilla Cheesecake Bars Recipe
Before we dive into the baking process, let’s make sure we have all the right tools at our fingertips. Having the right equipment can make a world of difference in your cooking experience. Here’s what you’ll need for these delightful Sopapilla Cheesecake Bars:
- 9×13-inch baking dish: This is the perfect size for our bars. If you don’t have one, a similar-sized dish will work just fine!
- Mixing bowls: You’ll need a couple of these for mixing the cream cheese filling and for combining the cinnamon sugar.
- Electric mixer: While you can mix by hand, an electric mixer makes it so much easier to achieve that fluffy cream cheese mixture. If you don’t have one, a whisk will do the trick, but it may take a bit more elbow grease!
- Spatula: A rubber spatula is great for spreading the cream cheese mixture evenly over the dough.
- Measuring cups and spoons: Accurate measurements are key to baking success, so make sure you have these handy!
- Cooling rack: If you have one, it’s perfect for letting your bars cool evenly. If not, just leave them in the baking dish for a bit longer.
With these tools in your kitchen arsenal, you’ll be well-equipped to create your Sopapilla Cheesecake Bars. I always find that having everything organized and ready to go makes the baking process so much more enjoyable. Now, let’s move on to the variations of this delicious recipe!
Variations of Sopapilla Cheesecake Bars Recipe
One of the things I adore about Sopapilla Cheesecake Bars is their versatility. You can easily switch things up to suit your taste or the occasion. Here are a few delightful variations that I’ve tried and loved:
- Chocolate Chip Sopapilla Bars: Add a generous handful of chocolate chips to the cream cheese mixture for a rich, sweet twist. The melty chocolate pairs beautifully with the creamy filling!
- Fruit-Infused Bars: Mix in some fresh berries or sliced peaches into the cream cheese filling. The fruity burst adds a refreshing touch that’s perfect for summer gatherings.
- Nutty Delight: Toss in some chopped pecans or walnuts for a crunchy texture. The nuts add a lovely contrast to the soft bars and enhance the flavor.
- Caramel Drizzle: Drizzle warm caramel sauce over the top before serving. It adds an indulgent layer of sweetness that’s simply irresistible!
These variations not only keep things exciting but also allow you to personalize your Sopapilla Cheesecake Bars. I remember making the chocolate chip version for a friend’s birthday, and they were a huge hit! So, don’t hesitate to get creative and make this recipe your own. Now, let’s explore some cooking notes to ensure your bars turn out perfectly every time!
Cooking Notes for Sopapilla Cheesecake Bars Recipe
As I’ve learned through my culinary adventures, a few cooking notes can make all the difference in achieving the perfect Sopapilla Cheesecake Bars. Here are some tips that I always keep in mind when whipping up this delightful treat:
- Room Temperature Ingredients: Always ensure your cream cheese and eggs (if using) are at room temperature. This helps them blend smoothly, creating that luscious filling we all love.
- Don’t Overmix: When combining the cream cheese mixture, mix just until smooth. Overmixing can introduce too much air, leading to cracks in your bars as they cool.
- Watch the Baking Time: Every oven is different! Start checking your bars a few minutes before the recommended baking time. You want them golden brown but not overcooked.
- Cool Completely: Allow the bars to cool completely before cutting. This helps them set and makes for cleaner, prettier squares.
- Storage Tips: Store any leftovers in an airtight container in the fridge. They’ll stay fresh for up to a week, but I doubt they’ll last that long!
These little notes have helped me perfect my Sopapilla Cheesecake Bars over time. I hope they guide you on your baking journey, too! Now, let’s move on to some serving suggestions that will elevate your dessert experience even further.
Serving Suggestions for Sopapilla Cheesecake Bars Recipe
Now that our Sopapilla Cheesecake Bars are ready to shine, let’s talk about how to serve them for maximum enjoyment! Presentation can elevate any dish, and these bars are no exception. Here are some delightful serving suggestions that I’ve found to be crowd-pleasers:
- Warm with Ice Cream: Serve the bars warm with a scoop of vanilla ice cream on top. The creamy ice cream melts slightly, creating a delicious contrast with the warm, flaky bars.
- Drizzle with Honey or Caramel: A drizzle of honey or caramel sauce adds a touch of sweetness and makes for a beautiful presentation. It’s like a cherry on top, but even better!
- Fresh Berries: Garnish with fresh berries like strawberries or blueberries. Not only do they add a pop of color, but they also bring a refreshing burst of flavor.
- Dust with Powdered Sugar: A light dusting of powdered sugar right before serving gives the bars a lovely, elegant finish. It’s a simple touch that makes them look extra special!
These serving suggestions not only enhance the visual appeal but also add layers of flavor that make each bite even more delightful. I remember serving these bars at a family gathering, and everyone loved the warm ice cream combo. It’s a memory I cherish! So, get creative and have fun with your presentation. Your guests will be impressed, and your taste buds will thank you!
Tips for Making Sopapilla Cheesecake Bars Recipe
As I’ve spent countless hours perfecting my Sopapilla Cheesecake Bars, I’ve gathered a treasure trove of tips that can help you achieve the best results. These little nuggets of wisdom can make your baking experience smoother and your bars even more delicious. Here are my top tips:
- Chill the Dough: If you find the crescent roll dough hard to work with, try chilling it for a few minutes. This makes it easier to handle and less sticky.
- Experiment with Spices: While cinnamon is a classic, don’t hesitate to add a pinch of nutmeg or even a dash of cardamom for a unique flavor twist. It’s like a secret ingredient that can elevate your bars!
- Use Quality Cream Cheese: Opt for a full-fat cream cheese for a richer, creamier filling. Trust me, it makes a world of difference in taste and texture.
- Don’t Rush the Cooling: Allow your bars to cool completely before cutting. This helps them set properly and makes for cleaner slices. Patience is key!
- Get Creative with Toppings: Don’t be afraid to mix and match toppings. Whether it’s a sprinkle of nuts, a drizzle of chocolate, or a dollop of whipped cream, the possibilities are endless!
These tips have transformed my baking game, and I hope they do the same for you! Each time I make these bars, I discover something new, and that’s the beauty of cooking. So, roll up your sleeves and let your creativity shine as you whip up your own batch of Sopapilla Cheesecake Bars!
Breakdown of Time for Sopapilla Cheesecake Bars Recipe
As a home cook, I know that time management is key in the kitchen. When it comes to making Sopapilla Cheesecake Bars, it’s all about balancing preparation and baking time. Here’s a quick breakdown to help you plan your baking adventure:
- Prep Time: 15 minutes – This includes gathering your ingredients, preheating the oven, and mixing the cream cheese filling.
- Cooking Time: 30-35 minutes – This is the time your bars will spend in the oven, transforming into golden, delicious treats.
- Total Time: 45-50 minutes – From start to finish, you can have these delightful bars ready to serve in under an hour!
Knowing this time breakdown helps me plan my baking sessions better. I often whip these up when I have friends coming over or when I want to treat my family to something special. Plus, the best part is that the aroma of these bars baking fills the house, making everyone eager to dig in! So, let’s get ready to enjoy some sweet moments with our Sopapilla Cheesecake Bars!
Nutritional Information for Sopapilla Cheesecake Bars Recipe
As a passionate home cook, I believe it’s important to be mindful of what we’re putting into our bodies, even when indulging in something as delightful as Sopapilla Cheesecake Bars. While these bars are a treat, knowing their nutritional information can help you enjoy them in moderation. Here’s a general breakdown per serving (assuming you cut the bars into 12 squares):
- Calories: Approximately 250 calories
- Fat: 15g (of which saturated fat is about 8g)
- Carbohydrates: 28g
- Fiber: 1g
- Sugar: 12g
- Protein: 3g
Keep in mind that these values can vary based on the specific brands of ingredients you use and any optional add-ons you choose to include. For instance, adding chocolate chips or nuts will increase the calorie count, but they also add delicious flavor and texture!
When I make these bars, I like to savor them as a special treat rather than an everyday dessert. It’s all about balance, right? So, enjoy your Sopapilla Cheesecake Bars, and remember that a little indulgence can be a wonderful part of a happy, healthy lifestyle!
Frequently Asked Questions about Sopapilla Cheesecake Bars Recipe
As I’ve shared my love for Sopapilla Cheesecake Bars, I’ve often encountered questions from fellow home cooks eager to try this delightful recipe. It’s always a joy to help others navigate their culinary adventures! Here are some of the most common questions I’ve received, along with my answers:
Can I use a different type of dough?
Absolutely! While I love using crescent roll dough for its flaky texture, you can also try puff pastry or even a homemade pie crust. Just keep in mind that the baking time may vary slightly, so keep an eye on it!
How do I store leftovers?
To keep your Sopapilla Cheesecake Bars fresh, store them in an airtight container in the refrigerator. They’ll stay delicious for up to a week. Just remember to let them cool completely before storing to avoid sogginess!
Can I freeze these bars?
Yes, you can freeze Sopapilla Cheesecake Bars! Just wrap them tightly in plastic wrap and then place them in a freezer-safe container. They can be frozen for up to three months. When you’re ready to enjoy them, simply thaw them in the fridge overnight.
What can I substitute for cream cheese?
If you’re looking for a lighter option, you can use Greek yogurt or mascarpone cheese as a substitute. Just keep in mind that the flavor and texture may vary slightly, but they can still create a delicious filling!
Can I make these bars ahead of time?
Definitely! These bars are perfect for making ahead of time. You can prepare them a day in advance and store them in the fridge. Just remember to sprinkle the powdered sugar on top right before serving for that fresh look!
These FAQs are just a glimpse into the wonderful world of Sopapilla Cheesecake Bars. I hope they help you feel more confident as you embark on your baking journey. If you have any other questions, feel free to reach out! Now, let’s wrap up our sweet adventure with a final note on these delightful bars.
Conclusion on Sopapilla Cheesecake Bars Recipe
As we reach the end of our sweet journey through the world of Sopapilla Cheesecake Bars, I can’t help but feel a sense of joy and satisfaction. These bars are more than just a dessert; they are a celebration of flavors, memories, and the simple pleasure of sharing good food with loved ones. The combination of flaky dough, creamy filling, and a sprinkle of cinnamon sugar creates a delightful experience that’s hard to resist.
What I love most about this recipe is its accessibility. With just a handful of ingredients and straightforward steps, anyone can whip up these delicious bars, whether you’re a seasoned baker or just starting out. Plus, the versatility of the recipe allows you to customize it to your taste, making it a perfect canvas for your culinary creativity.
So, whether you’re making them for a family gathering, a potluck, or just to treat yourself, I encourage you to embrace the joy of baking these Sopapilla Cheesecake Bars. They are sure to bring smiles and sweet moments to your table. Happy baking, and may your kitchen always be filled with love and laughter!


