

Introduction to Peppermint Swirl Fudge Shots
Imagine the rich, decadent soul of a classic chocolate fudge and the bright, festive spirit of a candy cane, all magically condensed into a single, irresistible, bite-sized shot. Welcome to the world of Peppermint Swirl Fudge Shots, the ultimate no-bake holiday confection that is equal parts dessert, decoration, and pure, unadulterated joy. These are not merely pieces of fudge; they are dense, creamy, and intensely chocolatey morsels, meticulously layered and swirled with a vibrant, peppermint-kissed white topping that creates a stunning visual reminiscent of a holiday candy. Each shot is a perfect one-bite wonder that delivers a powerful punch of flavor and a texture that is miraculously smooth and melt-in-your-mouth.
Why Is This Peppermint Swirl Fudge Shots So Popular?
The meteoric rise of this particular holiday treat is a phenomenon built on its visual appeal, foolproof method, and the universal love for its classic flavor combination.
First and foremost is their stunning, professional-looking presentation. The contrast between the deep, dark chocolate base and the bright white and red peppermint swirl is instantly eye-catching and undeniably festive. They look like they came from a high-end chocolatier, yet they are deceptively simple to make. This “wow” factor makes them a superstar on holiday dessert tables and a highly shareable image on social media.
Secondly, they are an unbelievably easy and reliable no-bake dessert. In a season where oven space is at a premium and time is a luxury, a recipe that requires zero baking and sets in the fridge is a godsend. The process is as simple as melting, mixing, and swirling, making it an accessible and fun project for bakers of all skill levels, including children who can help with the swirling and sprinkling.
Thirdly, their perfect portion control and party-friendly nature make them a host’s best friend. The small, shot-sized portions mean guests can sample one (or three!) without commitment, leaving room for other desserts. Their neat, contained shape prevents messy crumbs and sticky fingers, making them ideal for elegant gatherings and casual potlucks alike.
Finally, the nostalgic and universally beloved flavor profile is a guaranteed crowd-pleaser. The combination of rich chocolate and cool peppermint is the very essence of Christmas for many people. This recipe delivers that familiar comfort in a new, exciting format that feels both classic and contemporary.
Why You’ll Love This Peppermint Swirl Fudge Shots:
- No-Bake Holiday Hero: You will love having a spectacular dessert that doesn’t require any oven time during the busy holiday season.
- Foolproof and Fast: The process is simple, straightforward, and guarantees a smooth, creamy fudge every time.
- Stunning Visual Impact: You will be proud to present these beautiful, professionally decorated treats on any holiday platter.
- Perfect Party Portion: The bite-sized “shot” format is perfect for parties and gifting.
- Fun to Make with Family: The swirling and decorating process is a delightful and easy activity to share with loved ones.
Here’s what you’ll need:
The elegance of this fudge comes from the quality of its few, simple ingredients.
For the Chocolate Fudge Base:
- 3 cups (18 oz / 510g) High-Quality Semi-Sweet Chocolate Chips: The flavor starts here, so choose a brand you enjoy eating.
- 1 can (14 oz / 396g) Sweetened Condensed Milk: This is the magic ingredient that creates a smooth, firm set.
- 2 tablespoons (28g) Unsalted Butter
- 1 teaspoon Pure Vanilla Extract
- ¼ teaspoon Salt: This is crucial for enhancing the chocolate flavor and balancing the sweetness.
For the Peppermint Swirl Layer:
- 1 ½ cups (9 oz / 255g) High-Quality White Chocolate Chips
- ⅓ cup Sweetened Condensed Milk
- ½ teaspoon Peppermint Extract (not mint extract, for that classic candy cane flavor)
- Red Gel Food Coloring: Gel coloring is preferred over liquid as it provides vibrant color without altering the consistency.
For Decoration:
- 2-3 Candy Canes, crushed
- Optional: Coarse Sugar or Edible Glitter for extra sparkle.
How to Make Peppermint Swirl Fudge Shots:
Now that you have your ingredients ready, let’s dive into the steps for making this delightful Peppermint Swirl Fudge Shots. It’s as easy as pie, and I promise you’ll feel like a culinary superstar!
Step 1: Prepare the Pan
Line a 9×9 inch baking pan with parchment paper, leaving an overhang on two opposite sides. This “sling” will make it incredibly easy to lift the entire block of fudge out for clean cutting later. Lightly grease the parchment paper.
Step 2: Create the Chocolate Fudge Base
In a medium, heatproof bowl, combine the semi-sweet chocolate chips, the entire can of sweetened condensed milk, butter, and salt. Create a double boiler by setting the bowl over a saucepan of gently simmering water, ensuring the bottom of the bowl does not touch the water. Stir constantly with a spatula until the chocolate and butter are completely melted and the mixture is smooth and glossy. Remove from heat and stir in the vanilla extract. Pour this chocolate base into your prepared pan and spread it into a smooth, even layer.
Step 3: Make the Peppermint Swirl Topping
Immediately rinse and dry the bowl (or use a new one). Combine the white chocolate chips and the ⅓ cup of sweetened condensed milk. Set the bowl over the simmering water again and stir until the white chocolate is completely melted and smooth. Remove from heat and quickly stir in the peppermint extract.
Step 4: Divide and Color
Working quickly before the white chocolate sets, spoon about one-third of the peppermint mixture into a separate small bowl. Add several drops of red gel food coloring to this smaller portion and stir until you achieve a uniform, vibrant pink or red color.
Step 5: The Swirling Masterpiece
Drop alternating spoonfuls of the plain white peppermint mixture and the red peppermint mixture all over the surface of the set chocolate base. Once all the topping is dotted across, use a toothpick or a thin skewer to gently drag and swirl the two colors together, creating beautiful marbled patterns. Be careful not to over-swirl, or the colors will blend into one.
Step 6: Add the Festive Crunch
While the swirl layer is still soft, generously sprinkle the entire surface with the crushed candy canes, pressing them down gently so they adhere.
Step 7: Chill to Perfection
Transfer the pan to the refrigerator and allow the fudge to chill for at least 3-4 hours, or until it is completely firm and set.
Step 8: Slice into “Shots”
Once fully set, use the parchment paper sling to lift the entire block of fudge out of the pan and onto a cutting board. Using a large, sharp knife, slice the fudge into small, rectangular “shot”-sized pieces. For a clean cut, wipe the knife blade with a hot, damp cloth between slices.
Step 9: Serve and Store
Arrange the fudge shots on a platter and serve cool. Store any leftovers in an airtight container in the refrigerator for up to 2 weeks.
Tips for Success:
- Use a Double Boiler: Melting the chocolate over direct, even gentle heat, can cause it to seize and become grainy. The double boiler is your best insurance for a silky-smooth fudge.
- Don’t Substitute Chocolate: Using chocolate bars chopped up is often better than chips, but high-quality chips work well. Do not use compound chocolate or candy melts, as they will not set with the correct texture.
- Work Quickly with White Chocolate: White chocolate is notoriously sensitive and can thicken as it cools. Have your food coloring ready and move swiftly during the swirling step.
- Gel Food Coloring is Key: Liquid food coloring can cause the white chocolate to seize. Gel or oil-based coloring blends in smoothly.
- Chill Thoroughly: Do not rush the chilling process. The fudge needs to be completely firm to get clean, neat cuts.
- Sharp Knife, Hot Blade: For the most professional-looking slices, use a sharp chef’s knife and dip it in hot water, wiping it dry between each cut.
Equipment Needed:
- 9×9 inch Baking Pan
- Parchment Paper
- Two Heatproof Mixing Bowls
- Saucepan (for double boiler)
- Spatula
- Toothpicks or a Skewer
- Sharp Knife
Variations of Peppermint Swirl Fudge Shots:
- Dark Chocolate Peppermint: Use dark chocolate chips for the base for a more intense, less sweet flavor.
- Nutty Crunch: Sprinkle chopped toasted almonds or pecans on top along with the crushed candy canes.
- Alcoholic Kick: Add 1-2 tablespoons of Peppermint Schnapps, Crème de Menthe, or Irish Cream to the white chocolate peppermint layer.
- Layered Fudge Shots: For a more defined look, spread the entire white peppermint layer smoothly over the chocolate base, then drizzle the red coloring on top and swirl.
- Vegan/Dairy-Free: Use dairy-free chocolate chips and vegan sweetened condensed coconut milk.
Serving Suggestions for Peppermint Swirl Fudge Shots:
- Holiday Cookie Tray Star: Arrange them as the centerpiece of your holiday dessert platter.
- Homemade Gift: Package them in decorative boxes or cellophane bags tied with a ribbon for a heartfelt and delicious gift.
- Party Favors: Place a few in small gift boxes as a sweet takeaway for your guests.
- After-Dinner “Shot”: Serve on a small platter with after-dinner coffee as a fun, decadent treat.
Prep Time:
20 minutes
Cooking Time:
10 minutes (melting)
Total Time:
30 minutes (plus 3-4 hours chilling)
Nutritional Information (Approximate per fudge shot):
- Calories: ~110 kcal
- Protein: 1 g
- Sodium: 25 mg
- Sugar: 12 g
- Fat: 6 g (Saturated Fat: 4 g)
- Carbohydrates: 15 g
- Fiber: 1 g
Please note: This is an estimate and can vary significantly based on the specific brands of ingredients and the size of your slices.
FAQs about Peppermint Swirl Fudge Shots:
Q: My white chocolate got thick and chunky. What happened?
A: This is called “seizing.” It usually happens if even a tiny drop of water or steam gets into the chocolate, or if it is overheated. Ensure your bowls and utensils are completely dry, and melt the white chocolate very gently over low, indirect heat.
Q: Can I freeze these fudge shots?
A: Yes! They freeze beautifully. Layer them between sheets of parchment paper in an airtight container and freeze for up to 3 months. Thaw in the refrigerator.
Q: How far in advance can I make these?
A: They are an excellent make-ahead dessert. You can prepare them up to 2 weeks in advance if stored properly in the refrigerator.
Q: I don’t have a 9×9 pan. What can I use?
A: An 8×8 pan will yield thicker fudge shots, and you may have a little less swirl topping. A 9×13 pan will yield thinner, more numerous shots.
Q: Can I use mint extract instead of peppermint?
A: Peppermint extract has a sharper, cooler flavor like a candy cane. Mint extract is often a blend (spearmint) and will taste more like a mint leaf. For the classic holiday flavor, peppermint is strongly recommended.
Final Thoughts:
Peppermint Swirl Fudge Shots are more than a recipe; they are a bite-sized celebration of the holiday spirit. They encapsulate the joy, color, and flavor of the season in a form that is incredibly easy to create and share. The process is a delightful kitchen project, and the result is a treat that is guaranteed to bring smiles and festive cheer to everyone who tries one. So, melt that chocolate, create your swirl, and get ready to impress your friends, family, and yourself with this stunning, simple, and spectacular holiday confection. They are proof that the most magical Christmas treats don’t have to be complicated.
Print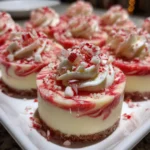
Peppermint Swirl Fudge Shots: Easy No-Bake Holiday Dessert
- Total Time: 30 minutes
Description
These peppermint swirl fudge shots are the perfect holiday treat! Layers of chocolate & peppermint in shot glasses. Easy, no-bake & festive!
Ingredients
For the Chocolate Fudge Base:
-
3 cups (18 oz / 510g) High-Quality Semi-Sweet Chocolate Chips: The flavor starts here, so choose a brand you enjoy eating.
-
1 can (14 oz / 396g) Sweetened Condensed Milk: This is the magic ingredient that creates a smooth, firm set.
-
2 tablespoons (28g) Unsalted Butter
-
1 teaspoon Pure Vanilla Extract
-
¼ teaspoon Salt: This is crucial for enhancing the chocolate flavor and balancing the sweetness.
For the Peppermint Swirl Layer:
-
1 ½ cups (9 oz / 255g) High-Quality White Chocolate Chips
-
⅓ cup Sweetened Condensed Milk
-
½ teaspoon Peppermint Extract (not mint extract, for that classic candy cane flavor)
-
Red Gel Food Coloring: Gel coloring is preferred over liquid as it provides vibrant color without altering the consistency.
For Decoration:
-
2-3 Candy Canes, crushed
-
Optional: Coarse Sugar or Edible Glitter for extra sparkle
Instructions
Step 1: Prepare the Pan
Line a 9×9 inch baking pan with parchment paper, leaving an overhang on two opposite sides. This “sling” will make it incredibly easy to lift the entire block of fudge out for clean cutting later. Lightly grease the parchment paper.
Step 2: Create the Chocolate Fudge Base
In a medium, heatproof bowl, combine the semi-sweet chocolate chips, the entire can of sweetened condensed milk, butter, and salt. Create a double boiler by setting the bowl over a saucepan of gently simmering water, ensuring the bottom of the bowl does not touch the water. Stir constantly with a spatula until the chocolate and butter are completely melted and the mixture is smooth and glossy. Remove from heat and stir in the vanilla extract. Pour this chocolate base into your prepared pan and spread it into a smooth, even layer.
Step 3: Make the Peppermint Swirl Topping
Immediately rinse and dry the bowl (or use a new one). Combine the white chocolate chips and the ⅓ cup of sweetened condensed milk. Set the bowl over the simmering water again and stir until the white chocolate is completely melted and smooth. Remove from heat and quickly stir in the peppermint extract.
Step 4: Divide and Color
Working quickly before the white chocolate sets, spoon about one-third of the peppermint mixture into a separate small bowl. Add several drops of red gel food coloring to this smaller portion and stir until you achieve a uniform, vibrant pink or red color.
Step 5: The Swirling Masterpiece
Drop alternating spoonfuls of the plain white peppermint mixture and the red peppermint mixture all over the surface of the set chocolate base. Once all the topping is dotted across, use a toothpick or a thin skewer to gently drag and swirl the two colors together, creating beautiful marbled patterns. Be careful not to over-swirl, or the colors will blend into one.
Step 6: Add the Festive Crunch
While the swirl layer is still soft, generously sprinkle the entire surface with the crushed candy canes, pressing them down gently so they adhere.
Step 7: Chill to Perfection
Transfer the pan to the refrigerator and allow the fudge to chill for at least 3-4 hours, or until it is completely firm and set.
Step 8: Slice into “Shots”
Once fully set, use the parchment paper sling to lift the entire block of fudge out of the pan and onto a cutting board. Using a large, sharp knife, slice the fudge into small, rectangular “shot”-sized pieces. For a clean cut, wipe the knife blade with a hot, damp cloth between slices.
Step 9: Serve and Store
Arrange the fudge shots on a platter and serve cool. Store any leftovers in an airtight container in the refrigerator for up to 2 weeks
Notes
-
9×9 inch Baking Pan
-
Parchment Paper
-
Two Heatproof Mixing Bowls
-
Saucepan (for double boiler)
-
Spatula
-
Toothpicks or a Skewer
-
Sharp Knife
- Prep Time: 20 minutes
- Category: dessert
- Cuisine: American
Nutrition
- Calories: 110 kcal
- Sugar: 12 g
- Sodium: 25 mg
- Fat: 6 g
- Carbohydrates: 15 g
- Fiber: 1 g
- Protein: 1g


