Description
Indulge in the ultimate Nutella Dream Shake! A creamy, decadent dessert drink with whipped cream & chocolate drizzle. Ready in just 5 minutes
Ingredients
The foundation of a legendary shake is quality ingredients. This is where we build our dream.
For the Core Shake Base:
-
3/4 Cup (approx. 200g) Nutella: This is the star. Use the genuine article for that authentic flavor. For the best consistency, gently warm the Nutella for 10-15 seconds in the microwave to make it easier to scoop and blend. This will ensure no stubborn chunks remain.
-
4 Large Scoops (about 2 Cups) of High-Quality Vanilla Ice Cream: The ice cream is the body. Use a premium, dense, and creamy vanilla ice cream. The better the ice cream, the richer and thicker your shake will be. Avoid “light” or low-fat versions, as they contain more air and water, leading to a thinner shake.
-
1/4 Cup Whole Milk: This is our tool for consistency. Whole milk provides the necessary richness and fat content to blend everything into a luxuriously thick but pourable shake. You can use less for an ultra-thick, spoonable shake, or more for a slightly drinkable one.
For the Flavor & Texture Enhancers:
-
1/8 Tsp Fine Sea Salt: This is the secret weapon. Salt elevates and intensifies the chocolate and hazelnut flavors, cutting through the sweetness and adding a sophisticated depth that prevents the shake from being one-dimensionally sugary.
-
1 Tsp Pure Vanilla Extract: This enhances the vanilla notes in the ice cream and adds another layer of warm, aromatic flavor that complements the Nutella perfectly.
For the Toppings & Garnish (The “Dream” Assembly):
-
Whipped Cream: A generous amount, either from a can for convenience or freshly whipped from heavy cream with a little sugar.
-
Chocolate Sauce or Syrup: For drizzling inside the glass and over the top.
-
Additional Nutella, warmed: To create a “lined” glass effect.
-
Chopped, Toasted Hazelnuts: Provides essential crunch and reinforces the core hazelnut flavor.
-
Mini Chocolate Chips or Chocolate Shavings: For extra chocolatey texture.
-
The “Pièce de Résistance” (Optional but recommended): This is what makes it a “Dream” shake. Choose one or more: a whole glazed donut perched on the rim, a slice of fudgy brownie, a large chocolate chip cookie, or a fun-sized chocolate bar
Instructions
Now that you have your ingredients ready, let’s dive into the steps for making this delightful Nutella Dream Shake. It’s as easy as pie, and I promise you’ll feel like a dessert superstar!
Step 1: Prepare Your Glassware – The Foundation of the Dream
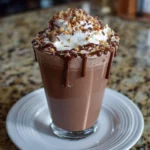
Take a tall, chilled glass—a pint glass or a specialty milkshake glass works perfectly. Using a spoon or a small spatula, spread a generous layer of the warmed Nutella around the inside of the glass. Create artistic swirls and ensure good coverage. Next, drizzle chocolate sauce over the Nutella lining. This step is crucial as it creates a beautiful visual effect and ensures every sip from the top to the bottom is packed with flavor.
Step 2: Blend the Dream Base
In a powerful blender, combine the 4 large scoops of vanilla ice cream, the 3/4 cup of Nutella, the 1/4 cup of whole milk, the 1/8 teaspoon of fine sea salt, and the 1 teaspoon of vanilla extract.
Step 3: Achieve the Perfect Consistency
Secure the lid on your blender tightly. Start blending on a low speed to initially combine the ingredients, then gradually increase to high speed. Blend for 30-60 seconds, pausing to scrape down the sides if necessary, until the mixture is completely smooth, thick, and has a uniform, deep chocolate-brown color. It should be thick enough to mound on itself.
Step 4: The First Assembly Layer
Slowly pour the blended shake into your prepared glass. Do not fill it to the top yet. Leave about 1 to 1.5 inches of space at the rim to accommodate the towering toppings. Using a long spoon, you can gently stir the shake in the glass to further integrate the Nutella and chocolate lining.
Step 5: Build the Topping Tower
Now, pipe or spoon a massive, cloud-like dome of whipped cream on top of the shake, completely covering the surface and extending over the rim of the glass. This whipped cream platform will be the foundation for the rest of your decorations.
Step 6: The Artistic Drizzle and Crunch
Generously drizzle more chocolate sauce (and even some extra warmed Nutella) over the whipped cream dome. Immediately, while the sauces are still wet, sprinkle a lavish amount of the chopped, toasted hazelnuts and mini chocolate chips over the top. This ensures they stick to the toppings.
Step 7: The Grand Finale – The Pièce de Résistance
For the final, iconic touch, carefully take your chosen “pièce de résistance”—be it a glazed donut, a slice of brownie, or a cookie—and gently press it onto the rim of the glass, resting it against the mountain of whipped cream. For an extra touch, you can spear a couple of mini marshmallows or a fun-sized candy bar on a long skewer and place it on top. Serve immediately with a long spoon and a wide straw.
Notes
-
A high-powered blender
-
Tall glasses (pint or milkshake glasses)
-
Measuring cups and spoons
-
Spatula (for scraping the blender and lining the glass)
-
Whipped cream canister or a hand mixer/stand mixer with a whisk attachment
- Prep Time: 15 minutes
- Category: Drinks
- Cuisine: American
Nutrition
- Calories: 1500
- Sugar: 140g
- Sodium: 380mg
- Fat: 65g
- Carbohydrates: 155g
- Fiber: 6g
- Protein: 18g