Description
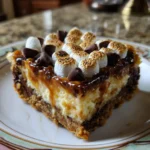
Campfire flavor, no oven needed! Creamy no-bake cheesecake bars with graham cracker crust, chocolate, and toasted marshmallow topping.
Ingredients
For the Graham Cracker Crust:
-
2 ½ cups (about 300g) graham cracker crumbs (from about 18–20 full sheets)
-
½ cup (100g) granulated sugar
-
10 tablespoons (1 ¼ sticks / 140g) unsalted butter, melted
-
Pinch of salt
For the Chocolate Cheesecake Filling:
-
16 oz (two 8-oz blocks) full-fat cream cheese, softened to room temperature
-
1 cup (120g) confectioners’ sugar, sifted
-
1 teaspoon pure vanilla extract
-
¼ teaspoon salt
-
1 ¼ cups (300ml) heavy cream, cold
-
7 oz (200g) semi-sweet or milk chocolate, finely chopped, or high-quality chocolate chips
-
1 tablespoon unsalted butter
For the Marshmallow Layer & Topping:
-
1 (7 oz or 200g) jar of Marshmallow Fluff or Creme (about 1 ½ cups)
-
½ cup (about 50g) mini marshmallows (optional, for extra texture)
-
2 oz (55g) semi-sweet or milk chocolate, finely chopped, for drizzling
-
1 teaspoon coconut oil or shortening
Instructions
Step 1: Prepare the Pan and Make the Crust
Line an 8×8-inch or 9×9-inch square baking pan with parchment paper, leaving an overhang on two sides for easy removal. In a medium bowl, combine the graham cracker crumbs, granulated sugar, and salt. Pour the melted butter over the crumbs and mix with a fork until the mixture resembles wet sand and holds together when pinched. Pour the mixture into the prepared pan and press it down firmly and evenly using the bottom of a measuring cup or glass. This compact crust is essential for clean slices. Place the pan in the freezer for 15-20 minutes to set solidly while you make the filling.
Step 2: Melt the Chocolate for the Filling
Create a double boiler: place a heatproof bowl over a saucepan of gently simmering water, ensuring the bottom of the bowl does not touch the water. Add the 7 oz of chopped chocolate and 1 tablespoon of butter. Stir occasionally until completely melted and smooth. Remove from heat and let cool slightly to lukewarm.
Step 3: Whip the Cream Cheese Base
In the bowl of a stand mixer fitted with the paddle attachment (or using a hand mixer), beat the softened cream cheese on medium speed until completely smooth and no lumps remain, about 2 minutes. Add the sifted confectioners’ sugar, vanilla extract, and salt. Beat on low until incorporated, then on medium-high until the mixture is fluffy, about another 2 minutes. Scrape down the sides of the bowl.
Step 4: Whip the Heavy Cream
In a separate, clean bowl (or wash and dry your mixer bowl and use the whisk attachment), beat the cold heavy cream on medium-high speed until stiff peaks form. Be careful not to over-whip into butter.
Step 5: Combine for the Final Filling
Pour the slightly cooled, melted chocolate into the cream cheese mixture. Beat on low speed until just combined and uniform in color. Using a large rubber spatula, gently fold in the whipped cream in two additions. Fold until no white streaks remain, being careful not to deflate the mixture. The filling should be thick, smooth, and airy.
Step 6: Assemble the Cheesecake Layer
Remove the pan with the set crust from the freezer. Pour the chocolate cheesecake filling over the crust. Use an offset spatula to spread it into a perfectly smooth, even layer. Tap the pan gently on the counter to release any air bubbles. Cover the pan with plastic wrap and refrigerate for a minimum of 4 hours, or preferably overnight, to allow the filling to set completely.
Step 7: Apply and Toast the Marshmallow Layer
Once fully set, prepare the marshmallow topping. If the Marshmallow Fluff is very stiff, you can microwave it for 5-10 seconds to make it more spreadable. Dollop the fluff over the chilled cheesecake layer. Using an offset spatula or a butter knife dipped in hot water, gently spread it into an even layer. If using, sprinkle the mini marshmallows evenly over the top. Position an oven rack in the upper third of your oven and preheat the broiler to HIGH. Place the pan under the broiler and watch it constantly. Toast for 30-90 seconds, rotating the pan if needed, until the marshmallow is puffed and golden brown in spots. This happens fast! Remove immediately and let cool on a wire rack for 5 minutes.
Step 8: The Chocolate Drizzle and Final Chill
While the marshmallow cools slightly, melt the remaining 2 oz of chocolate with the teaspoon of coconut oil in the microwave in 15-second bursts, stirring between each, until smooth. Alternatively, use the double boiler method. Using a fork or a piping bag with a tiny tip, drizzle the melted chocolate in zig-zags over the toasted marshmallow layer. Return the pan to the refrigerator for at least 30 minutes to allow the chocolate to set and the marshmallow to firm up.
Step 9: Slice and Serve
Using the parchment paper overhang, carefully lift the entire dessert out of the pan and onto a cutting board. Using a sharp knife dipped in hot water and wiped clean between each cut, slice into 12 or 16 squares. For the cleanest cuts, you can briefly place the knife under hot running water. Serve immediately, or store covered in the fridge
Notes
-
8×8 or 9×9-inch square baking pan
-
Parchment paper
-
Stand mixer or hand mixer
-
Medium and large mixing bowls
-
Rubber spatula and offset spatula
-
Double boiler setup (or microwave-safe bowl)
- Prep Time: 30 minutes
- Category: Dinner
- Cuisine: American
Nutrition
- Calories: 420
- Sugar: 35g
- Sodium: 220mg
- Fat: 28g
- Carbohydrates: 40g
- Fiber: 1g
- Protein: 4g