

Picture the quintessential flavors of a campfire classic, the gooey, toasted marshmallow, the sweet, melting chocolate, and the crisp, buttery graham cracker, elevated to a level of sophisticated, handheld decadence that requires no flame and no skewer. Welcome to No-Bake S’mores Cheesecake Bars, a dessert that masterfully fuses the nostalgic joy of s’mores with the rich, creamy indulgence of a New York-style cheesecake, all without ever turning on your oven. This is a dessert of glorious layers: a thick, crumbly crust of crushed graham crackers and butter, a velvety-smooth, impossibly light filling of chocolate-studded cream cheese, a blanket of toasted marshmallow fluff, and a final artistic drizzle of melted chocolate. Each bar is a textural and flavor journey, offering the familiar campfire taste in a form that is elegant, shareable, and profoundly satisfying.
Why Is This No-Bake S’mores Cheesecake Bars So Popular?
The meteoric rise of this dessert’s popularity is no mystery; it perfectly captures a beloved flavor profile in a convenient, visually stunning, and foolproof format. First, it is a powerful nostalgia bomb with a gourmet twist. S’mores are universally adored, evoking memories of campfires, family vacations, and simple joys. This recipe honors that nostalgia but elevates it by incorporating the sophisticated texture and flavor of cheesecake. It feels both comfortingly familiar and excitingly new, offering a grown-up, refined take on a childhood favorite that appeals to all ages.
Second, it is an absolute textural wonderland. A perfect bite delivers a symphony of sensations: the firm, buttery crunch of the graham base, the cold, creamy, melt-in-your-mouth give of the chocolate cheesecake, the sticky, sweet, slightly crisp chew of the toasted marshmallow, and the rich snap of the chocolate drizzle. This multi-layered experience makes the dessert incredibly engaging and addictive. Every component plays a crucial role, preventing it from being one-note and ensuring that each bar is a complete dessert experience in itself.
Finally, it is the ultimate “easy elegance” dessert. The “no-bake” aspect is a huge draw, especially during hot summer months or for bakers who lack confidence with the oven. There’s no risk of cracked cheesecakes or water baths. The assembly is straightforward—crush, mix, whip, spread, toast, drizzle. Yet, the final presentation, with its toasted peaks and artistic chocolate streaks, looks incredibly professional and impressive. It’s a dessert that yields massive culinary compliments for minimal technical effort, making it a favorite for both novice bakers and seasoned entertainers.
Why You’ll Love This No-Bake S’mores Cheesecake Bars:
You will love this recipe because it is pure, unadulterated fun to make. You will love the simple, cathartic act of crushing graham crackers into fine crumbs. You will love the process of whipping the cream cheese and cream into a cloud-like filling, then folding in the chocolate. You will love the satisfaction of creating such defined, beautiful layers in the pan. You will love the dramatic moment under the broiler, watching the marshmallow fluff puff, bubble, and turn a perfect golden brown—it’s like having a mini-campfire in your kitchen.
You will love the creative freedom with the final drizzle, making each pan your own masterpiece. You will love the practicality—it can be made a day or two in advance, freeing up your time on the day of your event. Most of all, you will love the universal delight it brings. Serving these bars is a guaranteed way to spark joy. They are the dessert that disappears first from the table, with people eagerly asking for the recipe. It’s a recipe that builds your reputation as a brilliant, effortless host.
Here’s what you’ll need:
Quality ingredients are key here, especially for the creamy filling. Full-fat dairy and good chocolate will make all the difference.
For the Graham Cracker Crust:
- 2 ½ cups (about 300g) graham cracker crumbs (from about 18-20 full sheets)
- ½ cup (100g) granulated sugar
- 10 tablespoons (1 ¼ sticks / 140g) unsalted butter, melted
- Pinch of salt
For the Chocolate Cheesecake Filling:
- 16 oz (two 8-oz blocks) full-fat cream cheese, softened to room temperature
- 1 cup (120g) confectioners’ sugar, sifted
- 1 teaspoon pure vanilla extract
- ¼ teaspoon salt
- 1 ¼ cups (300ml) heavy cream, cold
- 7 oz (200g) semi-sweet or milk chocolate, finely chopped, or high-quality chocolate chips
- 1 tablespoon unsalted butter
For the Marshmallow Layer & Topping:
- 1 (7 oz or 200g) jar of Marshmallow Fluff or Creme (about 1 ½ cups)
- ½ cup (about 50g) mini marshmallows (optional, for extra texture)
- 2 oz (55g) semi-sweet or milk chocolate, finely chopped, for drizzling
- 1 teaspoon coconut oil or shortening (to help chocolate drizzle smoothly)
How to Make No-Bake S’mores Cheesecake Bars:
Now that you have your ingredients ready, let’s dive into the steps for making this delightful No-Bake S’mores Cheesecake Bars. It’s as easy as pie, and I promise you’ll feel like a culinary superstar!
Step 1: Prepare the Pan and Make the Crust
Line an 8×8-inch or 9×9-inch square baking pan with parchment paper, leaving an overhang on two sides for easy removal. In a medium bowl, combine the graham cracker crumbs, granulated sugar, and salt. Pour the melted butter over the crumbs and mix with a fork until the mixture resembles wet sand and holds together when pinched. Pour the mixture into the prepared pan and press it down firmly and evenly using the bottom of a measuring cup or glass. This compact crust is essential for clean slices. Place the pan in the freezer for 15-20 minutes to set solidly while you make the filling.
Step 2: Melt the Chocolate for the Filling
Create a double boiler: place a heatproof bowl over a saucepan of gently simmering water, ensuring the bottom of the bowl does not touch the water. Add the 7 oz of chopped chocolate and 1 tablespoon of butter. Stir occasionally until completely melted and smooth. Remove from heat and let cool slightly to lukewarm.
Step 3: Whip the Cream Cheese Base
In the bowl of a stand mixer fitted with the paddle attachment (or using a hand mixer), beat the softened cream cheese on medium speed until completely smooth and no lumps remain, about 2 minutes. Add the sifted confectioners’ sugar, vanilla extract, and salt. Beat on low until incorporated, then on medium-high until the mixture is fluffy, about another 2 minutes. Scrape down the sides of the bowl.
Step 4: Whip the Heavy Cream
In a separate, clean bowl (or wash and dry your mixer bowl and use the whisk attachment), beat the cold heavy cream on medium-high speed until stiff peaks form. Be careful not to over-whip into butter.
Step 5: Combine for the Final Filling
Pour the slightly cooled, melted chocolate into the cream cheese mixture. Beat on low speed until just combined and uniform in color. Using a large rubber spatula, gently fold in the whipped cream in two additions. Fold until no white streaks remain, being careful not to deflate the mixture. The filling should be thick, smooth, and airy.
Step 6: Assemble the Cheesecake Layer
Remove the pan with the set crust from the freezer. Pour the chocolate cheesecake filling over the crust. Use an offset spatula to spread it into a perfectly smooth, even layer. Tap the pan gently on the counter to release any air bubbles. Cover the pan with plastic wrap and refrigerate for a minimum of 4 hours, or preferably overnight, to allow the filling to set completely.
Step 7: Apply and Toast the Marshmallow Layer
Once fully set, prepare the marshmallow topping. If the Marshmallow Fluff is very stiff, you can microwave it for 5-10 seconds to make it more spreadable. Dollop the fluff over the chilled cheesecake layer. Using an offset spatula or a butter knife dipped in hot water, gently spread it into an even layer. If using, sprinkle the mini marshmallows evenly over the top. Position an oven rack in the upper third of your oven and preheat the broiler to HIGH. Place the pan under the broiler and watch it constantly. Toast for 30-90 seconds, rotating the pan if needed, until the marshmallow is puffed and golden brown in spots. This happens fast! Remove immediately and let cool on a wire rack for 5 minutes.
Step 8: The Chocolate Drizzle and Final Chill
While the marshmallow cools slightly, melt the remaining 2 oz of chocolate with the teaspoon of coconut oil in the microwave in 15-second bursts, stirring between each, until smooth. Alternatively, use the double boiler method. Using a fork or a piping bag with a tiny tip, drizzle the melted chocolate in zig-zags over the toasted marshmallow layer. Return the pan to the refrigerator for at least 30 minutes to allow the chocolate to set and the marshmallow to firm up.
Step 9: Slice and Serve
Using the parchment paper overhang, carefully lift the entire dessert out of the pan and onto a cutting board. Using a sharp knife dipped in hot water and wiped clean between each cut, slice into 12 or 16 squares. For the cleanest cuts, you can briefly place the knife under hot running water. Serve immediately, or store covered in the fridge.
Tips for Success:
- Room Temperature Cream Cheese: This is non-negotiable for a lump-free, smooth filling. Let it sit out for 2-3 hours.
- Press the Crust Firmly: A well-compacted crust is the foundation. Press, press, press!
- Cool the Chocolate: Ensure the melted chocolate is lukewarm, not hot, before adding it to the cream cheese. Hot chocolate will melt the cream cheese and cause a runny filling.
- Watch the Broiler Like a Hawk: Marshmallow can go from golden to charcoal in seconds. Do not walk away. Use the broiler, not a kitchen torch, for the most even, classic toast.
- Clean Cuts: A hot, clean knife is the secret to pristine bars. Wipe it clean after every cut.
Equipment Needed:
- 8×8 or 9×9-inch square baking pan
- Parchment paper
- Stand mixer or hand mixer
- Medium and large mixing bowls
- Rubber spatula and offset spatula
- Double boiler setup (or microwave-safe bowl)
- Whisk attachment (if using stand mixer)
- Measuring cups and spoons
Variations of No-Bake S’mores Cheesecake Bars:
- Salted Caramel S’mores: Drizzle ½ cup of salted caramel sauce over the cheesecake layer before adding the marshmallow fluff.
- Peanut Butter Cup S’mores: Swirl ½ cup of peanut butter into half of the cheesecake filling before spreading, or layer chopped peanut butter cups on top of the crust.
- Cookies & Cream S’mores: Replace the graham cracker crumbs with crushed Oreo cookies (filling included) for the crust.
- Nutella S’mores: Swirl ⅓ cup of Nutella into the cheesecake filling.
- Individual Jars: Layer the components in small mason jars for a portable, adorable presentation. Toast the marshmallow topping with a kitchen torch.
Serving Suggestions for No-Bake S’mores Cheesecake Bars:
These are a self-contained dessert star. Serve them on a platter at a summer BBQ, picnic, or birthday party. They pair wonderfully with a glass of cold milk, a cup of rich coffee, or for the adults, a glass of tawny port or a creamy stout. For an over-the-top presentation, garnish each bar with a tiny piece of graham cracker and a mini marshmallow on a toothpick.
Prep Time:
30 minutes (plus chilling)
Cooking Time:
2 minutes (under broiler)
Total Time:
4 hours 35 minutes (minimum, mostly inactive chilling)
Nutritional Information:
(Estimated per bar, based on 16 rich servings.)
- Calories: ~420
- Protein: 4g
- Sodium: 220mg
- Sugar: 35g
- Fat: 28g
- Carbohydrates: 40g
- Fiber: 1g
FAQs about No-Bake S’mores Cheesecake Bars:
Q: Can I use homemade marshmallow instead of fluff?
A: Yes, but it’s trickier. You would need to make a Swiss or Italian meringue and spread it on top, then toast it with a kitchen torch. Fluff is much simpler and gives the classic flavor and texture.
Q: My filling is too soft/runny. What went wrong?
A: Likely culprits: cream cheese wasn’t full-fat or was too warm, the chocolate was too hot when added, the whipped cream was under-whipped, or it didn’t chill long enough. Ensure you follow the chilling time—overnight is best.
Q: Can I freeze these bars?
A: It’s not recommended. The marshmallow layer can become gummy and weep upon thawing, and the texture of the cheesecake filling can change. They are best kept refrigerated.
Q: How long will they keep in the fridge?
A: Stored in an airtight container, they will keep well for 3-4 days. The marshmallow may start to soften and lose its toast over time.
Q: Can I make this without a mixer?
A: It will be very difficult to achieve the proper airy texture for the filling. A hand mixer is a minimum requirement to whip the cream and cream cheese properly. Whipping cream by hand is possible but extremely labor-intensive.
Final Thoughts:
No-Bake S’mores Cheesecake Bars are a triumph of creative dessert engineering. They capture a beloved moment of simple pleasure and translate it into a form that is shareable, stunning, and sinfully delicious. This recipe is a celebration of contrast: the cool and the warm, the crisp and the creamy, the sweet and the subtly salty. It is a dessert that requires patience (for chilling) but rewards it with a flawless, impressive result that promises and delivers pure joy. So, crush your graham crackers, whip your cream, and prepare to create a dessert that doesn’t just end a meal—it becomes the main event.
Print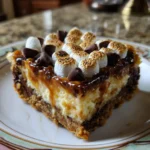
No-Bake Dream: S’mores Cheesecake Bars Recipe
- Total Time: 4 hours 35 minutes
Description
Campfire flavor, no oven needed! Creamy no-bake cheesecake bars with graham cracker crust, chocolate, and toasted marshmallow topping.
Ingredients
For the Graham Cracker Crust:
-
2 ½ cups (about 300g) graham cracker crumbs (from about 18–20 full sheets)
-
½ cup (100g) granulated sugar
-
10 tablespoons (1 ¼ sticks / 140g) unsalted butter, melted
-
Pinch of salt
For the Chocolate Cheesecake Filling:
-
16 oz (two 8-oz blocks) full-fat cream cheese, softened to room temperature
-
1 cup (120g) confectioners’ sugar, sifted
-
1 teaspoon pure vanilla extract
-
¼ teaspoon salt
-
1 ¼ cups (300ml) heavy cream, cold
-
7 oz (200g) semi-sweet or milk chocolate, finely chopped, or high-quality chocolate chips
-
1 tablespoon unsalted butter
For the Marshmallow Layer & Topping:
-
1 (7 oz or 200g) jar of Marshmallow Fluff or Creme (about 1 ½ cups)
-
½ cup (about 50g) mini marshmallows (optional, for extra texture)
-
2 oz (55g) semi-sweet or milk chocolate, finely chopped, for drizzling
-
1 teaspoon coconut oil or shortening
Instructions
Step 1: Prepare the Pan and Make the Crust
Line an 8×8-inch or 9×9-inch square baking pan with parchment paper, leaving an overhang on two sides for easy removal. In a medium bowl, combine the graham cracker crumbs, granulated sugar, and salt. Pour the melted butter over the crumbs and mix with a fork until the mixture resembles wet sand and holds together when pinched. Pour the mixture into the prepared pan and press it down firmly and evenly using the bottom of a measuring cup or glass. This compact crust is essential for clean slices. Place the pan in the freezer for 15-20 minutes to set solidly while you make the filling.
Step 2: Melt the Chocolate for the Filling
Create a double boiler: place a heatproof bowl over a saucepan of gently simmering water, ensuring the bottom of the bowl does not touch the water. Add the 7 oz of chopped chocolate and 1 tablespoon of butter. Stir occasionally until completely melted and smooth. Remove from heat and let cool slightly to lukewarm.
Step 3: Whip the Cream Cheese Base
In the bowl of a stand mixer fitted with the paddle attachment (or using a hand mixer), beat the softened cream cheese on medium speed until completely smooth and no lumps remain, about 2 minutes. Add the sifted confectioners’ sugar, vanilla extract, and salt. Beat on low until incorporated, then on medium-high until the mixture is fluffy, about another 2 minutes. Scrape down the sides of the bowl.
Step 4: Whip the Heavy Cream
In a separate, clean bowl (or wash and dry your mixer bowl and use the whisk attachment), beat the cold heavy cream on medium-high speed until stiff peaks form. Be careful not to over-whip into butter.
Step 5: Combine for the Final Filling
Pour the slightly cooled, melted chocolate into the cream cheese mixture. Beat on low speed until just combined and uniform in color. Using a large rubber spatula, gently fold in the whipped cream in two additions. Fold until no white streaks remain, being careful not to deflate the mixture. The filling should be thick, smooth, and airy.
Step 6: Assemble the Cheesecake Layer
Remove the pan with the set crust from the freezer. Pour the chocolate cheesecake filling over the crust. Use an offset spatula to spread it into a perfectly smooth, even layer. Tap the pan gently on the counter to release any air bubbles. Cover the pan with plastic wrap and refrigerate for a minimum of 4 hours, or preferably overnight, to allow the filling to set completely.
Step 7: Apply and Toast the Marshmallow Layer
Once fully set, prepare the marshmallow topping. If the Marshmallow Fluff is very stiff, you can microwave it for 5-10 seconds to make it more spreadable. Dollop the fluff over the chilled cheesecake layer. Using an offset spatula or a butter knife dipped in hot water, gently spread it into an even layer. If using, sprinkle the mini marshmallows evenly over the top. Position an oven rack in the upper third of your oven and preheat the broiler to HIGH. Place the pan under the broiler and watch it constantly. Toast for 30-90 seconds, rotating the pan if needed, until the marshmallow is puffed and golden brown in spots. This happens fast! Remove immediately and let cool on a wire rack for 5 minutes.
Step 8: The Chocolate Drizzle and Final Chill
While the marshmallow cools slightly, melt the remaining 2 oz of chocolate with the teaspoon of coconut oil in the microwave in 15-second bursts, stirring between each, until smooth. Alternatively, use the double boiler method. Using a fork or a piping bag with a tiny tip, drizzle the melted chocolate in zig-zags over the toasted marshmallow layer. Return the pan to the refrigerator for at least 30 minutes to allow the chocolate to set and the marshmallow to firm up.
Step 9: Slice and Serve
Using the parchment paper overhang, carefully lift the entire dessert out of the pan and onto a cutting board. Using a sharp knife dipped in hot water and wiped clean between each cut, slice into 12 or 16 squares. For the cleanest cuts, you can briefly place the knife under hot running water. Serve immediately, or store covered in the fridge
Notes
-
8×8 or 9×9-inch square baking pan
-
Parchment paper
-
Stand mixer or hand mixer
-
Medium and large mixing bowls
-
Rubber spatula and offset spatula
-
Double boiler setup (or microwave-safe bowl)
- Prep Time: 30 minutes
- Category: Dinner
- Cuisine: American
Nutrition
- Calories: 420
- Sugar: 35g
- Sodium: 220mg
- Fat: 28g
- Carbohydrates: 40g
- Fiber: 1g
- Protein: 4g


