
Introduction to No-Bake Oreo Balls Recipe
As a passionate home cook, I find joy in creating sweet treats that bring smiles to faces. One of my all-time favorite recipes is the No-Bake Oreo Balls. These delightful little bites are not just easy to make; they are a crowd-pleaser that never fails to impress. I remember the first time I made them for a family gathering. The moment I placed the platter on the table, the room filled with excited chatter and eager hands reaching for these chocolatey wonders.
What I love most about this recipe is its simplicity. With just a handful of ingredients, you can whip up a batch in no time. Plus, there’s something magical about the combination of crushed Oreos and cream cheese. It’s like a party in your mouth! The creamy, rich filling wrapped in a chocolate coating is a treat that feels indulgent yet is surprisingly easy to prepare.
Whether you’re hosting a birthday party, a holiday gathering, or just want to satisfy your sweet tooth, these No-Bake Oreo Balls are the perfect solution. They require no baking, which means less time in the kitchen and more time enjoying the company of friends and family. Plus, they’re incredibly versatile! You can customize them with different toppings or flavors to suit your taste.
So, grab your apron and let’s dive into this delicious adventure together. I promise you, once you try making these No-Bake Oreo Balls, they’ll become a staple in your dessert repertoire. Let’s get started!
Ingredients for No-Bake Oreo Balls Recipe
Before we dive into the fun of making these No-Bake Oreo Balls, let’s gather our ingredients. I always believe that quality matters, especially when it comes to desserts. Using the right ingredients can elevate your treats from good to absolutely divine! Here’s what you’ll need:
Main Ingredients
- 1 package (15.35 oz) of Oreo cookies: The classic chocolate flavor is perfect, but feel free to experiment with other varieties!
- 8 oz cream cheese, softened: I recommend using full-fat cream cheese for a richer taste. Make sure it’s at room temperature for easy mixing.
- 2 cups chocolate chips: Semi-sweet chocolate chips work wonderfully, but you can also use milk chocolate or dark chocolate, depending on your preference.
Optional Add-ons
- Sprinkles: Add some color and fun by rolling the balls in sprinkles before the chocolate sets.
- Crushed nuts: Chopped almonds or walnuts can add a delightful crunch and flavor contrast.
- Flavored extracts: A splash of vanilla or peppermint extract can give your Oreo balls a unique twist.
- White chocolate: For a different look, dip some of the balls in white chocolate instead of dark.
When I make these Oreo Balls, I often like to mix and match the optional add-ons. It’s a fun way to personalize each batch! Remember, the key is to have fun and let your creativity shine. Now that we have our ingredients ready, let’s move on to the next step of this delicious journey!
How to Prepare No-Bake Oreo Balls Recipe
Now that we have our ingredients all lined up, it’s time to roll up our sleeves and get to the fun part—preparing these delightful No-Bake Oreo Balls! I love how each step brings us closer to that sweet, creamy goodness. Let’s dive into the process together!
Step 1: Crush the Oreos
The first step is to crush those Oreos into fine crumbs. You can use a food processor for this, which makes it super easy. Just toss the cookies in and pulse until they resemble sand. If you don’t have a food processor, no worries! You can place the Oreos in a zip-top bag and crush them with a rolling pin. It’s a great way to relieve stress, too!
Tips for Crushing Oreos
- Make sure to crush them well; larger chunks can make it hard to form the balls later.
- For a fun twist, try mixing different Oreo flavors for a unique taste!
Step 2: Mix with Cream Cheese
Next, we’ll mix the crushed Oreos with the softened cream cheese. In a large bowl, combine the Oreo crumbs and cream cheese. I like to use my hands for this part; it’s messy but oh-so-fun! Just make sure everything is well combined, and you’ll have a thick, dough-like mixture.
Tips for Mixing
- Ensure your cream cheese is at room temperature; it makes mixing much easier.
- If the mixture feels too dry, add a little more cream cheese until it’s just right.
Step 3: Form the Balls
Now comes the exciting part—shaping the mixture into balls! I usually scoop about a tablespoon of the mixture and roll it between my palms. It’s like crafting little edible treasures! Place each ball on a baking sheet lined with parchment paper.
Tips for Shaping
- Keep your hands slightly damp to prevent the mixture from sticking.
- Try to make them uniform in size for even coating later on.
Step 4: Chill the Balls
Once you’ve shaped all the balls, it’s time to chill them in the fridge for about 30 minutes. This step is crucial as it helps the balls firm up, making them easier to dip in chocolate later.
Tips for Chilling
- If you’re in a hurry, you can pop them in the freezer for about 15 minutes instead.
- Cover them with plastic wrap to prevent them from drying out while chilling.
Step 5: Dip in Chocolate
Finally, it’s time to dip those chilled Oreo balls in chocolate! Melt your chocolate chips in a microwave-safe bowl, stirring every 30 seconds until smooth. Then, using a fork, dip each ball into the melted chocolate, letting the excess drip off before placing it back on the parchment paper.
Tips for Dipping
- For a smoother finish, you can add a teaspoon of vegetable oil to the melted chocolate.
- Don’t forget to sprinkle any toppings before the chocolate sets!
And there you have it! Each step brings us closer to those delicious No-Bake Oreo Balls. I can already smell the sweet aroma wafting through my kitchen. Let’s keep the momentum going and move on to the next section!
Equipment Needed for No-Bake Oreo Balls Recipe
Before we dive into the delicious world of No-Bake Oreo Balls, let’s make sure we have the right tools at our disposal. Having the right equipment can make the process smoother and more enjoyable. Here’s what you’ll need:
- Food Processor: This handy gadget is perfect for crushing Oreos quickly. If you don’t have one, a zip-top bag and a rolling pin work just as well!
- Mixing Bowl: A large bowl is essential for mixing the Oreo crumbs and cream cheese. I love using a glass bowl so I can see the mixture come together.
- Baking Sheet: You’ll need a baking sheet lined with parchment paper to place your formed balls. This keeps them from sticking and makes cleanup a breeze.
- Microwave-Safe Bowl: For melting the chocolate, a microwave-safe bowl is a must. If you prefer, you can also use a double boiler on the stove.
- Fork: A simple fork is perfect for dipping the balls into chocolate. It helps you get a nice coating without making a mess.
With these tools in hand, you’re all set to create your No-Bake Oreo Balls! Each piece of equipment plays a role in making this process fun and efficient. So, let’s keep the momentum going and get ready for the next step in our sweet adventure!
Variations of No-Bake Oreo Balls Recipe
One of the things I adore about the No-Bake Oreo Balls is their versatility. You can easily switch things up to create new flavors and textures. Here are a few fun variations that I’ve tried and loved:
- Peanut Butter Oreo Balls: Mix in a few tablespoons of creamy peanut butter with the cream cheese for a nutty twist. The combination of chocolate and peanut butter is simply irresistible!
- Mint Chocolate Oreo Balls: Add a few drops of peppermint extract to the mixture for a refreshing minty flavor. It’s like a cool breeze on a warm day!
- Cookie Dough Oreo Balls: Swap out some of the cream cheese for cookie dough. Just make sure to use heat-treated flour for safety. This variation is a sweet nod to classic cookie dough lovers!
- Rainbow Oreo Balls: Roll the balls in colorful sprinkles or crushed candies for a festive look. They’re perfect for parties or celebrations!
These variations not only add a personal touch but also keep things exciting in the kitchen. I love experimenting with different flavors and toppings, and I encourage you to do the same! The possibilities are endless, and each batch can be a new adventure. So, let your creativity run wild and enjoy the process!
Cooking Notes for No-Bake Oreo Balls Recipe
As I’ve journeyed through making No-Bake Oreo Balls, I’ve picked up a few cooking notes that can help you achieve the best results. These little tips can make a big difference in your final product!
- Room Temperature Ingredients: Always ensure your cream cheese is softened to room temperature. This makes mixing easier and helps create a smooth, creamy filling.
- Chilling Time: Don’t rush the chilling process! Allowing the balls to chill properly helps them hold their shape when you dip them in chocolate.
- Chocolate Melting: When melting chocolate, be patient. Stir every 30 seconds to avoid burning. If you notice it thickening, a splash of vegetable oil can help smooth it out.
- Storage: Store your finished Oreo Balls in an airtight container in the fridge. They can last up to a week, but I doubt they’ll last that long!
- Experiment with Toppings: Don’t hesitate to get creative with toppings! From crushed cookies to drizzles of white chocolate, the sky’s the limit!
These cooking notes are like little nuggets of wisdom I’ve gathered over time. They help ensure that each batch of No-Bake Oreo Balls turns out perfectly delicious. So, keep these tips in mind as you embark on your own sweet adventure!
Serving Suggestions for No-Bake Oreo Balls Recipe
Now that we’ve crafted these delightful No-Bake Oreo Balls, it’s time to think about how to serve them! Presentation can elevate your treats from simple to spectacular. Here are some of my favorite serving suggestions that will surely impress your guests:
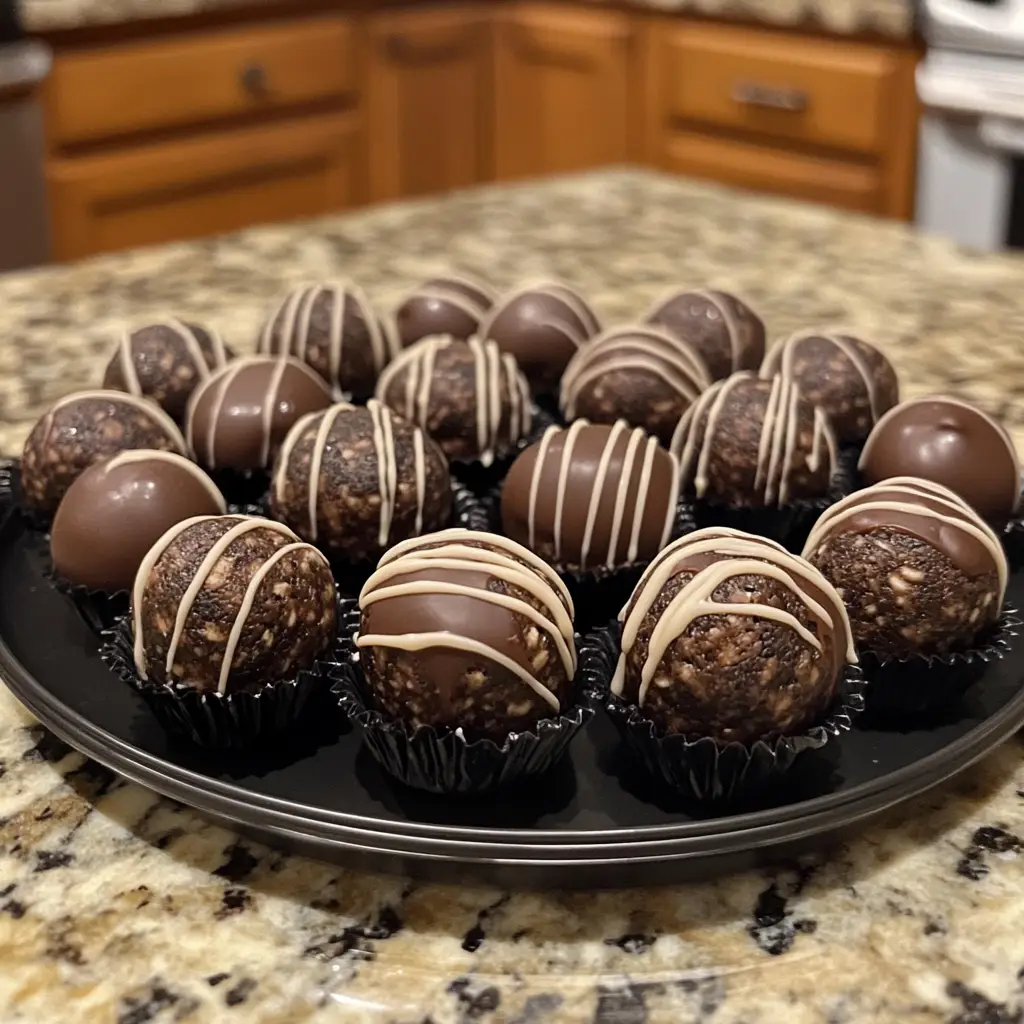
- Platter Display: Arrange the Oreo Balls on a beautiful serving platter. You can create a colorful display by mixing different variations and toppings. It’s like a sweet art piece!
- Individual Treat Cups: For a fun twist, place each Oreo Ball in a mini cupcake liner or small treat cup. This makes them easy to grab and adds a festive touch.
- Garnish with Fresh Fruit: Serve the Oreo Balls alongside fresh strawberries or raspberries. The tartness of the fruit complements the sweetness of the balls perfectly.
- Chocolate Drizzle: For an extra touch of elegance, drizzle some melted chocolate over the top of the Oreo Balls before serving. It adds a beautiful finish and a hint of extra chocolatey goodness!
- Pair with Ice Cream: These Oreo Balls make a fantastic pairing with a scoop of vanilla or chocolate ice cream. It’s a match made in dessert heaven!
These serving suggestions not only enhance the visual appeal but also create a delightful experience for everyone. I love how a little creativity can turn a simple treat into a showstopper. So, whether it’s a casual family gathering or a fancy celebration, these No-Bake Oreo Balls are sure to steal the spotlight!
Tips for Perfect No-Bake Oreo Balls Recipe
As I’ve made these No-Bake Oreo Balls time and time again, I’ve gathered a treasure trove of tips that can help you achieve perfection. These little nuggets of wisdom can make all the difference in your sweet creations. Here are my top tips for making the best Oreo Balls:
- Use Fresh Ingredients: Always check the expiration dates on your cream cheese and chocolate chips. Fresh ingredients lead to the best flavor and texture!
- Don’t Skip the Chilling: Chilling the balls is crucial. It helps them firm up, making them easier to dip and ensuring they hold their shape.
- Experiment with Chocolate: Try using different types of chocolate for dipping. Dark, milk, or even white chocolate can create unique flavor profiles!
- Keep It Clean: Use a fork or toothpick for dipping to keep your hands clean. It also helps you get a nice, even coating on each ball.
- Have Fun with Toppings: Get creative with toppings! From crushed Oreos to colorful sprinkles, the options are endless. It’s a great way to personalize your treats!
These tips are like little secrets I’ve learned along the way. They help ensure that each batch of No-Bake Oreo Balls turns out not just good, but absolutely amazing! So, keep these in mind as you embark on your own delicious journey. Happy cooking!
Breakdown of Time for No-Bake Oreo Balls Recipe
As a home cook, I know that time is often of the essence, especially when you’re eager to enjoy a sweet treat! Here’s a quick breakdown of the time you’ll need to whip up these delightful No-Bake Oreo Balls:
- Prep Time: 15 minutes – This includes gathering your ingredients, crushing the Oreos, and mixing everything together. It’s a quick and fun process!
- Chilling Time: 30 minutes – This step is crucial for firming up the balls, making them easier to dip in chocolate. Patience is key here!
- Cooking Time: 10 minutes – This is the time it takes to melt the chocolate and dip the Oreo balls. It’s the final touch that makes them irresistible!
Total Time: 55 minutes – In just under an hour, you can have a batch of these delicious No-Bake Oreo Balls ready to impress your family and friends. It’s a sweet reward for a little bit of time spent in the kitchen!
With this time breakdown, you can easily plan your baking adventure. I love how quick and satisfying this recipe is, allowing me to enjoy the fruits of my labor in no time. So, let’s keep the momentum going and get ready for the next delicious section!
Nutritional Information for No-Bake Oreo Balls Recipe
As a passionate home cook, I always find it helpful to know the nutritional information of the treats I make. It allows me to enjoy them mindfully while sharing them with family and friends. Here’s a quick overview of the nutritional content for one No-Bake Oreo Ball, based on the ingredients listed:
- Calories: Approximately 150 calories
- Fat: 8 grams (mostly from cream cheese and chocolate)
- Carbohydrates: 18 grams (from Oreos and chocolate)
- Protein: 2 grams (from cream cheese)
- Sugar: 10 grams (from Oreos and chocolate)
Keep in mind that these values can vary based on the specific brands and types of ingredients you use. If you decide to add optional ingredients like nuts or flavored extracts, the nutritional content will change accordingly. I always encourage balance, so enjoy these delightful treats in moderation!
Knowing the nutritional information helps me appreciate the indulgence of these No-Bake Oreo Balls even more. They’re a sweet treat that can be enjoyed on special occasions or as a delightful pick-me-up. Now, let’s keep the excitement going as we move on to the next section!
Frequently Asked Questions about No-Bake Oreo Balls Recipe
As I’ve shared my No-Bake Oreo Balls recipe with friends and family, I’ve noticed a few common questions pop up. It’s always great to clarify any doubts, especially when it comes to creating these delicious treats. Here are some of the most frequently asked questions I encounter, along with my answers:
Can I use different types of cookies?
Absolutely! While Oreos are the classic choice, you can experiment with other cookies like chocolate sandwich cookies or even graham crackers. Just keep in mind that the flavor and texture may change slightly, but that’s part of the fun!
How long do No-Bake Oreo Balls last?
When stored in an airtight container in the fridge, these Oreo Balls can last up to a week. However, I doubt they’ll stick around that long! They’re just too delicious to resist!
Can I freeze No-Bake Oreo Balls?
Yes, you can freeze them! Just place the Oreo Balls in a single layer on a baking sheet until they’re firm, then transfer them to an airtight container or freezer bag. They can last for up to three months in the freezer. Just remember to let them thaw in the fridge before enjoying!
What can I use instead of cream cheese?
If you’re looking for a dairy-free option, you can use vegan cream cheese or even nut butter like almond or cashew butter. Just keep in mind that the flavor and texture will be different, but it can still be delicious!
Can I make these ahead of time?
Definitely! These No-Bake Oreo Balls are perfect for making ahead of time. You can prepare them a day or two in advance and store them in the fridge until you’re ready to serve. It’s a great way to save time when hosting!
These FAQs help clear up any uncertainties and make the process of creating No-Bake Oreo Balls even more enjoyable. I love sharing my experiences and tips, and I hope these answers inspire you to dive into this sweet adventure with confidence. Now, let’s wrap up our delicious journey with a final note!
Conclusion on No-Bake Oreo Balls Recipe
As I reflect on my journey of making No-Bake Oreo Balls, I can’t help but smile at how these little treats have become a staple in my kitchen. Their appeal lies not just in their delicious taste but also in their simplicity and versatility. With just a few ingredients and minimal effort, you can create a dessert that brings joy to any gathering.
What I love most is how these Oreo Balls can be customized to fit any occasion. Whether you’re celebrating a birthday, hosting a holiday party, or simply indulging in a sweet craving, they are always a hit. Plus, the no-bake aspect means you can whip them up quickly, leaving you more time to enjoy the company of loved ones.
So, if you’re looking for a fun and easy dessert that’s sure to impress, I wholeheartedly recommend giving this No-Bake Oreo Balls recipe a try. I promise you, once you take that first bite, you’ll understand why they hold a special place in my heart. Happy cooking, and may your kitchen be filled with sweet memories!


