

Picture the iconic, beloved flavors of a peanut butter cup, but reimagined as a magnificent, multi-layered, no-bake dessert that’s as stunning to behold as it is decadent to devour. Welcome to Chocolate Peanut Butter Lasagna—a dessert that takes the comforting concept of layered “lasagna” and applies it to a symphony of creamy, crunchy, chocolaty, and peanut buttery components. This is not a cake, a pie, or a trifle; it is a glorious, frozen or chilled construction built in a 9×13 pan, where each distinct stratum contributes to an addictive textural and flavor experience. At its base lies a crunchy crust of chocolate sandwich cookies. Upon this, layers of velvety peanut butter cream cheese, rich chocolate pudding, billowy whipped topping, and a confetti of chopped peanut butter cups and peanuts create a dessert that is both whimsical and deeply satisfying.
Why Is This Chocolate Peanut Butter Lasagna Dessert So Popular?
The meteoric rise of this dessert’s popularity is a testament to its universal appeal and foolproof nature. First, it is a direct hit of nostalgic, crave-worthy flavor. The combination of chocolate and peanut butter is one of the most beloved pairings in the dessert world, evoking memories of childhood treats and simple pleasures. This recipe taps directly into that powerful emotional connection, delivering it in a novel, shareable, and spectacular format. It feels both comfortingly familiar and excitingly new, offering a grown-up, layered take on a classic flavor duo that appeals to all ages.
Second, it is an extraordinary textural adventure. A perfect bite delivers a symphony of sensations: the initial crack through the whipped topping and chocolate shavings, the cool, soft give of the pudding and peanut butter mousse, and the definitive, crunchy-sandy base of the Oreo crust. This constant interplay of creamy, crunchy, smooth, and crumbly prevents any single bite from being monotonous, creating an addictive eating experience that keeps you coming back for “just one more taste.” The variety of textures makes it far more engaging than a uniform cake or pie.
Finally, it is the ultimate “easy elegance” no-bake dessert. The “no-bake” aspect is a huge draw, especially during hot months or for those who lack confidence with the oven. There’s no risk of overbaking or complicated techniques. The assembly is straightforward—crush, mix, whip, spread, repeat. Yet, the final presentation, with its beautifully defined layers and artful garnish, looks incredibly professional and impressive. It’s a dessert that yields massive culinary compliments for minimal technical effort, making it a favorite for both novice bakers and seasoned entertainers who appreciate a reliable, stunning make-ahead option.
Why You’ll Love This Chocolate Peanut Butter Lasagna Dessert:
You will love this recipe because it is pure, unadulterated kitchen fun. You will love the simple, cathartic act of crushing cookies into fine crumbs. You will love the process of whipping the cream cheese and peanut butter into a cloud-like filling. You will love the satisfaction of creating such defined, beautiful layers in the pan, watching your dessert masterpiece come to life. You will love the flexibility—it can be made a day or two in advance, freeing up your time on the day of your event.
You will love the creative freedom with garnishes, making each pan your own edible artwork. You will love the practicality of serving a crowd from a single pan. Most of all, you will love the universal delight it brings. Presenting this dessert is a guaranteed way to spark joy and conversation. It’s the dish that disappears first from the table, with people eagerly asking for the recipe. It’s a recipe that builds your reputation as a brilliant, effortless host and brings smiles with every creamy, peanut buttery, chocolaty layer.
Here’s what you’ll need:
Quality ingredients are key here, especially for the creamy fillings. Full-fat dairy and name-brand peanut butter will make all the difference.
For the Chocolate Cookie Crust:
- 36 Oreo cookies (about one 14.3 oz package), cream filling included
- 6 tablespoons (85g) unsalted butter, melted
For the Peanut Butter Cream Cheese Layer:
- 1 (8 oz) block full-fat cream cheese, softened to room temperature
- 1 cup (250g) creamy peanut butter (not natural/oily style)
- 1 cup (120g) confectioners’ sugar, sifted
- 1 teaspoon pure vanilla extract
- 2 cups (one 8 oz tub) frozen whipped topping (like Cool Whip), thawed, divided
For the Chocolate Pudding Layer:
- 2 (3.9 oz) boxes instant chocolate pudding mix (NOT cook-and-serve)
- 3 cups (720ml) cold whole milk
- 1 teaspoon pure vanilla extract
For the Toppings & Assembly:
- Remaining thawed whipped topping (from above)
- 1 cup (about 150g) chopped peanut butter cups (mini or regular)
- ½ cup (75g) roasted, salted peanuts, chopped
- ¼ cup chocolate syrup or hot fudge sauce, for drizzling
- Optional: Additional whipped cream for piping, chocolate shavings
How to Make Chocolate Peanut Butter Lasagna Dessert:
Now that you have your ingredients ready, let’s dive into the steps for making this delightful Chocolate Peanut Butter Lasagna Dessert. It’s as easy as pie, and I promise you’ll feel like a culinary superstar!
Step 1: Create the Oreo Cookie Crust
Place the entire Oreo cookies (creams and all) in a food processor. Pulse until you have fine, uniform crumbs. Alternatively, place them in a large zip-top bag and crush with a rolling pin. In a medium bowl, combine the fine cookie crumbs with the melted butter, mixing until the crumbs resemble wet sand and hold together when pinched. Pour the mixture into an ungreased 9×13-inch baking dish. Press it down firmly and evenly using the bottom of a measuring cup or glass. This compact crust is essential for clean slices. Place the pan in the freezer for 15-20 minutes to set solidly while you make the fillings.
Step 2: Whip the Peanut Butter Cream Cheese Layer
In the bowl of a stand mixer fitted with the paddle attachment (or using a hand mixer), beat the softened cream cheese on medium speed until completely smooth and no lumps remain, about 2 minutes. Add the peanut butter, confectioners’ sugar, and vanilla extract. Beat on low until incorporated, then on medium-high until the mixture is fluffy and fully combined, about 2 more minutes.
Step 3: Lighten the Peanut Butter Mixture
Using a large rubber spatula, gently fold in half (about 1 cup) of the thawed whipped topping into the peanut butter mixture. Fold until no white streaks remain, being careful not to deflate the mixture. This creates a light, mousse-like consistency.
Step 4: Assemble the First Creamy Layer
Remove the pan with the set crust from the freezer. Using an offset spatula or spoon, carefully spread the entire peanut butter cream cheese mixture over the crust in a smooth, even layer, going all the way to the edges. This layer acts as a rich, flavorful barrier.
Step 5: Prepare the Chocolate Pudding Layer
In a large bowl, whisk together the two boxes of instant chocolate pudding mix and the cold milk. Whisk vigorously for a full 2 minutes until the pudding is very thick and smooth. Whisk in the teaspoon of vanilla extract. Let it sit for 3-5 minutes to finish setting.
Step 6: Add the Chocolate Pudding Layer
Give the set pudding a quick stir. Pour it over the peanut butter layer. Spread it gently into a perfectly smooth, even layer, being careful not to disturb the layer below.
Step 7: Apply the Whipped Topping Layer
Spread the remaining 1 cup of thawed whipped topping over the chocolate pudding layer, creating a beautiful white top. Cover the pan tightly with plastic wrap and refrigerate for at least 4 hours, but ideally overnight. This chilling time is non-negotiable; it allows all the layers to firm up, the flavors to meld, and the dessert to set for perfect slicing.
Step 8: The Grand Finale – Garnish and Serve
Just before serving, garnish the dessert. Sprinkle the chopped peanut butter cups and chopped peanuts evenly over the entire surface. Warm the chocolate syrup slightly for easy drizzling, and zigzag it artfully over the top. For extra flair, you can pipe additional whipped cream around the edges.
Step 9: Slice and Serve
To serve, use a sharp knife dipped in hot water and wiped clean between each cut. Slice into squares. The clean, defined layers are part of the visual appeal. Serve chilled, directly from the pan.
Tips for Success:
- Room Temperature Cream Cheese & Peanut Butter: This is non-negotiable for a lump-free, smooth peanut butter layer. Let them sit out for 2-3 hours.
- Press the Crust Firmly: A well-compacted crust is the foundation that holds the creamy layers. Press, press, press!
- Use Instant Pudding: Cook-and-serve pudding will not set properly without heat. Instant pudding is formulated to set with cold milk and is essential for this no-bake dessert.
- Full-Fat is Your Friend: Use whole milk for the pudding and full-fat cream cheese. Low-fat alternatives will result in a weepy, less stable dessert.
- Patience in Chilling: Do not shortcut the 4+ hour chill. This dessert needs time for the pudding to fully set and the layers to fuse. Overnight is ideal.
Equipment Needed:
- 9×13-inch baking dish
- Food processor or zip-top bag and rolling pin (for crust)
- Stand mixer or hand mixer
- Large and medium mixing bowls
- Whisk and rubber spatula
- Offset spatula or butter knife for smoothing
- Measuring cups and spoons
Variations of Chocolate Peanut Butter Lasagna Dessert:
- Nutella Swirl Lasagna: Swirl ½ cup of Nutella into the peanut butter layer before adding the chocolate pudding.
- Cookies & Cream Lasagna: Replace the peanut butter layer with a mixture of crushed Oreos folded into sweetened cream cheese.
- Salted Caramel Peanut Butter: Drizzle ½ cup of salted caramel sauce over the peanut butter layer before adding the chocolate pudding. Sprinkle with flaky sea salt with the final garnish.
- Banana Peanut Butter: Add a layer of thinly sliced bananas on top of the peanut butter layer before adding the pudding.
- Mocha Peanut Butter: Dissolve 1 tablespoon of instant espresso powder into the milk before making the chocolate pudding.
Serving Suggestions for Chocolate Peanut Butter Lasagna Dessert:
This is a self-contained celebration. Serve it directly from the pan at a potluck or party. It pairs wonderfully with a glass of cold milk, a cup of strong black coffee, or for the adults, a glass of creamy stout or port. For an over-the-top presentation, serve each square on a plate with a dollop of whipped cream and a mini peanut butter cup on top.
Prep Time:
30 minutes
Cooking Time:
0 minutes
Total Time:
4 hours 30 minutes (minimum, including chilling)
Nutritional Information:
(Estimated per serving, based on 15 rich servings.)
- Calories: ~550
- Protein: 10g
- Sodium: 450mg
- Sugar: 45g
- Fat: 35g
- Carbohydrates: 55g
- Fiber: 3g
FAQs about Chocolate Peanut Butter Lasagna Dessert:
Q: Can I use homemade whipped cream instead of frozen whipped topping?
A: You can, but stabilized whipped cream is better. Fold 1 cup of heavy whipped cream into the peanut butter layer. For the top, sweeten and stabilize 1.5 cups of whipped cream with a little powdered sugar and gelatin or cornstarch so it holds up.
Q: My layers are mixing/not setting. What happened?
A: This usually means the pudding wasn’t thick enough (didn’t whisk for 2 full minutes) or the dessert didn’t chill long enough. Ensure you whisk the pudding vigorously and allow for the full, preferably overnight, chilling time.
Q: Can I make this gluten-free?
A: Yes. Use gluten-free chocolate sandwich cookies (like Glutino) for the crust and ensure your pudding mix and other ingredients are certified gluten-free.
Q: How far in advance can I make this?
A: You can assemble it completely (through Step 7) up to 24-48 hours in advance. Keep it covered in the refrigerator. Add the final garnish (peanut butter cups, peanuts, drizzle) within 1-2 hours of serving for the best texture.
Q: Can I freeze this dessert?
A: It is not recommended. The whipped topping and pudding layers can become icy and watery upon thawing, and the texture will suffer significantly.
Final Thoughts:
Chocolate Peanut Butter Lasagna Dessert is a triumphant celebration of flavor, texture, and make-ahead genius. It’s a dessert that requires patience (for chilling) but rewards it with a flawless, impressive result that promises and delivers pure joy. This recipe is a testament to the idea that the most beloved treats are often those that combine nostalgic flavors with a playful, creative presentation. From the crunchy Oreo base to the final sprinkle of salty peanuts, it is a journey through every wonderful aspect of the chocolate-peanut butter partnership. So, clear a space in your fridge, gather your ingredients, and prepare to build a dessert that doesn’t just end a meal—it becomes the main event, a layered monument to one of the greatest flavor combinations of all time
Print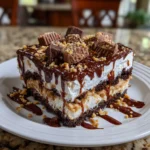
Chocolate Peanut Butter Lasagna Dessert: A No-Bake Layered Dream
- Total Time: 4 hours 30 minutes
Description
Layers of chocolate pudding, peanut butter cream, whipped topping, and crushed cookies. This easy, no-bake dessert is cool, rich, and always a crowd-pleaser.
Ingredients
For the Chocolate Cookie Crust:
-
36 Oreo cookies (about one 14.3 oz package), cream filling included
-
6 tablespoons (85g) unsalted butter, melted
For the Peanut Butter Cream Cheese Layer:
-
1 (8 oz) block full-fat cream cheese, softened to room temperature
-
1 cup (250g) creamy peanut butter (not natural/oily style)
-
1 cup (120g) confectioners’ sugar, sifted
-
1 teaspoon pure vanilla extract
-
2 cups (one 8 oz tub) frozen whipped topping (like Cool Whip), thawed, divided
For the Chocolate Pudding Layer:
-
2 (3.9 oz) boxes instant chocolate pudding mix (NOT cook-and-serve)
-
3 cups (720ml) cold whole milk
-
1 teaspoon pure vanilla extract
For the Toppings & Assembly:
-
Remaining thawed whipped topping (from above)
-
1 cup (about 150g) chopped peanut butter cups (mini or regular)
-
½ cup (75g) roasted, salted peanuts, chopped
-
¼ cup chocolate syrup or hot fudge sauce, for drizzling
-
Optional: Additional whipped cream for piping, chocolate shavings
Instructions
Step 1: Create the Oreo Cookie Crust
Place the entire Oreo cookies (creams and all) in a food processor. Pulse until you have fine, uniform crumbs. Alternatively, place them in a large zip-top bag and crush with a rolling pin. In a medium bowl, combine the fine cookie crumbs with the melted butter, mixing until the crumbs resemble wet sand and hold together when pinched. Pour the mixture into an ungreased 9×13-inch baking dish. Press it down firmly and evenly using the bottom of a measuring cup or glass. This compact crust is essential for clean slices. Place the pan in the freezer for 15-20 minutes to set solidly while you make the fillings.
Step 2: Whip the Peanut Butter Cream Cheese Layer
In the bowl of a stand mixer fitted with the paddle attachment (or using a hand mixer), beat the softened cream cheese on medium speed until completely smooth and no lumps remain, about 2 minutes. Add the peanut butter, confectioners’ sugar, and vanilla extract. Beat on low until incorporated, then on medium-high until the mixture is fluffy and fully combined, about 2 more minutes.
Step 3: Lighten the Peanut Butter Mixture
Using a large rubber spatula, gently fold in half (about 1 cup) of the thawed whipped topping into the peanut butter mixture. Fold until no white streaks remain, being careful not to deflate the mixture. This creates a light, mousse-like consistency.
Step 4: Assemble the First Creamy Layer
Remove the pan with the set crust from the freezer. Using an offset spatula or spoon, carefully spread the entire peanut butter cream cheese mixture over the crust in a smooth, even layer, going all the way to the edges. This layer acts as a rich, flavorful barrier.
Step 5: Prepare the Chocolate Pudding Layer
In a large bowl, whisk together the two boxes of instant chocolate pudding mix and the cold milk. Whisk vigorously for a full 2 minutes until the pudding is very thick and smooth. Whisk in the teaspoon of vanilla extract. Let it sit for 3-5 minutes to finish setting.
Step 6: Add the Chocolate Pudding Layer
Give the set pudding a quick stir. Pour it over the peanut butter layer. Spread it gently into a perfectly smooth, even layer, being careful not to disturb the layer below.
Step 7: Apply the Whipped Topping Layer
Spread the remaining 1 cup of thawed whipped topping over the chocolate pudding layer, creating a beautiful white top. Cover the pan tightly with plastic wrap and refrigerate for at least 4 hours, but ideally overnight. This chilling time is non-negotiable; it allows all the layers to firm up, the flavors to meld, and the dessert to set for perfect slicing.
Step 8: The Grand Finale – Garnish and Serve
Just before serving, garnish the dessert. Sprinkle the chopped peanut butter cups and chopped peanuts evenly over the entire surface. Warm the chocolate syrup slightly for easy drizzling, and zigzag it artfully over the top. For extra flair, you can pipe additional whipped cream around the edges.
Step 9: Slice and Serve
To serve, use a sharp knife dipped in hot water and wiped clean between each cut. Slice into squares. The clean, defined layers are part of the visual appeal. Serve chilled, directly from the pan
Notes
-
9×13-inch baking dish
-
Food processor or zip-top bag and rolling pin (for crust)
-
Stand mixer or hand mixer
-
Large and medium mixing bowls
-
Whisk and rubber spatula
-
Offset spatula or butter knife for smoothing
-
Measuring cups and spoons
- Prep Time: 30 minutes
- Category: Dinner
- Cuisine: American
Nutrition
- Calories: 550
- Sugar: 45g
- Sodium: 450mg
- Fat: 35g
- Carbohydrates: 55g
- Fiber: 3g
- Protein: 10g


