
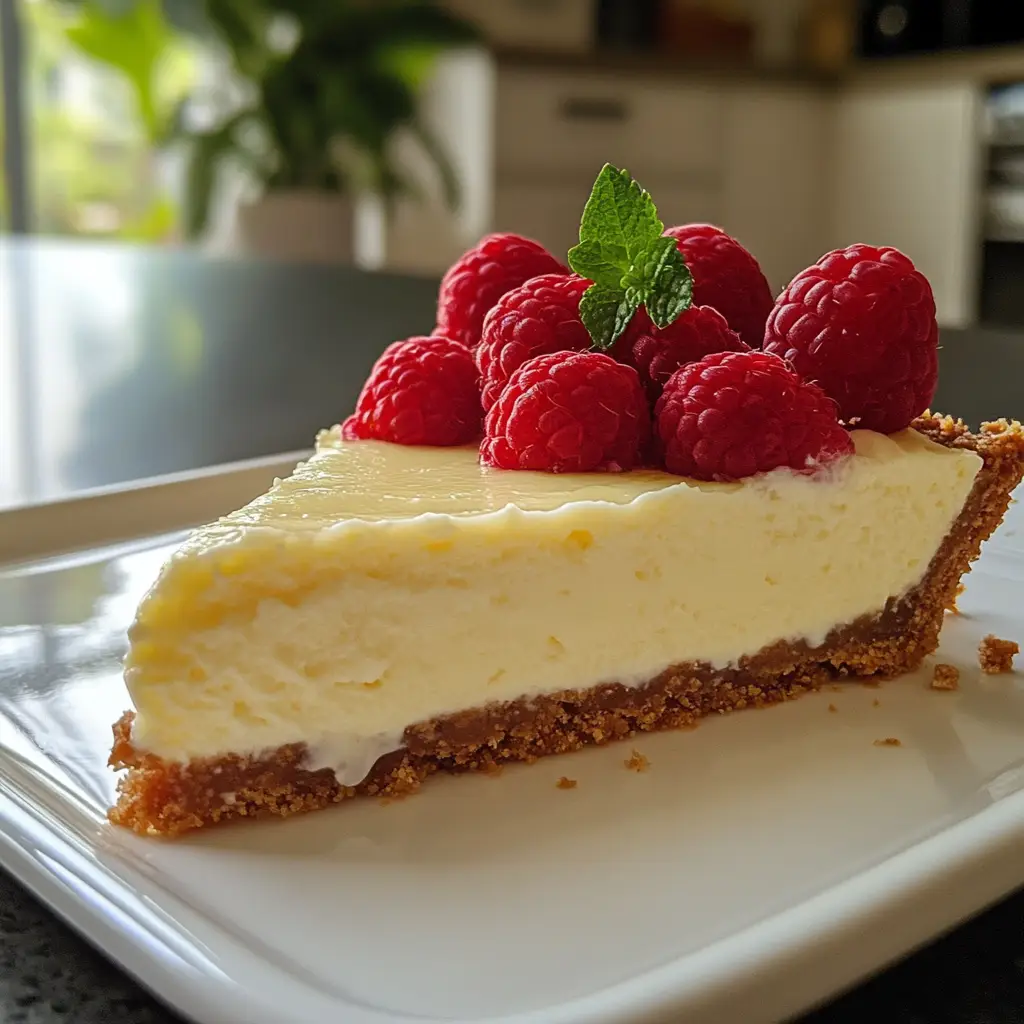
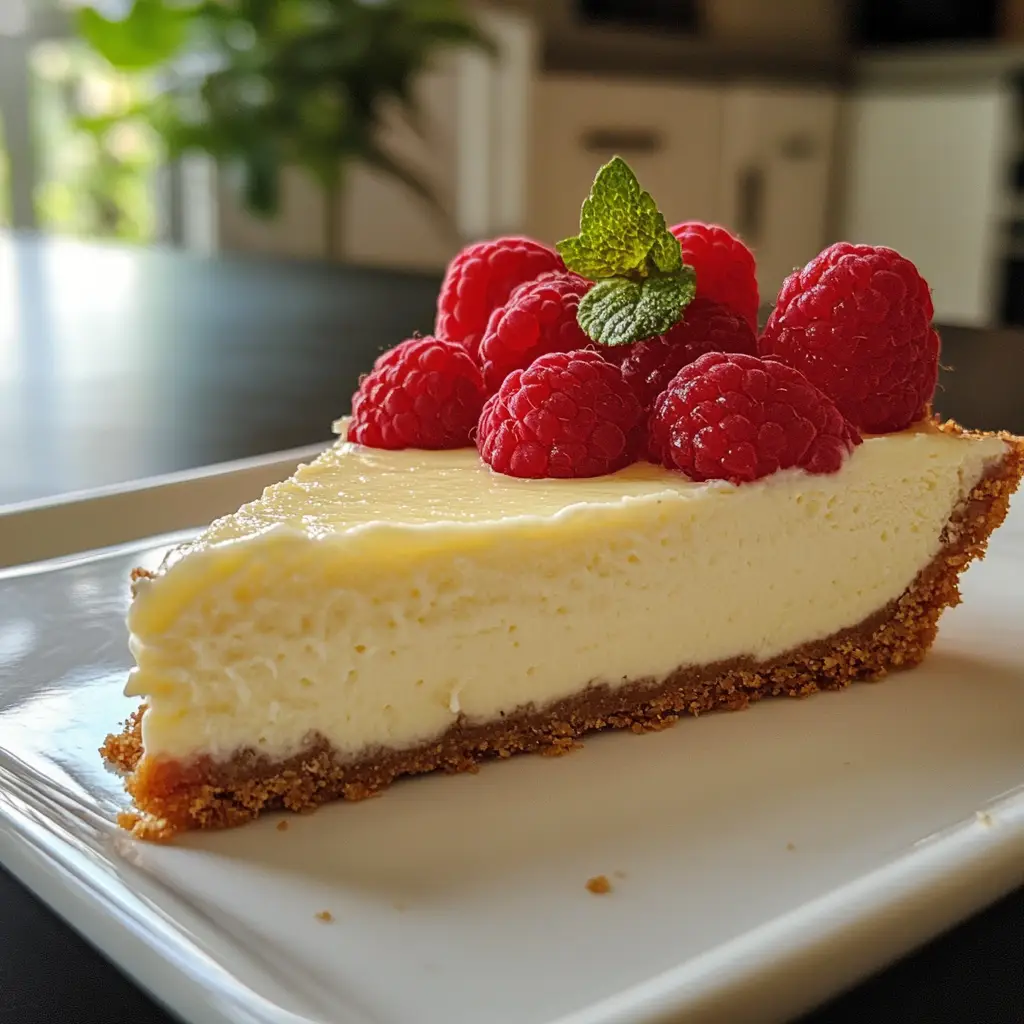
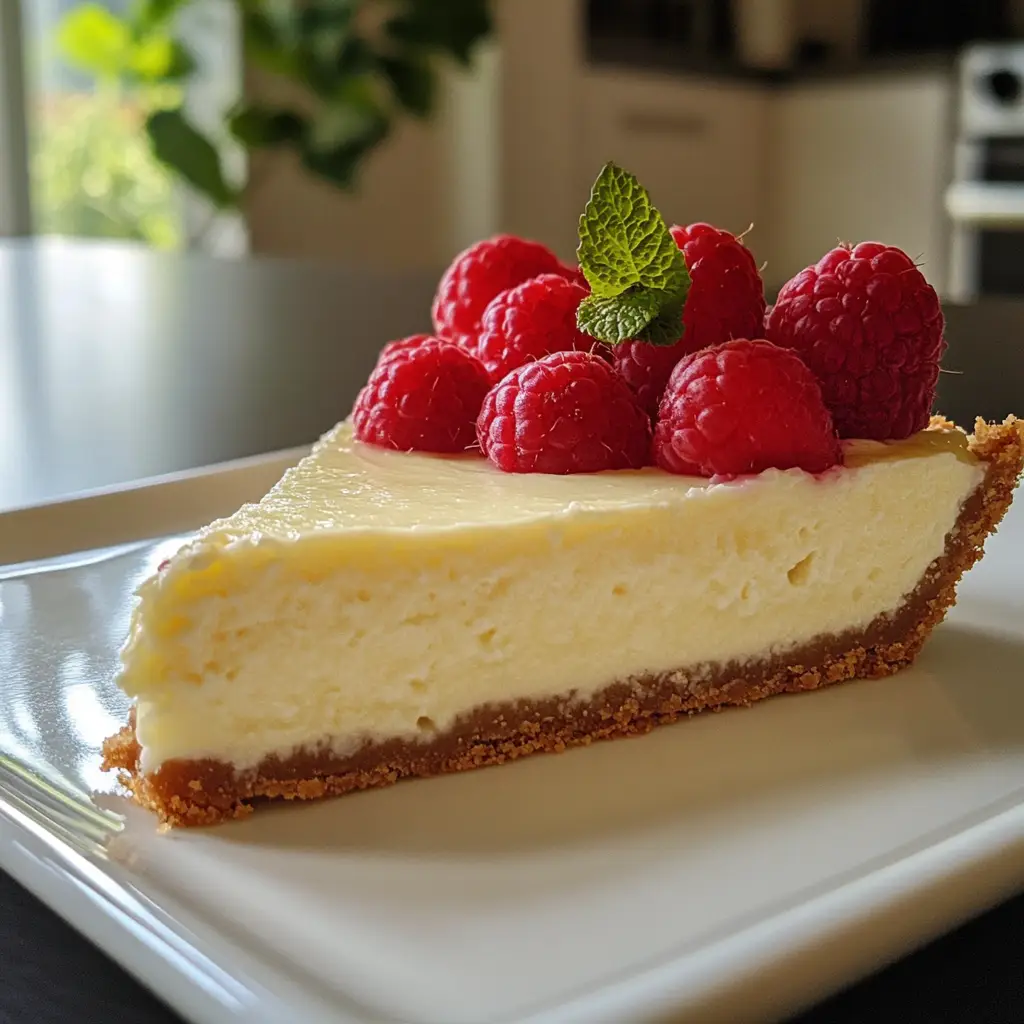
The Cheesecake Tart is the elegant, sophisticated cousin of the classic New York cheesecake. It represents the perfect marriage between the rich, creamy, tangy filling we all adore and a delicate, buttery, shortcrust pastry shell. Where a traditional cheesecake can be dense and imposing, a tart is light, refined, and designed for savoring every nuanced bite. This dessert is a showstopper, boasting a beautiful appearance with its golden, fluted edges and a filling that is smooth as silk. It’s the ideal finale for a dinner party, a luxurious treat for a weekend indulgence, or a stunning centerpiece for a holiday table.
Why Is This Cheesecake Tart So Popular?
The Cheesecake Tart’s popularity stems from its ability to deliver maximum gourmet impact with less intimidation than a full-sized springform pan cheesecake. It is perceived as more European and pastry-shop worthy, making it feel special. Its popularity is also driven by its textural perfection: the contrast between the crisp, crumbly, savory-sweet pastry and the luxuriously smooth, creamy filling is an experience a standard graham cracker crust simply cannot replicate. Furthermore, its smaller, shallower form means it bakes faster, cools more quickly, and is less prone to the dreaded cracking that plagues many cheesecakes. It’s a dessert that caters to the modern desire for elegance without excessive sweetness, allowing the pure flavors of high-quality cream cheese, vanilla, and sour cream to truly shine.
Why You’ll Love This Cheesecake Tart:
You will fall in love with this recipe because it is the ultimate elegant dessert that is deceptively simple to create.
- Perfect Texture Harmony: The crisp, buttery shortcrust pastry (pâte sucrée) provides a sturdy and flavorful base that beautifully complements the velvety, cloud-like filling without ever becoming soggy.
- Elegant Presentation: The fluted edges of a tart pan create a professionally beautiful dessert that looks like it came from a patisserie window, requiring minimal decoration to impress.
- Foolproof Method: Without the need for a water bath and with a shorter baking time, this tart is significantly less finicky than a tall cheesecake, making it a more approachable project for bakers of all levels.
- Ideal Canvas for Creativity: This tart is a dream to customize. Top it with lemon curd, a glossy fruit glaze, salted caramel, chocolate ganache, or a simple pile of fresh fruit.
- Perfect Portion Size: Served in slender slices, it feels luxurious and satisfying without being overly heavy, making it perfect after a rich meal.
Here’s what you’ll need:
For the Shortcrust Pastry (Pâte Sucrée):
- 1 ½ cups (180g) All-Purpose Flour: Spooned and leveled to ensure accuracy. This is the structure of your tart shell.
- ½ cup (60g) Powdered Sugar: This fine sugar dissolves easily and contributes to the pastry’s tender, melt-in-your-mouth texture.
- ¼ tsp Fine Sea Salt: Enhances all the other flavors and balances the sweetness.
- ½ cup (115g) European-style Unsalted Butter: Very cold and cut into small cubes. High-fat butter is crucial for flakiness.
- 1 Large Egg Yolk: Binds the dough together and adds richness and color.
- 1-2 tbsp Ice Cold Water: Added only as needed to bring the dough together.
For the Cheesecake Filling:
- 16 oz (452g) Full-Fat Cream Cheese: Absolutely must be at room temperature. This is non-negotiable for a lump-free, silky filling.
- ½ cup (100g) Granulated Sugar: Provides the primary sweetness; its fine grain dissolves perfectly into the filling.
- ½ cup (120g) Full-Fat Sour Cream: Also at room temperature. This is the secret ingredient for incredible tanginess and a lighter, creamier texture.
- 2 Large Eggs: At room temperature. They provide structure and richness.
- 1 tsp Pure Vanilla Extract or Paste: For classic, warm flavor. Vanilla paste will provide those beautiful speckles.
- 1 tbsp All-Purpose Flour: Just a small amount helps stabilize the filling, preventing it from puffing up and then collapsing.
- Zest of 1 Lemon: (Optional but highly recommended) Brightens the entire flavor profile and cuts through the richness.
For the Optional Finish:
- Fresh berries (strawberries, raspberries, blueberries)
- A fruit glaze (apricot jam heated with a little water, strained)
- A dusting of powdered sugar
- Melted chocolate for drizzling
How to Make Cheesecake Tart:
Now that you have your ingredients ready, let’s dive into the steps for making this delightful Cheesecake Tart. It’s as easy as pie, and I promise you’ll feel like a culinary superstar!
Step 1: Make the Pastry Dough
In the bowl of a food processor, pulse the flour, powdered sugar, and salt to combine. Add the cold, cubed butter and pulse until the mixture resembles coarse, sandy breadcrumbs with a few pea-sized pieces of butter remaining. Add the egg yolk and pulse again. While pulsing, slowly drizzle in the ice water, one tablespoon at a time, until the dough just begins to clump together. Turn the dough out onto a work surface, gently knead it into a disc, wrap tightly in plastic wrap, and refrigerate for at least 1 hour (and up to 2 days).
Step 2: Blind Bake the Tart Shell
Preheat your oven to 375°F (190°C). On a lightly floured surface, roll your chilled dough into a circle about 2 inches larger than your 9-inch tart pan with a removable bottom. Carefully press the dough into the pan’s fluted edges and trim the excess. Prick the base all over with a fork. Line the shell with parchment paper and fill with pie weights or dried beans. Bake for 15 minutes. Carefully remove the weights and parchment and bake for another 5-7 minutes, until the shell is light golden brown and dry to the touch. Set aside to cool slightly. Reduce oven temperature to 325°F (160°C).
Step 3: Prepare the Filling
While the shell is baking, prepare the filling. In the bowl of a stand mixer fitted with the paddle attachment (or using a hand mixer), beat the room-temperature cream cheese on medium speed until it is completely smooth and creamy, scraping down the bowl several times. This is the most important step to avoid lumps.
Step 4: Incorporate Remaining Ingredients
Add the granulated sugar and beat until fully combined and smooth. Scrape down the bowl. Add the sour cream, vanilla, and lemon zest, and mix on low until incorporated. Add the eggs, one at a time, mixing on low speed until just combined after each addition. Finally, sprinkle in the tablespoon of flour and mix until it disappears. Do not overmix once the eggs are added, as this can incorporate too much air and cause the filling to rise and fall dramatically.
Step 5: Assemble and Bake
Pour the finished filling into the slightly cooled, par-baked tart shell. Use a spatula to smooth the top into an even layer. Tap the pan gently on the counter to release any large air bubbles.
Step 6: The Bake
Bake at 325°F (160°C) for 25-35 minutes. The tart is done when the edges are set but the center still has a slight, gentle jiggle—like Jell-O—when you nudge the pan. It will firm up completely as it cools.
Step 7: Cool Completely
Remove the tart from the oven and place it on a wire rack. Allow it to cool completely to room temperature before carefully removing the outer ring of the pan. Then, refrigerate for at least 4 hours, preferably overnight, to allow the filling to fully set and the flavors to mature.
Tips for Success:
- Temperature is Everything: Room temperature cream cheese, eggs, and sour cream are critical. Cold ingredients will lead to a lumpy filling, forcing you to overmix and incorporate air.
- Don’t Overmix: Once you add the eggs, mix on low speed and stop as soon as they are incorporated. Overmixing incorporates air bubbles that can lead to cracking.
- Prevent Soggy Bottoms: Blind baking (pre-baking) the crust is essential. Ensure it is fully baked and golden before adding the filling to create a moisture barrier.
- The Jiggle Test: Trust the jiggle. Overbaking is the primary cause of cracking and a dry, crumbly texture. The residual heat will cook the center perfectly.
- Chill Thoroughly: Patience is a virtue. Chilling is not optional; it is the final step of the cooking process that allows the structure to firm up.
Equipment Needed:
- 9-inch Tart Pan with Removable Bottom: (Essential) This allows for clean removal and beautiful presentation.
- Food Processor: (Highly recommended) For making the pastry dough effortlessly.
- Stand Mixer or Hand Mixer: Crucial for achieving a perfectly smooth filling.
- Pie Weights or Dried Beans: For blind baking the crust.
- Rolling Pin
- Measuring Cups and Spoons
- Rubber Spatula
Variations of Cheesecake Tart:
- Chocolate Marble: Swirl ¼ cup of melted and cooled chocolate into the filled tart pan before baking.
- Luxury Lemon: Add the juice of one lemon to the filling and top with a layer of homemade lemon curd after chilling.
- Salted Caramel: Drizzle the bottom of the pre-baked tart shell with ½ cup of salted caramel sauce before adding the filling. After baking and chilling, drizzle more on top.
- Berry Swirl: Drop spoonfuls of seedless raspberry or strawberry jam onto the filled tart and use a knife to swirl it decoratively before baking.
- Biscoff Cookie Crust: Substitute the shortcrust pastry with a crust made from crushed Biscoff cookies and butter for a warm, spiced flavor.
Serving Suggestions for Cheesecake Tart:
- Classic Elegance: Top with a glossy glaze of warmed apricot jam and artfully arranged fresh raspberries and blueberries.
- Decadent Indulgence: Drizzle with high-quality dark chocolate ganache and a sprinkle of flaky sea salt.
- Simple Sophistication: A light dusting of powdered sugar and a few fresh mint leaves is all it needs.
- Seasonal Celebration: Top with sliced peaches and a honey glaze in the summer, or spiced poached pears in the fall.
- Serve chilled, straight from the refrigerator. Pair with a cup of strong coffee or a dessert wine.
Prep Time:
30 minutes (plus 1+ hours for chilling dough)
Cooking Time:
45-50 minutes
Total Time:
About 6-7 hours (including cooling and chilling)
Nutritional Information (Estimated per slice, serves 12):
- Calories: ~380
- Protein: 6g
- Sodium: 220mg
- Sugar: 22g
- Fat: 26g
- Carbohydrates: 30g
- Fiber: 1g
Please note: Nutritional information is an estimate and can vary greatly based on specific brands and ingredients used.
FAQs about Cheesecake Tart:
Q: Can I use a store-bought pie crust?
A: While you can use a pre-rolled pie crust in a pinch, it will not provide the same flavor or texture as a sweet shortcrust pastry (pâte sucrée). The buttery, cookie-like crust is a defining feature of this dessert.
Q: Why did my filling crack?
A: Cracking is usually caused by overmixing (incorporating too much air), overbaking, or a rapid temperature change. Cooling the tart gradually at room temperature before refrigerating is key.
Q: Can I make this tart ahead of time?
A: Absolutely. In fact, it is highly recommended. The tart needs to chill for at least 4 hours, but it can be made up to 2 days in advance. Keep it covered in the refrigerator until ready to serve.
Q: My filling is lumpy. What did I do wrong?
A: Lumpy filling is almost always a result of using cream cheese, sour cream, or eggs that were too cold. Ensure all filling ingredients are truly at room temperature.
Q: Can I freeze a cheesecake tart?
A: It is not recommended to freeze the assembled tart, as the pastry can become soggy upon thawing. The filling can be frozen on its own, and the pastry shell can be pre-baked and frozen separately.
Final Thoughts:
The Cheesecake Tart is more than just a dessert; it is an expression of culinary artistry that balances simplicity with stunning results. It teaches fundamental baking skills—the importance of temperature, the technique of blind baking, and the patience required for proper chilling—all of which pay off tenfold. This tart has the power to transform an ordinary day into a celebration and to make any home baker feel like a true pastry chef. Its elegant appearance belies its straightforward method, making it the perfect recipe to build confidence and impress loved ones. So, take your time, trust the process, and prepare to create a dessert that is as unforgettable to eat as it is beautiful to behold. One slice of this creamy, tangy, buttery masterpiece, and you’ll understand why the Cheesecake Tart reigns supreme.


