

Introduction to Butterfinger Bomb Cake
Hey there, fellow dessert lovers! If you’re anything like me, you know that life can get pretty hectic. Between juggling work, family, and everything in between, finding time to whip up something special can feel impossible. That’s where my Butterfinger Bomb Cake comes in! This rich and decadent cake is not just a treat for your taste buds; it’s a quick solution for a busy day. Imagine the smiles on your loved ones’ faces when you serve them a slice of this sweet delight. Trust me, it’s a game-changer for any occasion!
Why You’ll Love This Butterfinger Bomb Cake
This Butterfinger Bomb Cake is a dream come true for busy moms and professionals alike. It’s incredibly easy to make, requiring just a few simple ingredients and minimal prep time. Plus, the rich chocolate flavor combined with the crunchy Butterfinger pieces creates a taste sensation that’s hard to resist. Whether you’re celebrating a special occasion or just need a sweet pick-me-up, this cake is sure to impress and satisfy everyone’s cravings!
Ingredients for Butterfinger Bomb Cake
Let’s gather our ingredients for this delightful Butterfinger Bomb Cake! Each component plays a crucial role in creating that rich, indulgent flavor we all crave. Here’s what you’ll need:
- Chocolate cake mix: The base of our cake, providing that rich chocolate flavor. You can opt for dark chocolate for an even deeper taste.
- Water: This helps to hydrate the cake mix, ensuring a moist texture. You can also use brewed coffee for an extra flavor boost!
- Vegetable oil: This adds moisture and richness to the cake. If you prefer, melted butter can be a delicious substitute.
- Large eggs: Eggs help bind the ingredients together and add structure. They also contribute to the cake’s fluffiness.
- Butterfinger candy bars: The star of the show! Chopped into pieces, they add a delightful crunch and sweet flavor throughout the cake.
- Chocolate frosting: This creamy topping enhances the chocolate experience. Feel free to use store-bought or homemade frosting.
- Whipped topping: A light and airy addition that balances the richness of the cake and frosting.
- Butterfinger crumbs: These are for sprinkling on top, adding an extra layer of flavor and texture. You can crush the candy bars yourself or buy pre-made crumbs.
For exact measurements, check the bottom of the article where you can find everything listed for easy printing. Now, let’s get ready to bake this delicious Butterfinger Bomb Cake!
How to Make Butterfinger Bomb Cake
Now that we have our ingredients ready, let’s dive into the fun part—making the Butterfinger Bomb Cake! Follow these simple steps, and you’ll have a delicious dessert that will wow your family and friends.
Step 1: Preheat the Oven
First things first, preheat your oven to 350°F (175°C). Preheating is crucial because it ensures that your cake bakes evenly. If the oven isn’t hot enough, your cake might not rise properly, and we definitely want that fluffy texture!
Step 2: Mix the Cake Batter
In a large mixing bowl, combine the chocolate cake mix, water, vegetable oil, and eggs. Use a whisk or an electric mixer to blend everything together until it’s smooth and well combined. This is where the magic begins! Make sure there are no lumps, as they can affect the cake’s texture.
Step 3: Fold in the Butterfinger
Now, it’s time to add the star ingredient—Butterfinger candy bars! Gently fold in the chopped pieces using a spatula. Folding is a technique that helps keep the batter light and airy. You want those delicious chunks evenly distributed throughout the batter for that delightful crunch in every bite!
Step 4: Bake the Cake
Pour the batter into a greased cake pan and pop it into the preheated oven. Bake for 30-35 minutes. To check for doneness, insert a toothpick into the center of the cake. If it comes out clean or with just a few crumbs, it’s ready! Once baked, let the cake cool in the pan for about 10 minutes before transferring it to a wire rack to cool completely.
Step 5: Frost and Decorate
Once your cake is completely cool, it’s time to frost! Spread a generous layer of chocolate frosting over the top. For an extra touch, add whipped topping and sprinkle with Butterfinger crumbs. This not only looks beautiful but adds a delightful crunch. Slice it up, and get ready to enjoy this sweet delight!
Tips for Success
- Always measure your ingredients accurately for the best results.
- Let the cake cool completely before frosting to prevent melting.
- Use room temperature eggs for a smoother batter.
- For a fun twist, try adding a layer of peanut butter between the cake and frosting.
- Store leftovers in an airtight container to keep them fresh and delicious.
Equipment Needed
- Mixing bowl: A large bowl for combining ingredients. A stand mixer works great too!
- Whisk or electric mixer: For blending the batter smoothly. A good old-fashioned whisk will do just fine!
- Measuring cups and spoons: Essential for accurate ingredient measurements.
- Spatula: Perfect for folding in the Butterfinger and spreading frosting.
- 9×13 inch cake pan: Ideal for baking the cake. You can also use round pans if you prefer layers.
Variations of Butterfinger Bomb Cake
- Peanut Butter Butterfinger Bomb Cake: Add a layer of creamy peanut butter between the cake and frosting for a delightful twist.
- Gluten-Free Option: Substitute the chocolate cake mix with a gluten-free cake mix to accommodate dietary needs.
- Mini Butterfinger Bomb Cakes: Bake the batter in muffin tins for individual-sized treats that are perfect for parties.
- Butterfinger Ice Cream Cake: Layer the cake with ice cream and freeze for a refreshing dessert on hot days.
- Nutty Variation: Add chopped nuts, like pecans or walnuts, to the batter for an extra crunch and flavor.
Serving Suggestions for Butterfinger Bomb Cake
- Pair with a scoop of vanilla ice cream for a delightful contrast of temperatures.
- Serve alongside fresh berries to add a pop of color and freshness.
- Drizzle with chocolate sauce for an extra indulgent touch.
- Garnish with whipped cream and a sprinkle of Butterfinger crumbs for a beautiful presentation.
- Enjoy with a cup of coffee or a glass of milk to balance the sweetness.
FAQs about Butterfinger Bomb Cake
As you embark on your Butterfinger Bomb Cake adventure, you might have a few questions. Don’t worry; I’ve got you covered! Here are some common queries that fellow bakers often ask:
Can I use a different type of cake mix?
Absolutely! While chocolate cake mix is a classic choice, you can experiment with vanilla or even red velvet for a fun twist. Just remember, the Butterfinger flavor will shine through no matter what base you choose!
How do I store leftovers?
To keep your Butterfinger Bomb Cake fresh, store it in an airtight container in the refrigerator. It should last for about 3-4 days. Just be sure to let it come to room temperature before serving for the best taste!
Can I make this cake ahead of time?
Yes! In fact, making the Butterfinger Bomb Cake a day in advance can enhance its flavor. Just frost it right before serving to keep that whipped topping nice and fluffy.
What can I substitute for whipped topping?
If you prefer a homemade touch, you can whip up some heavy cream with a bit of sugar and vanilla extract. It’s a delicious alternative that adds a personal flair to your cake!
Can I freeze the Butterfinger Bomb Cake?
Yes, you can freeze the cake! Just wrap it tightly in plastic wrap and then foil. When you’re ready to enjoy it, let it thaw in the fridge overnight. Frosting can be added after thawing for the best results.
Final Thoughts
Creating this Butterfinger Bomb Cake is more than just baking; it’s about sharing joy and sweetness with those you love. The rich chocolate, crunchy Butterfinger pieces, and fluffy frosting come together to create a dessert that feels like a warm hug. Whether it’s a birthday celebration or a simple family dinner, this cake is sure to bring smiles and happy memories. So, roll up your sleeves, gather your loved ones, and dive into this delightful baking adventure. Trust me, the joy of serving this cake will be as sweet as the first bite!
Print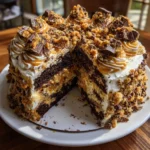
Butterfinger Bomb Cake
- Total Time: 55 minutes
- Yield: 12 servings 1x
- Diet: Vegetarian
Description
A rich and decadent cake filled with Butterfinger candy bars, perfect for any sweet tooth.
Ingredients
- 1 box chocolate cake mix
- 1 cup water
- 1/2 cup vegetable oil
- 3 large eggs
- 1 cup Butterfinger candy bars, chopped
- 1 cup chocolate frosting
- 1 cup whipped topping
- 1/2 cup Butterfinger crumbs for topping
Instructions
- Preheat the oven to 350°F (175°C).
- In a large bowl, combine the chocolate cake mix, water, vegetable oil, and eggs. Mix until well combined.
- Fold in the chopped Butterfinger candy bars.
- Pour the batter into a greased cake pan and bake for 30-35 minutes or until a toothpick comes out clean.
- Allow the cake to cool completely.
- Once cooled, spread chocolate frosting over the top of the cake.
- Top with whipped topping and sprinkle with Butterfinger crumbs.
- Slice and serve to enjoy the sweet delight!
Notes
- For a richer flavor, use dark chocolate cake mix.
- Store leftovers in an airtight container in the refrigerator.
- Can be made a day in advance for better flavor.
- Prep Time: 20 minutes
- Cook Time: 35 minutes
- Category: Dessert
- Method: Baking
- Cuisine: American
Nutrition
- Serving Size: 1 slice
- Calories: 350
- Sugar: 28g
- Sodium: 250mg
- Fat: 18g
- Saturated Fat: 8g
- Unsaturated Fat: 10g
- Trans Fat: 0g
- Carbohydrates: 42g
- Fiber: 2g
- Protein: 4g
- Cholesterol: 50mg
Keywords: Butterfinger Bomb Cake, chocolate cake, dessert, sweet treat


