Description
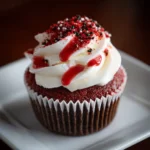
Bake these bloody red velvet cupcakes for Halloween! Moist crimson cakes with cream cheese frosting & “blood” drizzle. The perfect creepy-crawly dessert for parties!
Ingredients
Achieving the perfect bloody effect requires attention to both the cake and the “gory” frosting details.
For the Red Velvet Cupcakes:
-
1 ¼ cups (156g) All-Purpose Flour, spooned and leveled
-
¾ cup (150g) Granulated Sugar
-
1 teaspoon Baking Soda
-
1 teaspoon Unsweetened Cocoa Powder
-
½ teaspoon Salt
-
¾ cup Vegetable Oil
-
½ cup Buttermilk, at room temperature
-
1 large Egg, at room temperature
-
1 tablespoon Red Gel Food Coloring (Gel is mandatory for a deep, dark red color)
-
1 teaspoon Pure Vanilla Extract
-
½ teaspoon White Vinegar
For the “Bloody” Cream Cheese Frosting:
-
8 oz (226g) full-fat Cream Cheese, softened to room temperature
-
½ cup (1 stick or 113g) Unsalted Butter, softened to room temperature
-
3 cups (360g) Powdered Sugar, sifted
-
1 teaspoon Pure Vanilla Extract
-
A pinch of Salt
-
Red Gel Food Coloring AND Red Liquid Food Coloring (see step 6 for why both are used)
For the Garnish and “Gore”:
-
Additional Red Gel Food Coloring or Red Edible Blood for drips
-
Optional: Black Sprinkles, red sanding sugar, or plastic Halloween toppers (e.g., knives, eyeballs).
Instructions
Now that you have your ingredients ready, let’s dive into the steps for making this delightful Bloody Red Velvet Cupcake. It’s as easy as pie, and I promise you’ll feel like a culinary superstar!
Step 1: Prepare the Oven and Pan
Preheat your oven to 350°F (175°C). Line a standard 12-cup muffin tin with black, dark brown, or red paper liners for a more dramatic effect.
Step 2: Combine Dry Ingredients
In a medium bowl, whisk together the flour, sugar, baking soda, cocoa powder, and salt. Ensure they are well combined and free of lumps.
Step 3: Combine Wet Ingredients
In a separate, larger bowl, whisk together the vegetable oil, buttermilk, egg, red gel food coloring, and vanilla extract until the mixture is smooth and uniformly a vibrant red.
Step 4: Combine Wet and Dry
Add the dry ingredients to the wet ingredients and stir with a spatula until just combined and no dry streaks remain. Do not overmix. Right at the end, stir in the ½ teaspoon of white vinegar. The reaction with the baking soda will help give the cupcakes a slight lift.
Step 5: Bake to Perfection
Divide the batter evenly among the prepared muffin cups, filling each about ⅔ full. Bake for 18-22 minutes, or until a wooden toothpick inserted into the center of a cupcake comes out clean. Let the cupcakes cool in the pan for 5 minutes before transferring them to a wire rack to cool completely.
Step 6: Create the “Bloody” Frosting Base
In the bowl of a stand mixer fitted with the paddle attachment, beat the softened cream cheese and butter together on medium speed until completely smooth and creamy. Gradually add the sifted powdered sugar, one cup at a time, beating on low speed until incorporated. Add the vanilla and salt. Once combined, increase the speed to medium-high and beat for 2 minutes until fluffy.
Now, for the color: First, add red GEL food coloring and beat until the frosting is a uniform, pale pink or light red color. This provides the base “flesh” tone.
Step 7: Frost and Create the Wound
Once the cupcakes are completely cool, use an offset spatula or a knife to spread a thick, uneven layer of the light red frosting onto each cupcake. Don’t make it perfect! Create swirls and slight depressions to look like torn skin.
Step 8: The Grand Finale – Add the “Blood”
This is a two-part process:
-
Thick Blood: Take a small portion of your remaining frosting and mix in a very generous amount of red GEL food coloring until it becomes a deep, dark, blood-red paste. Place this in a small piping bag or a zip-top bag with a corner snipped off. Pipe a “wound” in the center of your frosted cupcake.
-
Dripping Blood: To create the realistic drips, you need a thinner consistency. In a small bowl, mix a few tablespoons of red LIQUID food coloring (or store-bought edible blood) with a teaspoon of corn syrup or simple syrup. This creates a thin, glossy “blood.” Using a spoon, a piping bag, or even a plastic syringe, carefully drizzle this liquid over the edges of the cupcake, allowing it to drip down the sides. Splatter it artistically for a more dramatic effect.
Step 9: Add Final Garnishes
While the “blood” is still wet, you can add black sprinkles for “dirt” or press in a plastic knife or eyeball for an extra spooky touch.
Notes
-
Standard Muffin Tin
-
Cupcake Liners (black or red)
-
Stand Mixer or Hand Mixer
-
Mixing Bowls
-
Whisk and Spatula
-
Piping Bags or Zip-Top Bags
- Prep Time: 25 minutes
- Cook Time: 20 minutes
- Category: dessert
- Cuisine: American
Nutrition
- Calories: 420 kcal
- Sugar: 45g
- Sodium: 220 mg
- Fat: 22 g
- Carbohydrates: 55 g
- Protein: 3g