
Introduction to Birria Quesa Tacos Recipe
Ah, Birria Quesa Tacos! Just the thought of them makes my mouth water. I remember the first time I tasted these delightful tacos at a local food festival. The aroma of slow-cooked meat, spices, and melted cheese wafted through the air, drawing me in like a moth to a flame. I took my first bite, and it was as if fireworks exploded in my mouth! The rich, savory flavors danced together, creating a symphony of taste that I couldn’t forget.
As a passionate home cook, I love recreating that magical experience in my own kitchen. Birria Quesa Tacos are not just a meal; they are a celebration of flavors and traditions. Originating from the beautiful state of Jalisco, Mexico, these tacos have become a beloved dish across the globe. The combination of tender, marinated meat, gooey cheese, and crispy tortillas is simply irresistible.
In this recipe, I’ll guide you through the steps to make your very own Birria Quesa Tacos. Whether you’re hosting a taco night with friends or just treating yourself to a delicious meal, this recipe is sure to impress. So, roll up your sleeves, and let’s embark on this culinary adventure together!
Ingredients for Birria Quesa Tacos Recipe
Before we dive into the cooking process, let’s gather all the ingredients needed for these mouthwatering Birria Quesa Tacos. I always believe that the quality of ingredients can make or break a dish. So, let’s make sure we’re using the best!
Main Ingredients
- 2 pounds of beef chuck roast (or lamb, if you prefer)
- 4 dried guajillo chiles
- 2 dried ancho chiles
- 1 medium onion, chopped
- 4 cloves of garlic, minced
- 2 teaspoons ground cumin
- 1 teaspoon dried oregano
- 1 teaspoon black pepper
- 1 teaspoon salt (adjust to taste)
- 4 cups beef broth
- 2 cups shredded cheese (I love using Oaxaca or mozzarella for that melty goodness)
- 8 corn tortillas
- Fresh cilantro, chopped (for garnish)
- Lime wedges (for serving)
When selecting your beef, I recommend looking for well-marbled cuts. The fat will render during cooking, making the meat tender and flavorful. As for the chiles, you can often find them in the international aisle of your grocery store or at a local Mexican market. They add a beautiful depth of flavor to the dish!
Optional Add-ons
- 1 jalapeño, chopped (for a spicy kick)
- 1 tablespoon apple cider vinegar (for a tangy twist)
- Avocado slices (for creaminess)
- Radishes, thinly sliced (for crunch)
- Pickled onions (for a zesty touch)
Feel free to mix and match these optional ingredients based on your taste preferences. I often add jalapeños for an extra layer of heat, and the pickled onions bring a delightful contrast to the rich flavors of the tacos. Remember, cooking is all about experimenting and finding what you love!
How to Prepare Birria Quesa Tacos Recipe
Now that we have all our ingredients ready, it’s time to roll up our sleeves and get cooking! The process of making Birria Quesa Tacos is a labor of love, but trust me, the end result is worth every minute spent in the kitchen. Let’s break it down step by step.
Step 1: Marinating the Meat
First things first, we need to marinate our meat. This step is crucial for infusing those rich flavors into the beef. Start by toasting the dried guajillo and ancho chiles in a dry skillet over medium heat for about 2-3 minutes. You want to bring out their natural oils, but be careful not to burn them!
Once toasted, remove the chiles from the skillet and let them cool slightly. Then, place them in a blender along with the chopped onion, minced garlic, ground cumin, oregano, black pepper, and salt. Pour in about a cup of beef broth to help blend everything smoothly. Blend until you have a thick, vibrant paste.
Now, in a large bowl, combine the beef chuck roast with the chile paste. Make sure every piece of meat is well-coated. Cover the bowl with plastic wrap and let it marinate in the fridge for at least 2 hours, or overnight if you have the time. The longer, the better!
Tips for Marinating
- For maximum flavor, marinate overnight. It allows the spices to penetrate deeply.
- If you’re short on time, even 30 minutes will still add some flavor.
- Don’t skip the toasting step for the chiles; it enhances their flavor significantly!
Step 2: Cooking the Birria
Once your meat has marinated, it’s time to cook it low and slow. In a large pot or Dutch oven, heat a drizzle of oil over medium-high heat. Add the marinated beef and sear it on all sides until it’s nicely browned. This step adds a wonderful depth of flavor.
Next, pour in the remaining beef broth and bring it to a gentle simmer. Cover the pot and let it cook for about 2-3 hours, or until the meat is fork-tender. You can also use a slow cooker for this step; just set it on low and let it work its magic for 6-8 hours.
Tips for Cooking
- Check the meat occasionally and add more broth if it looks too dry.
- For a richer flavor, you can add a tablespoon of apple cider vinegar to the pot.
- Don’t rush this step; the longer it cooks, the more tender and flavorful the meat will be!
Step 3: Preparing the Tacos
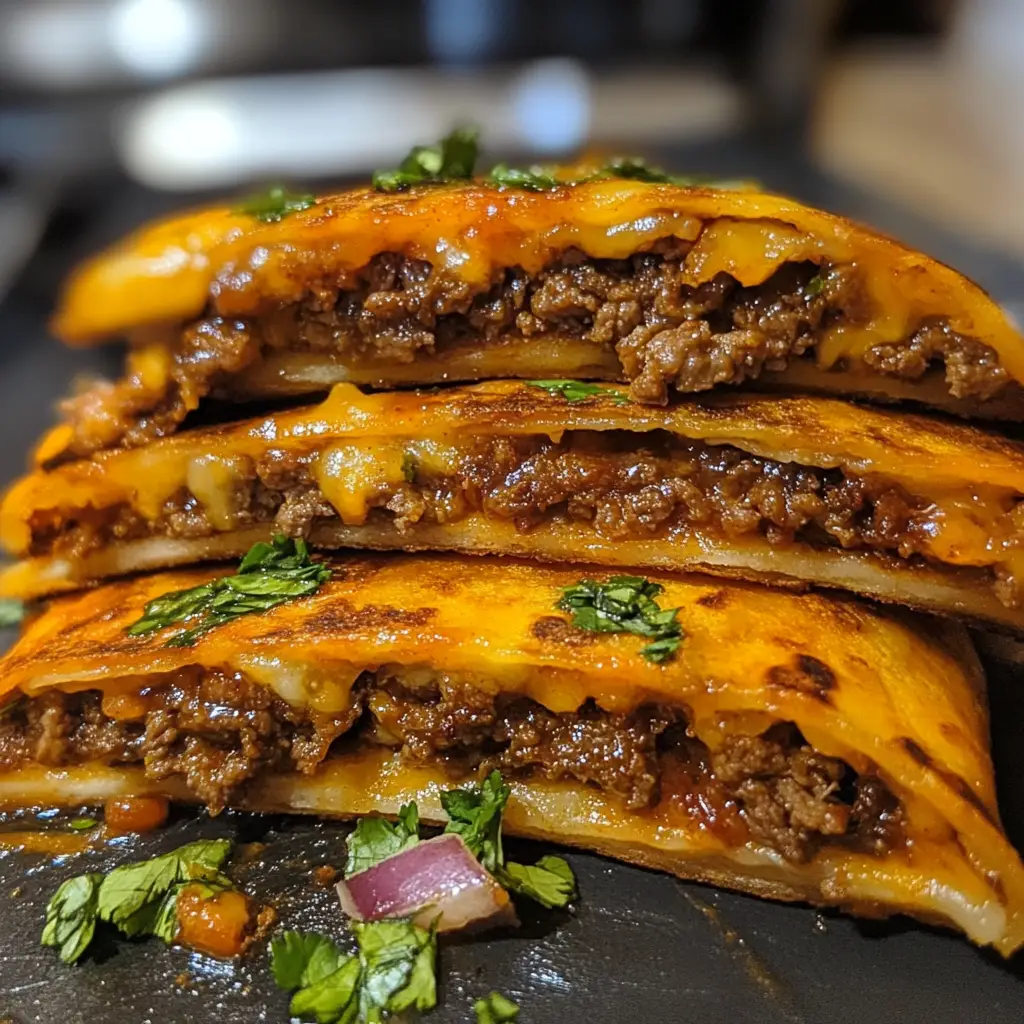
Once the meat is cooked, it’s time to assemble our tacos! Start by shredding the beef with two forks. It should fall apart easily. Now, heat a skillet over medium heat and warm the corn tortillas for about 30 seconds on each side. This makes them pliable and enhances their flavor.
To assemble, place a generous amount of shredded beef on one half of the tortilla, then sprinkle a handful of cheese on top. Fold the tortilla over to create a taco shape. You can also dip the taco in the birria broth before placing it in the skillet for an extra layer of flavor!
Tips for Assembling Tacos
- Don’t overfill the tacos; you want to be able to fold them without spilling!
- For extra crispiness, cook the tacos in a bit of oil until golden brown on both sides.
- Serve with a small bowl of the birria broth for dipping—it’s a game changer!
How to Prepare Birria Quesa Tacos Recipe
Now that we have all our ingredients ready, it’s time to roll up our sleeves and get cooking! The process of making Birria Quesa Tacos is a labor of love, but trust me, the end result is worth every minute spent in the kitchen. Let’s break it down step by step.
Step 1: Marinating the Meat
First things first, we need to marinate our meat. This step is crucial for infusing those rich flavors into the beef. Start by toasting the dried guajillo and ancho chiles in a dry skillet over medium heat for about 2-3 minutes. You want to bring out their natural oils, but be careful not to burn them!
Once toasted, remove the chiles from the skillet and let them cool slightly. Then, place them in a blender along with the chopped onion, minced garlic, ground cumin, oregano, black pepper, and salt. Pour in about a cup of beef broth to help blend everything smoothly. Blend until you have a thick, vibrant paste.
Now, in a large bowl, combine the beef chuck roast with the chile paste. Make sure every piece of meat is well-coated. Cover the bowl with plastic wrap and let it marinate in the fridge for at least 2 hours, or overnight if you have the time. The longer, the better!
Tips for Marinating
- For maximum flavor, marinate overnight. It allows the spices to penetrate deeply.
- If you’re short on time, even 30 minutes will still add some flavor.
- Don’t skip the toasting step for the chiles; it enhances their flavor significantly!
Step 2: Cooking the Birria
Once your meat has marinated, it’s time to cook it low and slow. In a large pot or Dutch oven, heat a drizzle of oil over medium-high heat. Add the marinated beef and sear it on all sides until it’s nicely browned. This step adds a wonderful depth of flavor.
Next, pour in the remaining beef broth and bring it to a gentle simmer. Cover the pot and let it cook for about 2-3 hours, or until the meat is fork-tender. You can also use a slow cooker for this step; just set it on low and let it work its magic for 6-8 hours.
Tips for Cooking
- Check the meat occasionally and add more broth if it looks too dry.
- For a richer flavor, you can add a tablespoon of apple cider vinegar to the pot.
- Don’t rush this step; the longer it cooks, the more tender and flavorful the meat will be!
Step 3: Preparing the Tacos
Once the meat is cooked, it’s time to assemble our tacos! Start by shredding the beef with two forks. It should fall apart easily. Now, heat a skillet over medium heat and warm the corn tortillas for about 30 seconds on each side. This makes them pliable and enhances their flavor.
To assemble, place a generous amount of shredded beef on one half of the tortilla, then sprinkle a handful of cheese on top. Fold the tortilla over to create a taco shape. You can also dip the taco in the birria broth before placing it in the skillet for an extra layer of flavor!
Tips for Assembling Tacos
- Don’t overfill the tacos; you want to be able to fold them without spilling!
- For extra crispiness, cook the tacos in a bit of oil until golden brown on both sides.
- Serve with a small bowl of the birria broth for dipping—it’s a game changer!
Equipment Needed for Birria Quesa Tacos Recipe
Before we dive into the cooking, let’s make sure we have the right tools at our disposal. Having the right equipment can make the process smoother and more enjoyable. Here’s what you’ll need to whip up these delicious Birria Quesa Tacos:
- Large Pot or Dutch Oven: This is essential for slow-cooking the marinated meat. If you don’t have a Dutch oven, any heavy-bottomed pot will do.
- Skillet: A non-stick or cast-iron skillet is perfect for warming tortillas and crisping up the tacos.
- Blender: A standard blender or an immersion blender will help you create that smooth chile paste. If you don’t have a blender, you can finely chop the ingredients by hand, but it will take a bit longer.
- Meat Forks: These are great for shredding the cooked beef. If you don’t have them, two regular forks will work just fine!
- Plastic Wrap: Use this to cover the bowl while marinating the meat. If you’re out of plastic wrap, a clean kitchen towel can also do the trick.
With these tools in hand, you’re all set to embark on your culinary adventure. Remember, cooking is about creativity, so feel free to adapt and use what you have available. Let’s get cooking!
Variations of Birria Quesa Tacos Recipe
As I’ve explored the world of Birria Quesa Tacos, I’ve discovered that there are so many delightful variations to try! Each twist brings a new flavor profile, making this dish even more exciting. Here are a few variations that I absolutely love:
- Chicken Birria Quesa Tacos: If you prefer poultry, swap the beef for chicken thighs. The marinating and cooking process remains the same, but the result is a lighter, yet equally delicious taco.
- Vegetarian Birria Quesa Tacos: For a meatless option, use jackfruit or mushrooms as the base. The jackfruit mimics the texture of pulled meat, while mushrooms add a rich umami flavor.
- Birria Quesa Tacos with Salsa Verde: Instead of the traditional red sauce, try topping your tacos with a fresh salsa verde. The bright, zesty flavors of tomatillos and cilantro create a refreshing contrast to the rich birria.
- Birria Quesa Tacos with Pineapple: Adding grilled pineapple to your tacos introduces a sweet and tangy element that pairs beautifully with the savory meat.
These variations not only keep things interesting but also allow you to cater to different tastes and dietary preferences. I encourage you to experiment and find your favorite version of Birria Quesa Tacos. After all, cooking is all about creativity and having fun in the kitchen!
Cooking Notes for Birria Quesa Tacos Recipe
As I’ve spent countless hours perfecting my Birria Quesa Tacos, I’ve gathered a few cooking notes that can help elevate your taco-making experience. These little tips can make a big difference in flavor and texture!
- Quality Matters: Always choose high-quality meat. Grass-fed beef or organic chicken can enhance the overall taste of your tacos.
- Broth Boost: If you have leftover broth from cooking the birria, don’t toss it! Use it as a dipping sauce for your tacos. It adds an extra layer of flavor that’s simply irresistible.
- Resting Time: After cooking, let the meat rest for about 10-15 minutes before shredding. This allows the juices to redistribute, making the meat even more tender and juicy.
- Cheese Choices: While Oaxaca cheese is traditional, feel free to experiment with other melting cheeses like Monterey Jack or even pepper jack for a spicy kick!
- Make Ahead: You can prepare the birria a day in advance. The flavors deepen overnight, making your tacos even more delicious when you’re ready to serve.
These cooking notes are like little nuggets of wisdom I’ve picked up along the way. They help me create the best Birria Quesa Tacos, and I hope they do the same for you! Happy cooking!
Serving Suggestions for Birria Quesa Tacos Recipe
Now that we’ve crafted these delicious Birria Quesa Tacos, it’s time to think about how to serve them for maximum enjoyment! Presentation can elevate the experience, and I love to make my taco nights feel special. Here are some serving suggestions that I’ve found to be crowd-pleasers:
- Garnish with Freshness: Top your tacos with freshly chopped cilantro and a squeeze of lime. The bright flavors cut through the richness of the meat and cheese, creating a delightful balance.
- Side Dishes: Serve your tacos alongside a refreshing Mexican street corn salad or a simple avocado salad. These sides complement the tacos beautifully and add a burst of color to your table.
- Broth for Dipping: Don’t forget to serve a small bowl of the birria broth on the side. Dipping the tacos into the warm broth adds an extra layer of flavor that’s simply irresistible!
- Hot Sauce: For those who enjoy a bit of heat, offer a selection of hot sauces. A drizzle of your favorite sauce can take these tacos to the next level!
- Creative Plating: Arrange the tacos on a colorful platter, and add lime wedges and extra garnishes around them. It makes for a beautiful presentation that’s sure to impress your guests.
These serving suggestions not only enhance the flavors but also create a festive atmosphere. Whether it’s a casual dinner or a special gathering, these tacos are sure to steal the show!
Tips for Making the Best Birria Quesa Tacos Recipe
As I’ve journeyed through the world of Birria Quesa Tacos, I’ve picked up a few golden tips that can truly elevate your taco game. These little secrets can make a big difference in flavor and texture, ensuring that every bite is a burst of deliciousness!
- Don’t Rush the Marinade: Allowing the meat to marinate overnight is ideal. This gives the spices time to work their magic, resulting in a more flavorful taco.
- Use Fresh Ingredients: Fresh herbs, spices, and quality meat can transform your tacos. I always opt for fresh cilantro and ripe limes for that zesty kick!
- Perfect Your Tortilla Technique: Warm your tortillas just before serving. This keeps them pliable and enhances their flavor. A quick toast in a dry skillet works wonders!
- Experiment with Cheese: While Oaxaca cheese is traditional, don’t hesitate to try different melting cheeses. A blend of cheeses can add depth and richness to your tacos.
- Serve with Love: Presentation matters! Arrange your tacos beautifully on a platter, and don’t forget the garnishes. A little extra effort goes a long way in impressing your guests.
These tips are like little treasures I’ve discovered along my cooking journey. They help me create the best Birria Quesa Tacos, and I hope they inspire you to make your own delicious version!
Breakdown of Time for Birria Quesa Tacos Recipe
When it comes to making Birria Quesa Tacos, timing is everything! I’ve learned that understanding the time commitment can help you plan your cooking adventure better. Here’s a quick breakdown of the time you’ll need:
- Prep Time: 30 minutes. This includes gathering your ingredients, marinating the meat, and preparing the chile paste. If you can marinate overnight, it’s even better!
- Cooking Time: 2-3 hours. This is the time it takes to cook the meat until it’s tender and bursting with flavor. If you’re using a slow cooker, it may take 6-8 hours on low.
- Total Time: Approximately 3-4 hours. This includes both prep and cooking time. If you marinate overnight, you can enjoy your tacos the next day with minimal effort!
By breaking it down this way, you can easily fit this delicious recipe into your schedule. Whether you’re planning a cozy dinner or a festive taco night, knowing the time involved helps you enjoy the process even more. Happy cooking!
Nutritional Information for Birria Quesa Tacos Recipe
As a passionate home cook, I always find it important to know what goes into my meals. Birria Quesa Tacos are not only delicious but can also be a balanced option when enjoyed in moderation. Here’s a general breakdown of the nutritional information for one serving (two tacos) of Birria Quesa Tacos:
- Calories: Approximately 450-500 calories
- Protein: 30-35 grams
- Fat: 25-30 grams (depending on the type of cheese and meat used)
- Carbohydrates: 30-35 grams
- Fiber: 2-3 grams
- Sodium: 800-1000 mg (varies based on added salt and broth)
These tacos are rich in protein, thanks to the beef and cheese, making them a filling meal. The use of fresh ingredients, like cilantro and lime, adds vitamins and minerals, enhancing the overall nutritional profile. Just remember, balance is key! Pair your tacos with a fresh salad or some veggies to round out your meal. Enjoying Birria Quesa Tacos can be a delightful experience that satisfies both your taste buds and your nutritional needs!
Frequently Asked Questions about Birria Quesa Tacos Recipe
As I’ve shared my love for Birria Quesa Tacos, I often get questions from fellow food enthusiasts eager to try their hand at this delicious dish. Here are some of the most common questions I’ve encountered, along with my answers to help you on your culinary journey!
What type of meat is best for Birria Quesa Tacos?
While beef chuck roast is the traditional choice, you can also use lamb or even chicken for a lighter option. Each type of meat brings its own unique flavor, so feel free to experiment and find what you love best!
Can I make Birria Quesa Tacos ahead of time?
Absolutely! You can prepare the birria a day in advance. In fact, letting it sit overnight allows the flavors to deepen, making your tacos even more delicious when you’re ready to serve.
How do I store leftovers?
If you have any leftovers, store the birria in an airtight container in the fridge for up to 3 days. Reheat gently on the stove or in the microwave before assembling your tacos again. The flavors will still be fantastic!
Can I freeze Birria Quesa Tacos?
Yes, you can freeze the cooked birria! Just let it cool completely, then transfer it to a freezer-safe container. It can last for up to 3 months in the freezer. When you’re ready to enjoy, thaw it in the fridge overnight and reheat before serving.
What can I serve with Birria Quesa Tacos?
These tacos pair wonderfully with a variety of sides! I love serving them with Mexican street corn salad, avocado salad, or a simple side of rice and beans. Don’t forget to include a small bowl of the birria broth for dipping!
Can I make Birria Quesa Tacos vegetarian?
Definitely! You can use jackfruit or mushrooms as a meat substitute. Both options provide a delicious texture and flavor that complements the spices beautifully. Just follow the same marinating and cooking steps for the best results!
These FAQs are just a glimpse into the wonderful world of Birria Quesa Tacos. I hope they help you feel more confident as you embark on your cooking adventure. Remember, cooking is all about having fun and making it your own!
Conclusion on Birria Quesa Tacos Recipe
In conclusion, Birria Quesa Tacos are more than just a meal; they are a delightful experience that brings people together. The combination of tender, marinated meat, gooey cheese, and crispy tortillas creates a flavor explosion that is hard to resist. As I’ve shared my journey of making these tacos, I hope you feel inspired to embark on your own culinary adventure.
Whether you’re cooking for family, friends, or just treating yourself, these tacos are sure to impress. The process may take some time, but the rewards are well worth it. With each bite, you’ll savor the rich flavors and the love that goes into making them. So, gather your ingredients, roll up your sleeves, and let the magic of Birria Quesa Tacos fill your kitchen with warmth and joy. Happy cooking!


1 thought on “Birria Quesa Tacos: Discover the Ultimate Recipe Today!”