
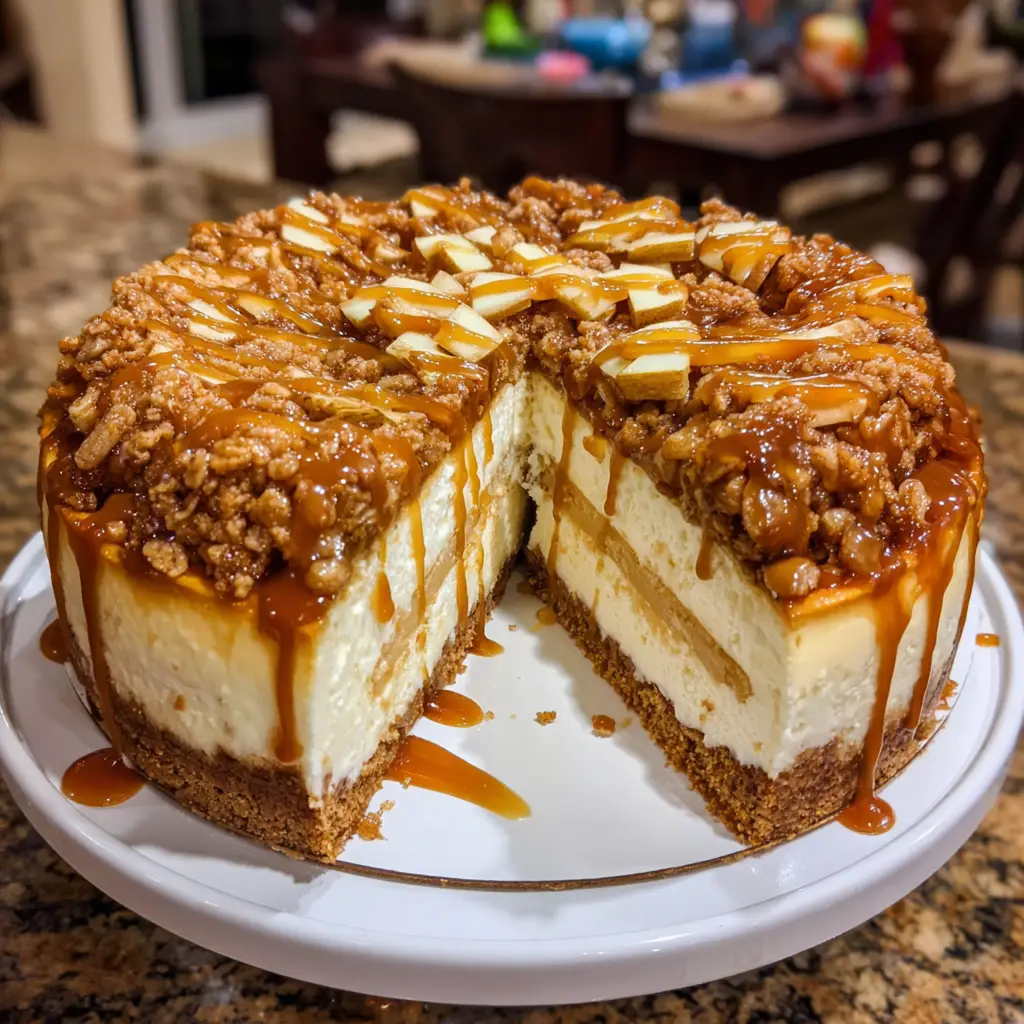
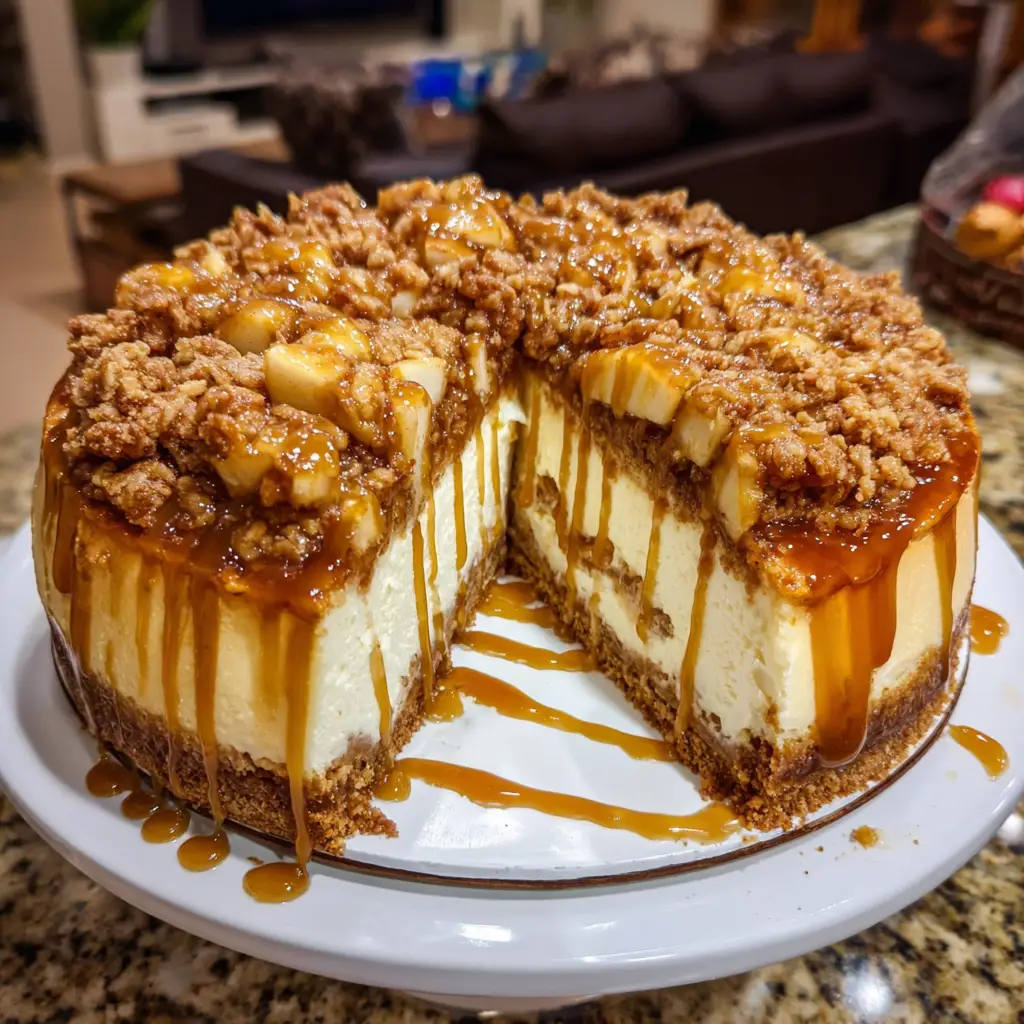
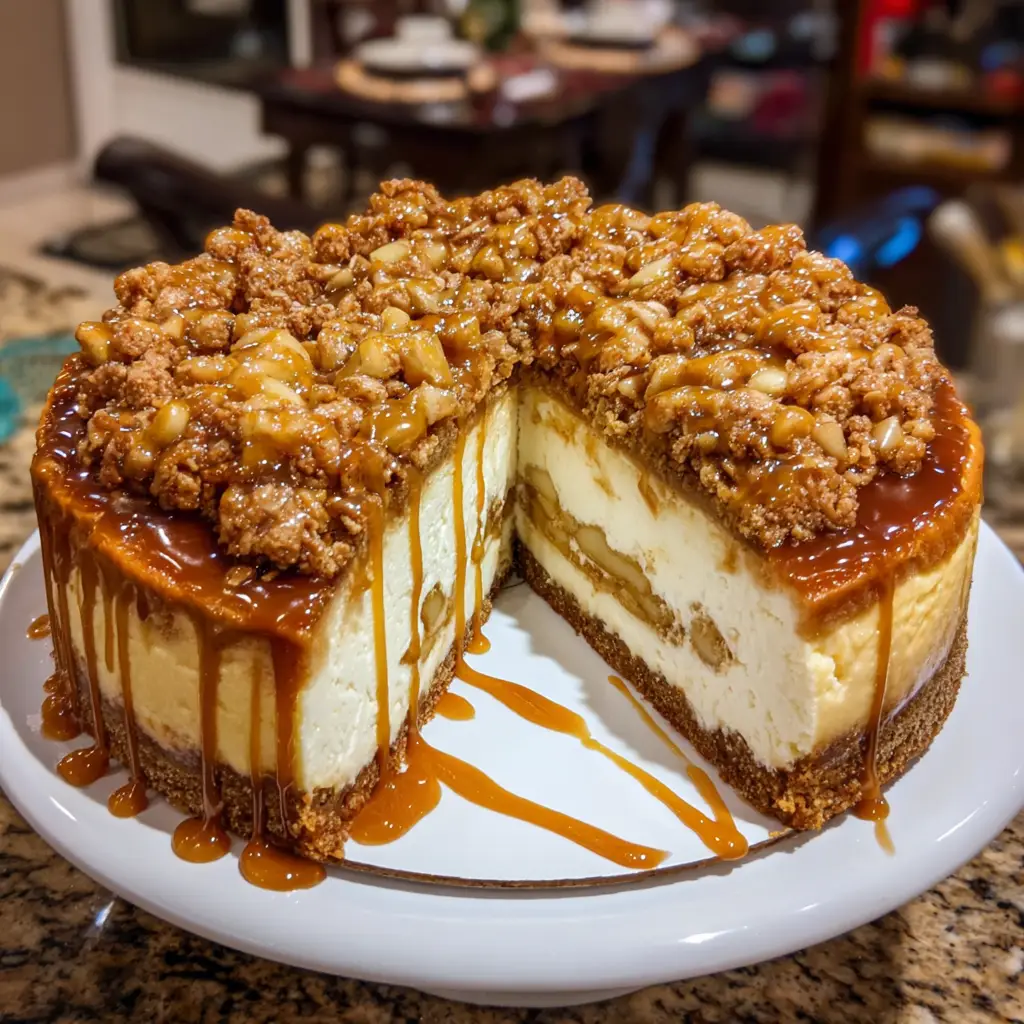
Imagine two of the most beloved desserts of all time, the rich, creamy, and tangy indulgence of a New York cheesecake and the warm, spiced, and comforting embrace of a classic apple crisp, merging into one singular, show-stopping masterpiece. This is Apple Crisp Cheesecake. It is the ultimate fusion dessert, a culinary triumph that layers a buttery, spiced apple pie filling over a velvety smooth cheesecake base, all crowned with a generous, crunchy brown sugar and oat streusel topping. This dessert is not just a pie and not just a cheesecake; it is an experience, a celebration of texture and flavor that is greater than the sum of its parts.
Why Is This Apple Crisp Cheesecake So Popular?
The popularity of Apple Crisp Cheesecake is a direct result of its genius combination of two universal comfort foods. First, it taps into a powerful vein of dessert nostalgia. The flavors of creamy cheesecake and spiced apple crisp are individually iconic and deeply comforting. Combining them creates a dessert that feels both familiar and excitingly novel, satisfying multiple cravings at once.
Secondly, it is a textural wonderland. The contrast between the dense, creamy cheesecake, the tender fruit, and the crisp, crumbly streusel is a multi-sensory experience that is far more exciting than a single-texture dessert. Every bite is a new combination. Furthermore, its visual “wow” factor is a huge draw. A beautifully sliced piece of this cheesecake, with its visible layers and golden-brown topping, is a stunning centerpiece that looks like it came from a professional patisserie, guaranteeing admiration from everyone who sees it.
Why You’ll Love This Apple Crisp Cheesecake:
You will love this recipe for the sheer satisfaction of creating a dessert that is both impressive and deeply delicious. You will love the layered, creative process—pressing the crust, smoothing the cheesecake batter, artfully arranging the spiced apples, and sprinkling the streusel. You will love the aromatic symphony that will fill your kitchen, from the sweet scent of the graham crust to the warm, spiced aroma of the baking apples and cinnamon.
You will love the control you have over the ingredients, from selecting the perfect baking apples to toasting the oats and nuts for the topping. You will love the chorus of delight it elicits; this is a dessert that people remember and request for years to come. Most of all, you will love having a legendary, show-stopping recipe in your repertoire that is as rewarding to make as it is to devour.
Here’s what you’ll need:
This recipe is built in four distinct layers, each requiring specific ingredients for the perfect result.
For the Graham Cracker Crust:
-
2 cups (about 200g) graham cracker crumbs
-
1/3 cup (67g) granulated sugar
-
1/2 cup (1 stick / 113g) unsalted butter, melted
For the Cheesecake Layer:
-
24 ounces (three 8-oz blocks) full-fat cream cheese, at room temperature
-
1 cup (200g) granulated sugar
-
1 cup (240g) full-fat sour cream, at room temperature
-
3 large eggs, at room temperature
-
1 tablespoon all-purpose flour
-
2 teaspoons pure vanilla extract or vanilla bean paste
For the Apple Crisp Layer:
-
3-4 medium baking apples (such as Granny Smith, Honeycrisp, or Braeburn), peeled, cored, and thinly sliced
-
3 tablespoons light brown sugar
-
1 tablespoon all-purpose flour
-
1 teaspoon ground cinnamon
-
1/4 teaspoon ground nutmeg
-
1 tablespoon lemon juice
For the Crisp Topping:
-
3/4 cup (95g) all-purpose flour
-
3/4 cup (150g) light brown sugar, packed
-
1/2 cup (45g) old-fashioned rolled oats
-
1/2 cup (1 stick / 113g) unsalted butter, cold and cubed
-
1/2 teaspoon ground cinnamon
-
1/4 teaspoon salt
-
Optional: 1/2 cup chopped pecans or walnuts
How to Make Apple Crisp Cheesecake:
Now that you have your ingredients ready, let’s dive into the steps for making this delightful Apple Crisp Cheesecake. It’s as easy as pie, and I promise you’ll feel like a culinary superstar!
Step 1: Prepare the Pan and Preheat Oven
Preheat your oven to 325°F (160°C). Grease the bottom and sides of a 9-inch springform pan. For extra security against leaks, you can wrap the outside of the pan in a double layer of heavy-duty aluminum foil.
Step 2: Make and Bake the Crust
In a medium bowl, combine the graham cracker crumbs and 1/3 cup sugar. Pour in the melted butter and stir until the mixture resembles wet sand and holds together when pinched. Press the mixture firmly and evenly into the bottom and about halfway up the sides of the prepared springform pan. Use the flat bottom of a measuring cup to compact it. Bake for 10 minutes, then remove and let it cool slightly. Leave the oven on.
Step 3: Prepare the Apple Filling
In a large bowl, toss the thinly sliced apples with lemon juice. Add the 3 tablespoons of brown sugar, 1 tablespoon of flour, cinnamon, and nutmeg. Toss until every apple slice is evenly coated. Set aside.
Step 4: Create the Cheesecake Filling
In the bowl of a stand mixer fitted with the paddle attachment (or using a hand mixer), beat the room-temperature cream cheese and 1 cup of granulated sugar on medium speed until completely smooth and creamy, about 3 minutes. Scrape down the bowl and beater. Add the sour cream, flour, and vanilla extract, and beat until combined. Add the eggs one at a time, beating on low speed until just incorporated after each addition. Do not overmix after adding the eggs.
Step 5: Assemble the First Two Layers
Pour the cheesecake filling into the cooled crust and smooth the top with a spatula.
Step 6: Create the Crisp Topping
In a separate bowl, combine the 3/4 cup flour, 3/4 cup brown sugar, oats, cinnamon, and salt. Add the cold, cubed butter. Using a pastry cutter, your fingers, or a fork, work the butter into the dry ingredients until the mixture is crumbly and the butter is about the size of peas. Stir in the optional nuts.
Step 7: Assemble the Final Layers
Carefully arrange the spiced apple slices evenly over the top of the cheesecake layer. You can create a neat pattern or simply scatter them. Evenly sprinkle the crisp topping over the apples.
Step 8: Bake in a Water Bath (Recommended)
Place the springform pan into a larger roasting pan. Pour hot water into the roasting pan until it comes about halfway up the sides of the springform pan. This water bath creates a humid environment, preventing cracks and ensuring an ultra-creamy texture. Bake for 1 hour and 15 minutes to 1 hour and 30 minutes. The edges of the cheesecake will be set, but the center will still have a slight jiggle.
Step 9: Cool Slowly and Chill
Turn off the oven, crack the door open, and let the cheesecake cool inside for 1 hour. This gradual temperature change helps prevent cracking. Remove from the oven and water bath, and cool completely on a wire rack. Then, refrigerate for at least 6 hours, or preferably overnight, to allow it to fully set.
Step 10: Serve and Enjoy
Run a thin knife around the edge of the cheesecake before releasing the springform pan collar. Slice with a sharp, warm knife for clean cuts. Serve cold or at room temperature.
Tips for Success:
-
Room Temperature is Key: This is the most important rule for a smooth, lump-free cheesecake. Cold cream cheese will never become perfectly smooth.
-
Don’t Overmix: Once you add the eggs, mix on low speed and only until combined. Overmixing incorporates too much air and can cause the cheesecake to puff and crack.
-
Apple Choice: Use a mix of tart (Granny Smith) and sweet (Honeycrisp) apples for a more complex flavor and better texture that holds its shape.
-
The Water Bath is Your Friend: Do not skip the water bath if you want a professional, crack-free, creamy texture. The foil wrap is crucial to prevent water seepage.
Equipment Needed:
-
9-inch Springform Pan
-
Stand Mixer or Hand Mixer
-
Large Roasting Pan (for water bath)
-
Aluminum Foil
-
Mixing Bowls (various sizes)
-
Pastry Cutter or Fork
-
Measuring Cups and Spoons
Variations of Apple Crisp Cheesecake:
-
Salted Caramel Apple Crisp Cheesecake: Drizzle 1/2 cup of salted caramel sauce over the apple layer before adding the crisp topping.
-
Pear Ginger Crisp Cheesecake: Substitute the apples with ripe, peeled and sliced pears, and add 1 tablespoon of freshly grated ginger to the fruit layer.
-
Pumpkin Apple Crisp Cheesecake: Replace one block of cream cheese with 1 cup of pumpkin purée and add pumpkin pie spice to the cheesecake batter.
-
Streusel-Only Version: For a simpler approach, omit the apple layer and simply sprinkle the crisp topping directly over the cheesecake batter before baking.
Serving Suggestions for Apple Crisp Cheesecake:
This dessert is a complete experience on its own, but a few simple accompaniments can elevate it further.
-
A La Mode: A scoop of high-quality vanilla bean ice cream is the classic and perfect pairing.
-
With a Dollop: A generous cloud of freshly whipped cream is a light and elegant complement.
-
Caramel Drizzle: Warm up extra caramel sauce and drizzle it over each slice just before serving.
-
A Dusting of Cinnamon: A light dusting of cinnamon or powdered sugar adds a final touch of beauty.
Prep Time:
45 minutes
Cooking Time:
1 hour 30 minutes
Total Time:
2 hours 15 minutes (plus at least 6 hours chilling time)
Nutritional Information:
(Per slice, based on 12 slices, estimated.)
-
Calories: ~580
-
Protein: 8g
-
Sodium: 380mg
-
Sugar: 45g
-
Fat: 35g
-
Carbohydrates: 60g
-
Fiber: 2g
FAQs about Apple Crisp Cheesecake:
Q: Can I make this without a springform pan?
A: It is not recommended. The high sides and removable collar are essential for getting the cheesecake out in one piece. A deep 9-inch cake pan would be very difficult to use.
Q: My cheesecake cracked. What did I do wrong?
A: Cracking is usually caused by overmixing, a sudden temperature change, or the oven being too hot. The water bath is the best defense. Don’t worry—the crisp topping will hide most cracks beautifully!
Q: Can I use a different fruit?
A: Absolutely! Peaches, cherries, or a berry mix would all work wonderfully. Adjust the sugar in the fruit layer based on the sweetness of your chosen fruit.
Q: How long does this cheesecake last?
A: Covered tightly in the refrigerator, it will last for up to 5 days. The flavors actually improve after a day or two.
Q: Can I freeze Apple Crisp Cheesecake?
A: Yes, but with caution. Freeze the fully chilled, undecorated cheesecake (without any whipped cream) on a tray until solid, then wrap tightly in plastic wrap and foil. Freeze for up to 2 months. Thaw overnight in the refrigerator. The texture of the topping may soften slightly.
Final Thoughts:
Apple Crisp Cheesecake is more than a dessert; it is a celebration of culinary ambition and comfort. It represents the joy of taking two classic, beloved treats and weaving them together into something truly extraordinary. From the meticulous layering to the patient chilling and the final, breathtaking reveal, this recipe is a rewarding journey that culminates in a dessert of legendary status. So, clear your schedule, embrace the process, and prepare to create a new, show-stopping classic that will have everyone asking for the recipe and savoring every single, sublime bite.


