
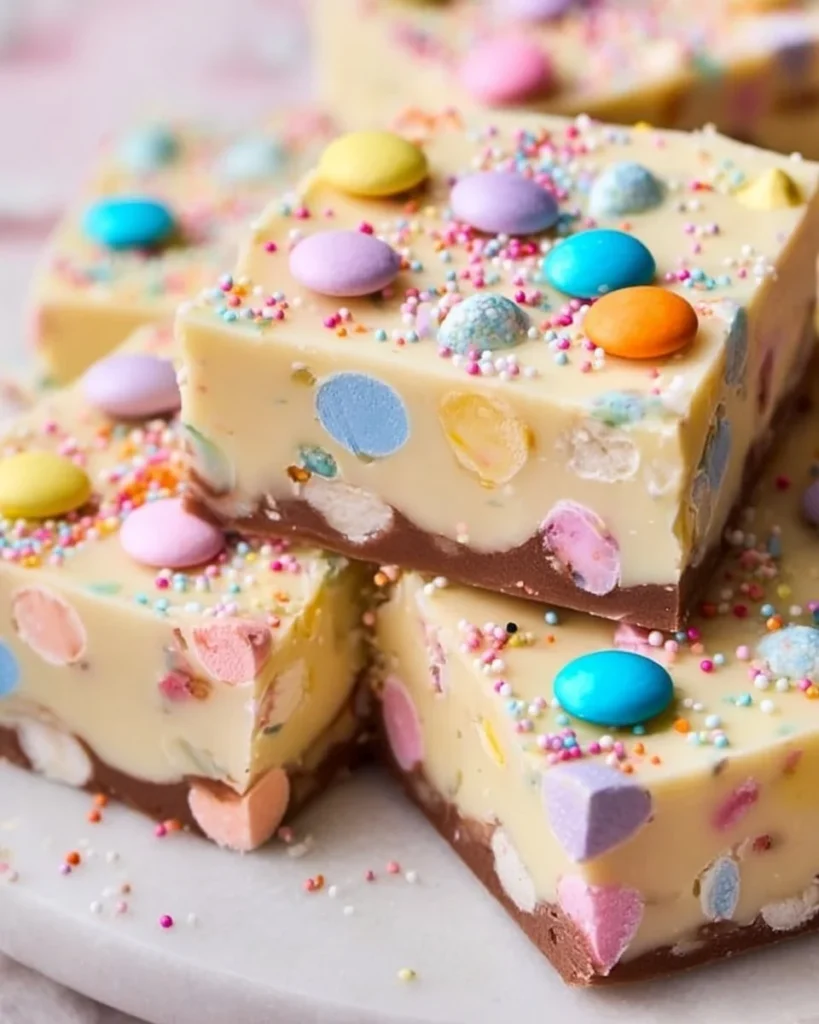
Easter is a time of renewal, joy, and indulgence, and what better way to celebrate the occasion than by delighting your taste buds with a batch of homemade Easter Fudge? Imagine taking a bite into a luscious piece of fudge, where the smooth creaminess of white chocolate melts effortlessly on your tongue, followed by bursts of colorful pastel candies that add a delightful crunch. The sweetness envelops your senses, bringing forth an overwhelming sensation of happiness. Each piece encapsulates the spirit of Easter, making them a whimsical addition to any festive gathering.
As you prepare this easy yet decadent treat, your kitchen fills with the delicious aroma of melting chocolate, creating the perfect backdrop for laughter and joy. This isn’t just a recipe; it’s an experience that beckons family and friends together, inviting them to share more than just a dessert but also sweet memories. Once you serve these vibrant squares, watch as smiles spread across faces, and hearts light up with the simple pleasure that only something homemade can bring.
Why You’ll Love This Easter Fudge
This delightful Easter Fudge captures the essence of the holiday in every bite. Its creamy base leads to a colorful explosion of flavor and texture, making it a standout treat for spring celebrations. Here are a few reasons to fall in love with this recipe:
-
A Taste of Joy: Each mouthful delivers a balanced sweetness paired with the delightful crunch of pastel candies. Together, they create a symphony of taste that dances on your palate.
-
Perfect for Any Celebration: Whether you’re enjoying an Easter brunch, a garden party, or simply want a sweet treat, this fudge fits right in. Its vibrant hues add a festive touch to various occasions, elevating any dessert table.
-
No Fancy Ingredients Required: With just a handful of easy-to-find ingredients, you don’t need to be a culinary wizard to whip up this indulgence. It embodies simplicity while still providing the satisfaction of a gourmet dessert.
-
A Treat for All Ages: From tiny tots to wise seniors, everyone enjoys this fudge. Its playful colors and luscious texture appeal to kids, while adults glow with nostalgia for their own childhood treats.
Preparation Phase & Tools to Use
Before diving into the mouthwatering process of making your Easter Fudge, gather these essential tools that will elevate your candy-making game:
-
Saucepan: A sturdy, heavy-bottomed saucepan helps prevent chocolate from burning. This ensures a smooth, luscious melt.
-
Spatula: A silicone spatula is ideal for mixing and scraping. It helps to thoroughly combine ingredients while keeping your mixture silky and smooth.
-
8×8 Inch Baking Dish: Opt for a square dish that’s easy to line with parchment paper, providing the perfect base for your fudge to set.
-
Parchment Paper: Lining your baking dish with parchment ensures easy removal of the fudge and minimizes cleanup. A key ingredient in achieving fudge perfection!
-
Refrigerator: Taking the time to chill your fudge in the fridge allows it to firm up beautifully, making it easy to cut into glorious squares.
Ingredients for Easter Fudge
Here’s what you need to create this decadent treat, along with a bit about each ingredient:
-
2 cups white chocolate chips: These creamy morsels form the foundation of your fudge. If you’re after a dairy-free option, choose non-dairy white chocolate chips!
-
1 can (14 oz) sweetened condensed milk: This sweet elixir provides a rich and creamy base that binds everything together. Opt for a low-fat version if desired, but don’t skip this essential ingredient.
-
1 teaspoon vanilla extract: A splash of vanilla enhances the overall flavor profile, offering warmth and depth. Feel free to experiment with almond or hazelnut extracts for a unique twist!
-
1 cup pastel candies: The star of your fudge that adds color and crunch! Think M&M’s or sprinkles. Use what you have or choose seasonal decorations for a festive flair.
-
Pinch of salt: A tiny amount of salt balances the sweetness and highlights the rich flavors, ensuring each bite is perfectly harmonious.
How to Make Easter Fudge
Creating this delectable fudge is both simple and rewarding. Follow these step-by-step instructions to bring your confectionery dreams to life:
-
Prepare Your Dish: Begin by lining your 8×8 inch baking dish with parchment paper, ensuring that the edges hang over for easy removal later.
-
Melt the Base: In a saucepan over low heat, combine the white chocolate chips and sweetened condensed milk. Stir gently until the mixture melts and transforms into a smooth, velvety texture. The aroma of sweet white chocolate fills the air, tantalizing your senses.
-
Enhance the Flavor: Remove the saucepan from heat and mix in the vanilla extract and a pinch of salt. Stir until combined, allowing the vanilla to weave its magic throughout the fudgy base.
-
Fold in the Color: Gently fold in the pastel candies, being careful not to crush them. This step adds visual appeal and a delightful crunch to each piece of fudge.
-
Spread the Love: Pour the fudge mixture into the prepared dish, using the spatula to spread it evenly across the surface. The colorful candies peek through, promising joy in each bite.
-
Chill to Perfection: Place the dish in the refrigerator and let the fudge set for at least 2 hours. This step allows the flavors to meld and the fudge to firm up into delicious squares.
-
Cut and Serve: Once set, lift the fudge out using the overhanging parchment and cut into bite-sized squares. Serve with love, and watch as your guests dive into this sweet delight.
Chef’s Notes & Helpful Tips
-
Make-Ahead Magic: Feel free to prepare the fudge a day in advance, allowing the flavors to develop even further while saving you time on dessert day.
-
Cooking Alternatives: If you’re feeling adventurous, try utilizing an air fryer for a unique spin! Adjust cooking times, as air fryers vary, but generally approach as you would with a traditional oven.
-
Customization Ideas: Experiment with different nuts or dried fruits, or even a swirl of natural peanut butter for an added layer of flavor. You could also use dark chocolate for a richer version.
Common Mistakes to Avoid
Creating the perfect fudge comes with its own set of challenges. Here are common pitfalls and how to avoid them:
-
Overheating the Chocolate: Chocolate can seize if overheated. Always melt on low heat, stirring continuously to maintain a smooth consistency.
-
Not Letting it Set: Patience is key! Skipping the refrigeration step can result in a fudge that’s too soft and won’t hold its shape.
-
Skipping the Parchment Paper: Attempting to remove the fudge without lining the dish can lead to disaster. Always use parchment to ensure clean removal and simple cutting.
What to Serve With Easter Fudge
Easter Fudge shines on its own, but it pairs beautifully with various accompaniments. Consider trying these delightful combinations:
-
Fresh Berries: Ripe strawberries or tangy raspberries add a refreshing contrast to the sweetness of the fudge.
-
Coffee or Tea: Pair a rich cup of coffee or herbal tea with fudge for an adult treat that feels indulgent.
-
Vanilla Ice Cream: A scoop of smooth vanilla ice cream brings a cool and creamy balance, transforming your fudge into an irresistible sundae.
-
Nut Butter: Serve with a drizzle of almond or peanut butter for an extra layer of flavor and a contrast of textures.
-
Whipped Cream: Top each fudge square with a dollop of fresh whipped cream to bring an airy, light touch.
-
Cheese Platter: Create a dessert cheese board with mild cheeses, nuts, and dried fruits alongside the fudge for a sophisticated pairing.
-
Cocktails: Pair with a light, fruity cocktail to enhance the festive atmosphere even more!
Storage & Reheating Instructions
Storing your Easter Fudge properly ensures you enjoy its deliciousness for days to come:
-
Fridge: Keep cut fudge in an airtight container in the refrigerator for up to one week. The cool temperature maintains its gooey texture.
-
Freezer: For longer storage, freeze individual squares in a freezer-safe bag or container for up to three months. Thaw overnight in the refrigerator before serving.
-
Reheating: If you enjoy fudge warm, pop it in the microwave for a few seconds. Please note that reheating may make it slightly softer.
Estimated Nutrition Information
Each square of delight contains approximately:
- Calories: 120
- Total Fat: 6g
- Carbohydrates: 15g
- Sugars: 12g
- Protein: 1g
(Disclaimer: These values are estimates and can vary based on the specific ingredients used.)
FAQs
Can I use other types of chocolate?
Absolutely! Milk chocolate or semi-sweet chocolate can be used instead, but adjust the sugar accordingly for balance.
How long does this fudge last?
When stored properly in the fridge, you can enjoy it for up to a week. If frozen, it lasts for up to three months.
Can I add different mix-ins?
Certainly! Consider coconut flakes, crushed nuts, or even crushed cookies for added texture and flavor.
How do I soften fudge that became too hard?
If your fudge is too firm, allow it to sit at room temperature for a few minutes or microwave it in short intervals (5 seconds) until it softens slightly.
Is this recipe suitable for vegans?
Yes! Use plant-based white chocolate and ensure the sweetened condensed milk is dairy-free for a vegan-friendly version.
Conclusion
Indulging in homemade Easter Fudge invites a little magic into your celebrations. With its vibrant flavors, creamy texture, and festive spirit, this fudge promises not just to delight your palate but to create cherished memories with each bite. As you gather with loved ones this spring, let this sweet treat be a centerpiece of joy, laughter, and fun. So, roll up those sleeves, gather your ingredients, and get ready to create a confection that embodies the happiness of the season. Your taste buds and your heart will thank you!
Print
Easter Fudge
- Total Time: 125 minutes
- Yield: 16 servings 1x
- Diet: Vegetarian
Description
Celebrate Easter with homemade Easter Fudge, a creamy white chocolate treat packed with colorful pastel candies.
Ingredients
- 2 cups white chocolate chips
- 1 can (14 oz) sweetened condensed milk
- 1 teaspoon vanilla extract
- 1 cup pastel candies
- Pinch of salt
Instructions
- Prepare your dish: Line an 8×8 inch baking dish with parchment paper, allowing edges to hang over.
- Melt the base: In a saucepan over low heat, combine white chocolate chips and sweetened condensed milk. Stir until smooth.
- Enhance the flavor: Mix in vanilla extract and a pinch of salt off the heat.
- Fold in the pastel candies gently.
- Spread the mixture evenly in the prepared dish using a spatula.
- Chill in the refrigerator for at least 2 hours to set.
- Cut into bite-sized squares and serve.
Notes
Make-ahead options are available; save time by preparing the fudge one day in advance.
- Prep Time: 15 minutes
- Cook Time: 10 minutes
- Category: Dessert
- Method: Chilling
- Cuisine: American
Nutrition
- Serving Size: 1 square
- Calories: 120
- Sugar: 12g
- Sodium: 50mg
- Fat: 6g
- Saturated Fat: 4g
- Unsaturated Fat: 2g
- Trans Fat: 0g
- Carbohydrates: 15g
- Fiber: 0g
- Protein: 1g
- Cholesterol: 10mg
Keywords: Easter fudge, white chocolate, festive dessert, spring treat, homemade fudge


