
Creating a DIY Öl- und Wasser-Dichteturm isn’t just an experiment; it’s a delightful journey into the world of science that enchants both minds and hearts. Picture a table scattered with vibrant colors, sparkling liquids, and the thrill of discovery dancing in the air. The moment you gather the ingredients and begin layering oil and water, a beautiful spectacle unfolds, captivating curious little eyes. Each splash and swirl invites creativity, as children explore the incredible science behind why these two liquids refuse to blend, transforming an ordinary day into extraordinary fun!
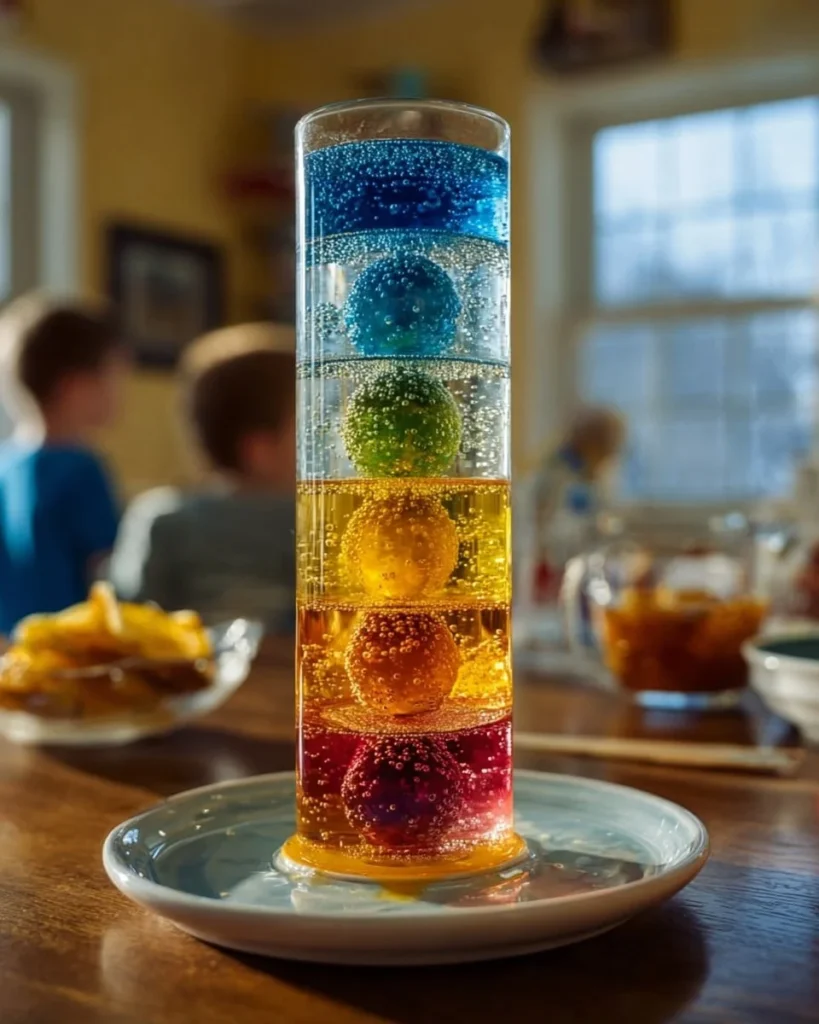
Imagine the excitement as you build your very own colorful tower, each layer vividly defined, showcasing its unique hues. This hands-on experience not only dazzles but also feeds a child’s curiosity about nature’s fascinating forces. The textures shift with each layer—smooth and slippery oil meets the sheer fluidity of water—creating a lush landscape that is both educational and entertaining. Every twist of a bottle and tilt of a glass unlocks newfound knowledge, making this project the pinnacle of fun and learning.
Why You’ll Love This DIY Öl- und Wasser-Dichteturm
This vibrant scientific creation stands out for many reasons. First and foremost, it serves as an accessible introduction to fundamental scientific concepts such as density and buoyancy, lessons that stick with children long after the project is complete. The simple yet engaging nature of this activity makes it perfect for rainy days, birthday parties, or afternoons with friends—turning ordinary moments into memorable adventures.
The DIY Öl- und Wasser-Dichteturm fosters creativity, allowing kids to experiment with colors and layering. It is visually striking, with cascading colors forming mini aquariums in their glass. Children will feel pride in crafting their unique masterpieces while gaining valuable insight into science and art. Plus, it keeps young minds engaged, igniting a passion for exploration that can last a lifetime.
Preparation Phase & Tools to Use
To create this eye-catching tower, gather some essential tools that amplify your experience.
- Clear Glass or Plastic Containers: The transparent nature of these containers allows for the majestic layers to shine, providing a front-row seat to the spectacle you’re creating. Choose various sizes and shapes for fun variations.
- Spoon or Stirring Stick: You’ll need a simple tool to help gently combine colors and create those perfect layers. Select a wooden stick or a disposable plastic spoon; both work well.
- Food Coloring: Make this project pop! Choose a range of your favorite colors or even mix your own to create a unique palette that reflects your child’s personality.
- Dropper or Small Funnel: To master delicate layering without disrupting the process, a dropper or funnel works wonders. It allows control and precision, ensuring those beautiful layers remain distinct.
Before starting, ensure your workspace is well-covered to avoid any spills, and enlist your little scientist’s help in selecting colors and containers. This project is all about exploration and fun!
Ingredients for DIY Öl- und Wasser-Dichteturm
- Vegetable Oil: This will form the top layer due to its lighter density. Feel free to use other oils like olive or coconut for an aromatic twist!
- Water: Use plain tap water, but you can enhance its appearance by adding food coloring for vibrant layers.
- Food Coloring: The key to customizing your project! Any color works, allowing for a creative mix or a rainbow of hues.
- Optional Add-ins: Glitter or small floating objects like beads can be introduced to enhance the visual excitement.
How to Make DIY Öl- und Wasser-Dichteturm
- Prepare Your Workspace: Lay down a protective cover to catch any drips. Gather your containers and tools nearby to ensure easy access through the experiment.
- Add Water: Fill your chosen container about halfway with water. Let your child help by pouring it in gently. It creates a great opportunity to discuss how water feels and looks.
- Color the Water: Add a few drops of food coloring into the water. Swirl it gently with the spoon to mix, creating a beautiful, tinted layer.
- Pour the Oil: Slowly and steadily, add vegetable oil on top of the colored water using a dropper or small funnel. Aim to do this very slowly to retain the distinct layers. Observe how the oil floats nonchalantly above the water!
- Watch the Delight: Take a moment to marvel at the stunning contrast between the two liquids. This moment is magical, as kids witness science in action.
- Customize: For added surprise elements, introduce colored glitter or small floating objects atop the oil. Enjoy the shimmering delight they bring!
Chef’s Notes & Helpful Tips
- Make-ahead Tips: If you’re hosting a workshop, prepare the colored water in advance and keep it sealed for a stress-free experience.
- Cooking Alternatives: While this isn’t a cooking project, applying similar layering techniques can yield stunning results with other semi-transparent models, including layered drinks or gelatin desserts!
- Customization Ideas: Mix different shades of food coloring for unique effects. Experiment with layering small toys in the liquids for a fun treasure hunt during playtime!
Common Mistakes to Avoid
Creating a stunning Öl- und Wasser-Dichteturm is all about the finesse of layering. Here are a few pitfalls to steer clear of:
- Pouring Too Quickly: A rushed pour will cause the water and oil to mix, disrupting the layers. Patience is key!
- Using Colored Oil: Avoid mixing food coloring with oil—use it only in water; oil doesn’t hold colors the same way.
- Skipping Stirring: Properly stirring colored water ensures even distribution of color. Swirl gently to avoid the water’s surface tension breaking.
What to Serve With DIY Öl- und Wasser-Dichteturm
There’s nothing better than enhancing a fun science project with a culinary treat! While enjoying your colorful creation, consider the following pairings:
- Mini Sandwiches: Small finger sandwiches, elegantly cut into fun shapes, keep appetites at bay during creative playtime.
- Fruit Skewers: Colorful bites of various fruits provide nutritious energy to sustain that creative spark.
- Veggie Cups: Display vibrant veggies with a dip for a crunchy side that complements the colorful project.
- Gummy Worms: Add a playful twist with sweet gummy worms creeping through the layers of your tower!
- Cookies: Bake or buy cheery cookies in fun shapes—this sweet addition will make the science project even more delightful.
- Smoothies: Blend colorful fruit smoothies that visually echo the layers of the oil and water.
Storage & Reheating Instructions
This project is best enjoyed fresh, given its assembly, but if you wish to save it for later viewing:
- Fridge: Store the created layers in a covered container. The colors may mix over time, but the tower will still remain an impressive sight for a day or two.
- Reheating: This science project doesn’t require reheating, but observing how it shifts over time may yield new discoveries!
Estimated Nutrition Information
This DIY project isn’t focused on nutrition, as it primarily involves liquids and colors, but here’s a breakdown of approximations when using edible toys:
- Calories: Varies based on additives but generally minimal.
- Carbs: Depends on fruits or cookies paired with the project.
Consider this a purely fun educational activity!
FAQs
1. Can I use other liquids beside oil and water? Absolutely! Explore the density of other liquids like corn syrup or dish soap to create different visual effects.
2. Is this project safe for all ages? It is safe for children under supervision. Ensure they are guided throughout the pouring and mixing process.
3. How long will the layers last in the container? The layers can last a day or two, but for best results, enjoy the visual experience right away.
4. Can I teach additional science concepts with this project? Definitely! Incorporate discussions on density, solubility, dissolution, and buoyancy for deeper learning.
5. What’s the best way to clean up? Use a damp cloth for spills, and delegate cleaning tasks to involve everyone while reinforcing teamwork!
Conclusion
The thrill of creating a DIY Öl- und Wasser-Dichteturm extends far beyond the mesmerizing visuals—it’s an adventure brimming with laughter, creativity, and learning. Children don’t just mix liquids; they embrace the magic of science! Dive into this delightful project and cultivate a love for exploration and discovery. Unleash their creative spirits and watch as they steep themselves in the joys of experimentation. Encourage them to share their creations and observations with family and friends. Set the stage for joy today, and spark their future as little scientists!
Print
DIY Öl- und Wasser-Dichteturm
- Total Time: 15 minutes
- Yield: 1 tower
- Diet: N/A
Description
An engaging science project for children that explores density and buoyancy by creating a colorful oil and water tower.
Ingredients
- Vegetable Oil (or other oils like olive or coconut)
- Water (plain tap water)
- Food Coloring (various colors)
- Optional Add-ins (glitter or small floating objects)
Instructions
- Prepare your workspace: Lay down a protective cover to catch any drips.
- Add water: Fill your chosen container halfway with water.
- Color the water: Add food coloring and swirl gently with a spoon.
- Pour the oil: Slowly add vegetable oil on top of the colored water.
- Watch the delight: Observe the stunning contrast between the two liquids.
- Customize: Add glitter or small floating objects for extra fun!
Notes
Ensure the workspace is covered and allow kids to help choose colors and containers. This is an exploration project, so enjoy it!
- Prep Time: 15 minutes
- Cook Time: 0 minutes
- Category: Educational Activity
- Method: Other
- Cuisine: N/A
Nutrition
- Serving Size: 1 project
- Calories: 50 (varies based on add-ins)
- Sugar: 0g
- Sodium: 0mg
- Fat: 5g
- Saturated Fat: 0g
- Unsaturated Fat: 5g
- Trans Fat: 0g
- Carbohydrates: 0g
- Fiber: 0g
- Protein: 0g
- Cholesterol: 0mg
Keywords: science experiment, kids activity, DIY project, oil and water experiment, educational fun


