

Introduction to Vanilla Wafer Cake
As a busy mom, I know how precious time can be, especially when it comes to whipping up something sweet. That’s why I absolutely adore this Vanilla Wafer Cake! It’s a delightful no-bake dessert that comes together in a flash, making it the perfect solution for those hectic days. Whether you’re hosting a gathering or just want to treat your family, this cake is sure to impress. With its creamy layers and crunchy vanilla wafers, it’s a simple yet elegant dessert that brings smiles all around. Let’s dive into this delicious adventure together!
Why You’ll Love This Vanilla Wafer Cake
This Vanilla Wafer Cake is a dream come true for busy lives. It’s incredibly easy to make, requiring no baking at all! Just a few simple steps and you’ll have a stunning dessert ready to chill. The taste? Oh, it’s a delightful blend of creamy and crunchy that dances on your taste buds. Plus, it’s versatile enough to adapt to any occasion, making it a go-to recipe in my kitchen!
Ingredients for Vanilla Wafer Cake
Gathering the right ingredients is the first step to creating this delightful Vanilla Wafer Cake. Here’s what you’ll need:
- Vanilla Wafers: These are the star of the show! They provide a sweet, crunchy base that pairs perfectly with the creamy layers.
- Heavy Cream: This is what gives the cake its luscious texture. Whipping it creates a light and airy filling that’s simply irresistible.
- Powdered Sugar: A touch of sweetness is essential. Powdered sugar blends smoothly into the whipped cream, ensuring a creamy consistency.
- Vanilla Extract: This adds a rich, aromatic flavor that enhances the overall taste of the cake. It’s like a warm hug in dessert form!
- Milk: Used to dip the wafers, milk softens them just enough to create that perfect layer. Whole milk is best for a richer flavor.
- Chopped Nuts (optional): If you want to add a bit of crunch, sprinkle some nuts on top. They also add a lovely contrast to the creamy layers.
For exact measurements, check the bottom of the article where you can find everything listed for easy printing. Happy baking!
How to Make Vanilla Wafer Cake
Now that we have our ingredients ready, let’s dive into the fun part—making the Vanilla Wafer Cake! This no-bake dessert is as easy as pie, or should I say cake? Follow these simple steps, and you’ll be on your way to a delicious treat in no time!
Step 1: Crush the Vanilla Wafers
First things first, we need to crush those vanilla wafers into fine crumbs. You can use a food processor for a quick job, or if you’re feeling a bit old-school, grab a ziplock bag and a rolling pin. Just toss the wafers in the bag, seal it tight, and roll away! Aim for a crumbly texture, not powder. This will give our cake that delightful crunch.
Step 2: Whip the Heavy Cream
Next, let’s whip the heavy cream! Pour it into a mixing bowl and use an electric mixer to beat it until soft peaks form. This means when you lift the beaters, the cream should hold its shape but still be soft. If you over-whip, it can turn into butter, and we don’t want that! So keep an eye on it, and stop when it looks fluffy and light.
Step 3: Mix in Sugar and Vanilla
Now it’s time to sweeten things up! Gently fold in the powdered sugar and vanilla extract into the whipped cream. Use a spatula to combine everything smoothly. This step is crucial because it adds that lovely sweetness and flavor to our cake. Make sure there are no lumps, and you’ll have a creamy mixture that’s simply irresistible!
Step 4: Prepare the Milk-Dipped Wafers
Let’s get those crushed wafers ready for layering! Pour some milk into a shallow bowl. Dip each crushed wafer briefly into the milk. Be careful not to soak them; we want them soft but not soggy. A quick dip will do the trick! This will help the wafers absorb some moisture and create that perfect texture in our cake.
Step 5: Layer the Cake
Now comes the fun part—layering! In a serving dish, start with a layer of the milk-dipped wafers, followed by a layer of the whipped cream mixture. Repeat this process, alternating layers until you run out of ingredients. I like to finish with a layer of whipped cream on top for a beautiful presentation. It’s like building a delicious tower of happiness!
Step 6: Add Nuts and Refrigerate
If you’re feeling adventurous, sprinkle some chopped nuts on top for added crunch. They add a lovely texture and flavor contrast. Now, cover your dish with plastic wrap and pop it in the refrigerator. Let it chill for at least 4 hours, or even better, overnight. This allows the flavors to meld beautifully, making each bite a delightful experience!
Tips for Success
- Use fresh heavy cream for the best texture and flavor.
- Don’t skip the chilling time; it’s essential for the cake to set properly.
- Experiment with different flavors of extract, like almond or coconut, for a twist.
- For a fun presentation, garnish with fresh fruit or chocolate shavings.
- Make it a day ahead for even better flavor!
Equipment Needed
- Mixing Bowl: A large bowl for whipping cream. Any bowl will do, but glass or metal works best.
- Electric Mixer: For whipping the cream quickly. A whisk can work too, but it’ll take more effort!
- Spatula: Essential for folding in ingredients smoothly.
- Shallow Bowl: For dipping the wafers in milk. A pie dish works great!
- Serving Dish: To layer and present your beautiful cake. Any dish that’s deep enough will work.
Variations of Vanilla Wafer Cake
- Chocolate Lovers: Swap out some vanilla wafers for chocolate wafers for a rich, chocolatey twist.
- Fruit-Infused: Add layers of sliced bananas or strawberries between the wafers for a fresh, fruity flavor.
- Nutty Delight: Mix in chopped nuts like pecans or walnuts into the whipped cream for added crunch and flavor.
- Gluten-Free Option: Use gluten-free vanilla wafers to make this dessert suitable for those with dietary restrictions.
- Vegan Version: Substitute heavy cream with coconut cream and use a plant-based milk for a delicious vegan treat.
Serving Suggestions for Vanilla Wafer Cake
- Pair with fresh berries for a pop of color and flavor.
- Serve alongside a scoop of vanilla ice cream for extra creaminess.
- Drizzle with chocolate or caramel sauce for a decadent touch.
- Garnish with mint leaves for a refreshing finish.
- Enjoy with a cup of coffee or tea for a delightful afternoon treat.
FAQs about Vanilla Wafer Cake
As you embark on your Vanilla Wafer Cake journey, you might have a few questions. Here are some common queries I’ve encountered, along with helpful answers to guide you along the way!
Can I make Vanilla Wafer Cake ahead of time?
Absolutely! In fact, making it a day in advance enhances the flavors. Just be sure to keep it covered in the fridge until you’re ready to serve.
What can I substitute for heavy cream?
If you’re looking for a lighter option, you can use whipped topping or coconut cream for a dairy-free version. Just remember, the texture may vary slightly.
How long can I store Vanilla Wafer Cake?
This cake can be stored in the refrigerator for up to 3 days. Just make sure it’s well-covered to keep it fresh and delicious!
Can I freeze Vanilla Wafer Cake?
While it’s best enjoyed fresh, you can freeze it for up to a month. Just wrap it tightly in plastic wrap and foil. Thaw it in the fridge before serving.
What other flavors can I add to the cake?
Feel free to get creative! You can add different extracts like almond or even mix in some cocoa powder for a chocolatey twist. The possibilities are endless!
Final Thoughts
Creating this Vanilla Wafer Cake is more than just making a dessert; it’s about bringing joy to your kitchen and your loved ones. The simplicity of the recipe allows you to focus on what truly matters—sharing delicious moments together. Each creamy, crunchy bite is a reminder that even the busiest days can end on a sweet note. So, whether it’s a family gathering or a quiet evening at home, this cake is sure to be a hit. I hope you enjoy making it as much as I do, and may it bring smiles to your table!
Print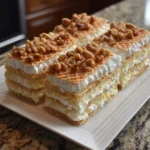
Vanilla Wafer Cake: Discover the Secret to Perfection!
- Total Time: 4 hours 20 minutes
- Yield: 8 servings 1x
- Diet: Vegetarian
Description
A delightful and easy-to-make Vanilla Wafer Cake that is perfect for any occasion.
Ingredients
- 2 cups vanilla wafers
- 1 cup heavy cream
- 1 cup powdered sugar
- 1 teaspoon vanilla extract
- 1 cup milk
- 1/2 cup chopped nuts (optional)
Instructions
- Crush the vanilla wafers into fine crumbs.
- In a mixing bowl, whip the heavy cream until soft peaks form.
- Add the powdered sugar and vanilla extract to the whipped cream and mix until well combined.
- In a separate bowl, dip the crushed vanilla wafers in milk briefly.
- Layer the dipped wafers and whipped cream mixture in a serving dish, alternating layers.
- Top with chopped nuts if desired.
- Refrigerate for at least 4 hours or overnight to set.
- Serve chilled and enjoy!
Notes
- For a richer flavor, use whole milk instead of low-fat milk.
- Feel free to add fruits like bananas or strawberries between the layers.
- This cake can be made a day in advance for better flavor.
- Prep Time: 20 minutes
- Cook Time: 0 minutes
- Category: Dessert
- Method: No-Bake
- Cuisine: American
Nutrition
- Serving Size: 1 slice
- Calories: 250
- Sugar: 15g
- Sodium: 50mg
- Fat: 15g
- Saturated Fat: 10g
- Unsaturated Fat: 3g
- Trans Fat: 0g
- Carbohydrates: 30g
- Fiber: 1g
- Protein: 3g
- Cholesterol: 40mg
Keywords: Vanilla Wafer Cake, No-Bake Cake, Easy Dessert


