

No-Bake Raspberry White Chocolate Bars are a stunning, elegant, and irresistibly easy dessert that delivers the vibrant, sun-ripened essence of summer berries and the luxurious creaminess of white chocolate in a foolproof, oven-free format. This dessert is a symphony of contrasting textures and harmonious flavors, built in dazzling layers that captivate both the eye and the palate. Imagine a foundation of buttery, salty-sweet pretzel crust that provides the perfect crunch, followed by a luscious, velvety middle layer where sweet white chocolate mellows the bright, tangy punch of raspberry jam or puree. The crowning glory is a glossy, jewel-toned raspberry topping, often infused with a hint of citrus, that sets into a tender, fruit-forward gel, studded with fresh raspberries for an extra burst of freshness.
Why Is This No-Bake Raspberry White Chocolate Bars Recipe So Popular?
The immense popularity of this recipe is anchored in its brilliant convergence of convenience, visual appeal, and universally adored flavors. First, its no-bake nature is a huge draw, eliminating the stress of oven temperatures, potential over-baking, and heating up the kitchen, making it a perfect treat for warm weather, last-minute guests, or cooking with children. Second, the flavor combination is iconic. The pairing of tart raspberry with sweet, creamy white chocolate is a classic that appeals to a wide audience, offering a sophisticated taste profile that feels special. Third, it is a show-stopping visual dessert. The distinct red, white, and golden layers create a stunning, professional-looking bar that is incredibly photogenic and impressive on any dessert table. Furthermore, its popularity is sustained by its versatility and make-ahead reliability. The bars must chill to set, meaning they can be prepared a full day (or more) in advance, freeing the host entirely. It’s a recipe that delivers maximum “wow” factor with minimal active effort, satisfying the desire for a homemade, gorgeous dessert without the complexity of traditional baking.
Why You’ll Love This No-Bake Raspberry White Chocolate Bars:
- Incredibly Easy & No Oven Required: Perfect for hot days, small kitchens, or when you simply don’t want to turn on the oven.
- Stunning Layered Presentation: The beautiful red, white, and gold layers look like they came from a professional bakery.
- Perfect Flavor Balance: The sweet white chocolate and buttery crust perfectly offset the bright, tangy raspberry.
- Excellent Make-Ahead Dessert: Needs several hours to chill, making it ideal for preparing the day before an event.
- Crowd-Pleasing for All Ages: Appeals to both adults and children with its familiar yet elegant flavors.
Here’s what you’ll need:
For the Pretzel Crust:
- 2 ½ cups (about 200g) finely crushed pretzels (traditional twists or sticks, not rods)
- ½ cup (100g) granulated sugar
- ¾ cup (170g / 1.5 sticks) unsalted butter, melted
- Pinch of salt (omit if using salted pretzels)
For the White Chocolate Filling Layer:
- 12 ounces (340g) high-quality white chocolate baking bars, finely chopped (not chips)
- 1 (8 oz / 225g) package full-fat brick cream cheese, softened to room temperature
- ⅓ cup (80ml) heavy cream
- 2 tablespoons unsalted butter, softened
- 1 teaspoon pure vanilla extract or vanilla bean paste
- ¼ teaspoon fine sea salt
- ½ cup (160g) seedless raspberry jam or preserves, divided
For the Raspberry Topping Layer:
- 3 cups (about 12 oz / 340g) fresh or frozen raspberries (divided: 2 cups for cooking, 1 cup for garnish)
- ½ cup (100g) granulated sugar
- 2 tablespoons fresh lemon juice
- 2 teaspoons powdered gelatin (or 2 sheets platinum gelatin)
- 3 tablespoons cool water
- 1-2 drops of red gel food coloring (optional, for a more vibrant color)
Special Equipment:
- 9×9 inch or 9×13 inch baking pan (for thicker or thinner bars)
- Parchment paper
- Food processor
- Double boiler or heatproof bowl for melting chocolate
- Fine mesh sieve
How to Make No-Bake Raspberry White Chocolate Bars:
Now that you have your ingredients ready, let’s dive into the steps for making this delightful No-Bake Raspberry White Chocolate Bars. It’s as easy as pie, and I promise you’ll feel like a culinary superstar!
Step 1: Prepare the Pan and Make the Crust
Line your chosen baking pan with parchment paper, leaving an overhang on two sides for easy removal. In a food processor, pulse the pretzels until they become fine, sandy crumbs. Transfer to a medium bowl and mix with the sugar and a pinch of salt. Pour the melted butter over the crumbs and stir until the mixture is uniformly moist and resembles wet sand. Pour the mixture into the prepared pan and press it down firmly and evenly using the bottom of a measuring cup or glass. This compact layer is crucial for a solid base. Place the pan in the freezer for 15-20 minutes to set while you prepare the next layer.
Step 2: Create the White Chocolate Filling
Create a double boiler: place a heatproof bowl over a saucepan of gently simmering water, ensuring the bowl doesn’t touch the water. Add the finely chopped white chocolate and heavy cream. Stir gently and constantly until the chocolate is completely melted and the mixture is smooth. Remove from heat and let cool for 5-10 minutes until lukewarm. In a separate large bowl, using a hand mixer or stand mixer, beat the softened cream cheese and 2 tablespoons of softened butter on medium speed until completely smooth and creamy, about 2 minutes. Scrape down the sides. With the mixer on low, slowly pour in the lukewarm white chocolate mixture, followed by the vanilla and salt. Beat until fully combined and smooth.
Step 3: Layer the Filling and Create a Raspberry Swirl
Remove the crust from the freezer. Pour the white chocolate filling over the set crust, spreading it into an even layer with an offset spatula. Warm ¼ cup of the raspberry jam in the microwave for 15-20 seconds until loose. Drop small dollops of the warmed jam over the white chocolate layer. Use a toothpick or a thin knife to gently swirl the jam into the filling, creating a beautiful marbled effect. Be careful not to over-swirl. Return the pan to the freezer for 20-30 minutes to allow this layer to firm up before adding the liquid topping.
Step 4: Prepare the Raspberry Gel Topping
In a medium saucepan, combine 2 cups of raspberries (fresh or frozen), sugar, and lemon juice. Cook over medium heat, stirring and mashing the berries with a spoon, until they break down and the mixture becomes juicy and bubbling, about 5-7 minutes. Remove from heat and press the mixture through a fine-mesh sieve into a clean bowl, using a spatula to extract all the puree. Discard the seeds. You should have about 1 cup of smooth raspberry puree. In a small bowl, sprinkle the powdered gelatin over the 3 tablespoons of cool water. Let it “bloom” for 5 minutes until it becomes a solid, spongy mass.
Step 5: Activate the Gelatin and Finish the Topping
Re-warm the strained raspberry puree over low heat until hot but not boiling. Add the bloomed gelatin mixture to the hot puree and whisk vigorously until the gelatin is completely dissolved, about 1-2 minutes. If using, add a tiny drop of red gel food coloring and whisk to intensify the color. Let the mixture cool for 15-20 minutes at room temperature, stirring occasionally, until it has thickened to the consistency of loose jam and is no longer hot to the touch (warm is okay).
Step 6: Assemble the Final Layer and Chill
Take the pan from the freezer. Scatter the remaining 1 cup of fresh raspberries evenly over the set white chocolate layer. Slowly and carefully pour the cooled (but not set) raspberry gelatin mixture over the fresh berries, guiding it into an even layer. If the raspberries float, gently push them down so they are suspended. Transfer the pan to the refrigerator. Chill for at least 6 hours, but ideally overnight, to allow all layers to set completely.
Step 7: Slice, Garnish, and Serve
Once fully set, use the parchment paper overhang to lift the entire slab of bars out of the pan and onto a cutting board. For clean cuts, use a sharp knife dipped in hot water and wiped dry between each slice. Cut into squares or rectangles. Serve chilled, optionally garnished with a dusting of powdered sugar, a drizzle of melted white chocolate, or a fresh mint leaf.
Tips for Success:
- Use a Baking Bar, Not Chips: White chocolate chips contain stabilizers that prevent them from melting smoothly. A high-quality baking bar (like Ghirardelli or Baker’s) is essential for a silky filling.
- Press the Crust Firmly: A well-compacted crust is the structural foundation. Press it down as firmly as possible.
- Cool Chocolate Before Adding: Ensure the melted white chocolate mixture is lukewarm, not hot, before adding it to the cream cheese to prevent the cheese from seizing or becoming grainy.
- Let Topping Cool Before Pouring: Pouring hot raspberry puree onto the white chocolate layer will melt it. Cooling the puree until thickened but still pourable is a critical step.
- Chill Thoroughly: Patience is key. A full overnight chill ensures clean, perfect slices.
- Seedless Jam for Swirl: Using seedless jam for the swirl ensures a smooth texture in the creamy layer.
Equipment Needed:
- 9×9 inch or 9×13 inch Baking Pan
- Parchment Paper
- Food Processor
- Double Boiler or Heatproof Bowl
- Hand Mixer or Stand Mixer
- Fine Mesh Sieve
- Offset Spatula
- Saucepan
Variations of No-Bake Raspberry White Chocolate Bars:
- Lemon Blueberry Bars: Use a graham cracker crust, add lemon zest to the white chocolate layer, and make a blueberry topping with lemon juice.
- Chocolate Raspberry: Substitute the white chocolate layer with a dark chocolate ganache layer.
- Strawberry or Mixed Berry: Replace raspberries with strawberries or a mix of your favorite berries for the topping.
- Vegan/Dairy-Free: Use vegan butter, vegan cream cheese, dairy-free white chocolate, and coconut cream. Use agar-agar instead of gelatin.
- Mango Passionfruit: Use a shortbread cookie crust, a plain white chocolate layer, and a tropical topping of mango and passionfruit puree.
- Peanut Butter Pretzel: Add ½ cup of creamy peanut butter to the white chocolate filling layer for a sweet-salty twist.
Serving Suggestions for No-Bake Raspberry White Chocolate Bars:
- On a Dessert Platter: Arrange the bars on a cake stand with other mini desserts like macarons and truffles.
- With Fresh Berries & Cream: Serve each bar with a dollop of lightly sweetened whipped cream and a few extra fresh raspberries on the side.
- For a Summer BBQ: The perfect portable, non-melty dessert to bring to outdoor gatherings.
- As an Elegant Dinner Party Dessert: Plate individually with a mint sprig and a delicate raspberry coulis drizzle.
- Gift Them: Package in clear cellophane bags or small boxes tied with ribbon for a beautiful homemade gift.
Prep Time:
40 minutes
Cooking Time:
10 minutes (stovetop only)
Total Time:
50 minutes (plus 6+ hours chilling)
Nutritional Information:
(Estimated per bar, based on 16 bars from a 9×9 pan)
- Calories: ~320
- Protein: 3g
- Sodium: ~180mg
- Sugar: 28g
- Fat: 21g (Saturated Fat: 13g)
- Carbohydrates: 33g
- Fiber: 2g
FAQs about No-Bake Raspberry White Chocolate Bars:
Q: Can I use frozen raspberries for the topping?
A: Yes, frozen raspberries work perfectly and are often more economical. There’s no need to thaw them before cooking.
Q: My white chocolate layer is grainy. What happened?
A: Graininess usually occurs if the white chocolate was overheated and seized, or if it was too hot when mixed with the cream cheese, causing the fat to separate. Gently melt over indirect heat and ensure it’s cooled to lukewarm.
Q: Can I make these without gelatin?
A: For a set topping, gelatin is recommended. For a looser, saucy topping, you can omit it, but the bars will be much messier to eat. Agar-agar (a plant-based substitute) can be used following package instructions.
Q: How long do these bars keep?
A: Stored in an airtight container in the refrigerator, they keep beautifully for 4-5 days. The fresh raspberries in the top layer may soften slightly but will still taste great.
Q: Can I freeze them?
A: Yes, they freeze well for up to 1 month. Freeze the whole slab or individual bars on a tray before wrapping tightly. Thaw in the refrigerator overnight before serving.
Q: My crust is too crumbly and won’t hold together.
A: You likely need a bit more melted butter. Add another tablespoon, mix, and press again. The mixture should hold its shape when pinched.
Final Thoughts:
No-Bake Raspberry White Chocolate Bars are a testament to the fact that the most dazzling desserts don’t always require an oven. This recipe is a celebration of intelligent layering, balanced flavors, and the sheer joy of creating something beautiful and delicious with minimal fuss. The process of building the distinct layers—salty-sweet crust, creamy marbled filling, and glistening fruit topping—is as satisfying as the final product is impressive. These bars are the ultimate secret weapon for the home cook: a dessert that looks like you spent hours crafting, yet comes together with simplicity and grace. They capture the bright, joyful spirit of ripe berries and the indulgent comfort of white chocolate in a form that is perfect for sharing and sure to elicit delighted compliments. So, crush those pretzels, melt that chocolate, and prepare to create a batch of these stunning, no-bake bars that are guaranteed to become a beloved staple in your repertoire of spectacular, stress-free desserts.
Print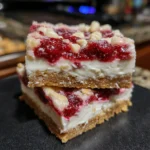
No-Bake Raspberry White Chocolate Bars: Sweet, Tart & Dreamy
- Total Time: 50 minutes
Description
Layers of buttery crust, creamy white chocolate filling, and sweet-tart raspberry topping. These easy, no-bake bars are a refreshing, crowd-pleasing treat.
Ingredients
For the Pretzel Crust:
-
2 ½ cups (about 200g) finely crushed pretzels (traditional twists or sticks, not rods)
-
½ cup (100g) granulated sugar
-
¾ cup (170g / 1.5 sticks) unsalted butter, melted
-
Pinch of salt (omit if using salted pretzels)
For the White Chocolate Filling Layer:
-
12 ounces (340g) high-quality white chocolate baking bars, finely chopped (not chips)
-
1 (8 oz / 225g) package full-fat brick cream cheese, softened to room temperature
-
⅓ cup (80ml) heavy cream
-
2 tablespoons unsalted butter, softened
-
1 teaspoon pure vanilla extract or vanilla bean paste
-
¼ teaspoon fine sea salt
-
½ cup (160g) seedless raspberry jam or preserves, divided
For the Raspberry Topping Layer:
-
3 cups (about 12 oz / 340g) fresh or frozen raspberries (divided: 2 cups for cooking, 1 cup for garnish)
-
½ cup (100g) granulated sugar
-
2 tablespoons fresh lemon juice
-
2 teaspoons powdered gelatin (or 2 sheets platinum gelatin)
-
3 tablespoons cool water
-
1–2 drops of red gel food coloring (optional, for a more vibrant color)
Special Equipment:
-
9x9 inch or 9×13 inch baking pan (for thicker or thinner bars)
-
Parchment paper
-
Food processor
-
Double boiler or heatproof bowl for melting chocolate
-
Fine mesh sieve
Instructions
Step 1: Prepare the Pan and Make the Crust
Line your chosen baking pan with parchment paper, leaving an overhang on two sides for easy removal. In a food processor, pulse the pretzels until they become fine, sandy crumbs. Transfer to a medium bowl and mix with the sugar and a pinch of salt. Pour the melted butter over the crumbs and stir until the mixture is uniformly moist and resembles wet sand. Pour the mixture into the prepared pan and press it down firmly and evenly using the bottom of a measuring cup or glass. This compact layer is crucial for a solid base. Place the pan in the freezer for 15-20 minutes to set while you prepare the next layer.
Step 2: Create the White Chocolate Filling
Create a double boiler: place a heatproof bowl over a saucepan of gently simmering water, ensuring the bowl doesn’t touch the water. Add the finely chopped white chocolate and heavy cream. Stir gently and constantly until the chocolate is completely melted and the mixture is smooth. Remove from heat and let cool for 5-10 minutes until lukewarm. In a separate large bowl, using a hand mixer or stand mixer, beat the softened cream cheese and 2 tablespoons of softened butter on medium speed until completely smooth and creamy, about 2 minutes. Scrape down the sides. With the mixer on low, slowly pour in the lukewarm white chocolate mixture, followed by the vanilla and salt. Beat until fully combined and smooth.
Step 3: Layer the Filling and Create a Raspberry Swirl
Remove the crust from the freezer. Pour the white chocolate filling over the set crust, spreading it into an even layer with an offset spatula. Warm ¼ cup of the raspberry jam in the microwave for 15-20 seconds until loose. Drop small dollops of the warmed jam over the white chocolate layer. Use a toothpick or a thin knife to gently swirl the jam into the filling, creating a beautiful marbled effect. Be careful not to over-swirl. Return the pan to the freezer for 20-30 minutes to allow this layer to firm up before adding the liquid topping.
Step 4: Prepare the Raspberry Gel Topping
In a medium saucepan, combine 2 cups of raspberries (fresh or frozen), sugar, and lemon juice. Cook over medium heat, stirring and mashing the berries with a spoon, until they break down and the mixture becomes juicy and bubbling, about 5-7 minutes. Remove from heat and press the mixture through a fine-mesh sieve into a clean bowl, using a spatula to extract all the puree. Discard the seeds. You should have about 1 cup of smooth raspberry puree. In a small bowl, sprinkle the powdered gelatin over the 3 tablespoons of cool water. Let it “bloom” for 5 minutes until it becomes a solid, spongy mass.
Step 5: Activate the Gelatin and Finish the Topping
Re-warm the strained raspberry puree over low heat until hot but not boiling. Add the bloomed gelatin mixture to the hot puree and whisk vigorously until the gelatin is completely dissolved, about 1-2 minutes. If using, add a tiny drop of red gel food coloring and whisk to intensify the color. Let the mixture cool for 15-20 minutes at room temperature, stirring occasionally, until it has thickened to the consistency of loose jam and is no longer hot to the touch (warm is okay).
Step 6: Assemble the Final Layer and Chill
Take the pan from the freezer. Scatter the remaining 1 cup of fresh raspberries evenly over the set white chocolate layer. Slowly and carefully pour the cooled (but not set) raspberry gelatin mixture over the fresh berries, guiding it into an even layer. If the raspberries float, gently push them down so they are suspended. Transfer the pan to the refrigerator. Chill for at least 6 hours, but ideally overnight, to allow all layers to set completely.
Step 7: Slice, Garnish, and Serve
Once fully set, use the parchment paper overhang to lift the entire slab of bars out of the pan and onto a cutting board. For clean cuts, use a sharp knife dipped in hot water and wiped dry between each slice. Cut into squares or rectangles. Serve chilled, optionally garnished with a dusting of powdered sugar, a drizzle of melted white chocolate, or a fresh mint leaf
Notes
-
9×9 inch or 9×13 inch Baking Pan
-
Parchment Paper
-
Food Processor
-
Double Boiler or Heatproof Bowl
-
Hand Mixer or Stand Mixer
-
Fine Mesh Sieve
-
Offset Spatula
-
Saucepan
- Prep Time: 40 minutes
- Category: dessert
- Cuisine: American
Nutrition
- Calories: 320
- Sugar: 28g
- Sodium: 180mg
- Fat: 21g
- Saturated Fat: 13g
- Carbohydrates: 33g
- Fiber: 2g
- Protein: 3g
- Cholesterol: 0


