

Picture a plate of golden, flaky spirals, each revealing a vibrant, molten core of spiced chicken, gooey cheese, and colorful vegetables. This is the magic of Fiesta Cheesy Chicken Roll-Ups, a dish that perfectly bridges the gap between a fun, hands-on appetizer and a satisfying, all-in-one main course. More than just a “roll-up,” this recipe is a culinary celebration, a true fiesta on a baking sheet. It transforms simple, humble ingredients into playful, elegant parcels bursting with the lively, comforting flavors of Tex-Mex cuisine.
Why Is This Fiesta Cheesy Chicken Roll-Ups So Popular?
The popularity of Fiesta Cheesy Chicken Roll-Ups is anchored in their unmatched versatility and their powerful crowd-pleasing appeal. First, they are incredibly fun and interactive food. There’s an inherent playfulness to eating a “roll-up”; it’s handheld, dippable, and visually exciting with its spiral interior. This makes them a massive hit with children and a nostalgic, enjoyable treat for adults, perfect for casual gatherings, game day spreads, or potlucks where finger food reigns supreme.
Second, they offer brilliant culinary efficiency. They solve the common dilemma of desiring complex flavor without complex effort. By utilizing pre-cooked chicken (like a rotisserie chicken) and convenient crescent roll dough, the recipe delivers a from-scratch taste and impressive presentation with supermarket-shortcut ease. They feel special and homemade without requiring advanced culinary skills.
Finally, they master the art of textural and flavor harmony. The contrast between the flaky, buttery, slightly crisp pastry and the soft, creamy, savory filling is deeply satisfying. The flavor profile—a fiesta of cumin, chili, garlic, melty cheese, and sweet pops of corn—is broadly appealing yet interesting enough to keep palates engaged. They are simultaneously familiar and just festive enough to feel like a treat, hitting the sweet spot between everyday comfort and party-ready excitement.
Why You’ll Love This Fiesta Cheesy Chicken Roll-Ups:
You will love this recipe because it is a guaranteed source of culinary joy and compliments. You will love the creative process of assembling the roll-ups, spreading the filling, and rolling them into neat little spirals—it’s a satisfying, almost therapeutic kitchen activity. You will love the magnificent aroma that fills your home as they bake: the warm spices mingling with toasted pastry and melting cheese is an irresistible prelude to the meal.
You will love the sheer adaptability of the dish. It’s a blank canvas for your favorite flavors; you can dial the heat up or down, sneak in extra veggies, or swap the proteins based on what you have on hand. Most of all, you will love the unanimous delight they bring to the table. They are the kind of food that makes people’s eyes light up, encouraging second helpings and recipe requests. They are perfect for portion control, great for leftovers, and solve the “what’s for dinner?” question with a fun and flavorful answer that everyone, from kids to gourmands, will adore.
Here’s what you’ll need:
For the Fiesta Chicken Filling:
- 2 cups (about 10 oz / 280g) cooked chicken, finely shredded or diced (rotisserie chicken is ideal)
- 4 ounces (115g) block cream cheese, softened to room temperature
- 1 ½ cups (about 6 oz / 170g) freshly shredded Mexican blend cheese (a mix of cheddar, Monterey Jack, queso quesadilla, etc.)
- 1 (4 oz / 113g) can of mild diced green chiles, thoroughly drained
- ⅔ cup frozen corn kernels, thawed (or canned corn, drained)
- ⅓ cup finely diced red bell pepper
- ¼ cup finely chopped fresh cilantro, plus more for garnish
- 2 green onions, thinly sliced
- 1 tablespoon taco seasoning (store-bought packet or homemade—see Variations)
- 1 teaspoon ground cumin
- ½ teaspoon garlic powder
- ½ teaspoon smoked paprika
- Juice of half a lime (about 1 tablespoon)
- Salt and freshly ground black pepper to taste
For the Assembly & Baking:
- 2 (8 oz / 225g) cans of refrigerated crescent roll dough (the standard 8-count cans)
- 2 tablespoons unsalted butter, melted
- 1 tablespoon everything bagel seasoning, sesame seeds, or a mix of garlic powder and dried parsley (for topping)
For Serving (The Essential Fiesta Finishers):
- Pico de Gallo or your favorite salsa
- Sour cream or Mexican crema
- Guacamole or sliced avocado
- Fresh lime wedges
- Pickled jalapeño slices
- Extra cilantro leaves
How to Make Fiesta Cheesy Chicken Roll-Ups:
Now that you have your ingredients ready, let’s dive into the steps for making this delightful Fiesta Cheesy Chicken Roll-Ups. It’s as easy as pie, and I promise you’ll feel like a culinary superstar!
Step 1: Craft the Flavor-Packed Fiesta Filling
In a large mixing bowl, combine the softened cream cheese, lime juice, taco seasoning, cumin, garlic powder, and smoked paprika. Stir vigorously with a spatula until completely smooth and the spices are fully incorporated. This forms your flavor base. To this base, add the shredded chicken, 1 cup of the Mexican blend cheese (reserve ½ cup for topping), drained green chiles, thawed corn, diced red bell pepper, chopped cilantro, and sliced green onions. Gently fold everything together until the chicken and vegetables are evenly coated in the creamy, spiced cheese mixture. Taste and adjust seasoning with salt and pepper. Set aside while you prepare the dough.
Step 2: Prepare the Crescent Dough Canvas
Preheat your oven to 375°F (190°C). Line a large, rimmed baking sheet with parchment paper. Open one can of crescent roll dough. DO NOT separate the triangles along the perforations. Instead, unroll the dough into one large rectangle. Firmly press the diagonal perforated seams together with your fingers to seal them, creating one solid, seamless sheet of dough. Repeat with the second can of dough on a separate work surface or a second piece of parchment.
Step 3: Spread and Distribute the Filling
Divide the prepared fiesta chicken filling evenly between the two dough rectangles. Using an offset spatula or the back of a spoon, spread the filling into a thin, even layer over each rectangle, leaving a bare ½-inch border around all edges. This border is crucial for a clean seal. Sprinkle the remaining ½ cup of shredded Mexican cheese evenly over the filling on both rectangles.
Step 4: Roll, Seal, and Slice into Spirals
Starting from one of the longer sides of a dough rectangle, carefully and tightly begin to roll the dough and filling into a log, like a jelly roll. Use the parchment paper to help lift and guide the roll. Once fully rolled, gently pinch the final seam and the ends to seal in the filling. Carefully transfer the log, seam-side down, to one side of the prepared baking sheet. Repeat with the second dough rectangle, placing it on the other side of the baking sheet with ample space between them.
Step 5: Glaze, Score, and Season
Using a sharp serrated or paring knife, make very light, shallow scores across the top of each log at 1-inch intervals. This indicates where you will cut after baking and helps steam escape. Do not cut all the way through. Brush the top and sides of each log generously with the melted butter. Then, sprinkle the tops evenly with the everything bagel seasoning or your chosen topping for added flavor and visual appeal.
Step 6: Bake to Golden-Brown Perfection
Place the baking sheet in the preheated oven. Bake for 18-23 minutes, or until the dough is puffed and a deep, golden brown all over. The filling should be hot and bubbly (you might see some cheese peeking out). Oven temperatures vary, so start checking at 18 minutes.
Step 7: Slice, Garnish, and Serve with Dipping Fiesta
Remove the baked logs from the oven and let them cool on the baking sheet for exactly 5 minutes. This short rest allows the filling to set slightly, making for cleaner slices. Using a sharp bread knife, slice through the logs at the pre-scored marks, creating individual roll-ups. Transfer them to a serving platter. Garnish with additional chopped cilantro and serve immediately while warm and flaky, with an abundant array of dipping sauces like pico de gallo, sour cream, and guacamole on the side.
Tips for Success:
- Seal the Seams: Taking the time to firmly press the crescent dough perforations closed prevents the filling from leaking out during baking and ensures a uniform roll.
- Filling Consistency: The filling should be cohesive, not runny. If it seems too wet, add a tablespoon of breadcrumbs or shredded cheese to bind it. If too stiff, a teaspoon of milk or salsa can loosen it.
- Sharp Knife for Slicing: A serrated bread knife used with a gentle sawing motion will give you clean slices without squishing the beautiful spiral layers.
- Don’t Overbake: The crescents brown quickly. Once they reach a rich golden hue, they are done. Overbaking can dry out the filling.
- Make-Ahead Magic: You can assemble the logs up to 24 hours in advance. Wrap them tightly in plastic wrap and refrigerate. Brush with butter, season, and bake directly from the fridge, adding 3-5 minutes to the bake time.
Equipment Needed:
- Large rimmed baking sheet
- Parchment paper
- Large mixing bowl
- Spatula
- Rolling pin (optional, for helping seal dough seams)
- Offset spatula or back of a spoon
- Sharp serrated knife or bread knife
- Pastry brush
Variations of Fiesta Cheesy Chicken Roll-Ups:
- Buffalo Chicken Roll-Ups: Replace the taco seasoning with ¼ cup of Buffalo sauce and use a blue cheese and mozzarella blend. Add diced celery to the filling.
- Southwest Breakfast Roll-Ups: Use scrambled eggs, cooked breakfast sausage, diced potatoes, and cheddar cheese as the filling. Perfect for brunch.
- Pizza Roll-Ups: Use Italian seasoning, marinara sauce, pepperoni slices, and a mozzarella and provolone cheese blend as the filling.
- Vegetarian “Fiesta” Roll-Ups: Substitute the chicken with 1 (15 oz) can of black beans (rinsed and mashed slightly) and 1 cup of cooked quinoa or riced cauliflower.
- Spicy Chipotle Version: Add 1-2 teaspoons of minced chipotle peppers in adobo sauce to the filling and use a Pepper Jack cheese blend.
Serving Suggestions for Fiesta Cheesy Chicken Roll-Ups:
While a complete meal on their own, these roll-ups shine brightest as part of a festive spread. Serve them alongside Mexican rice, warm black beans or frijoles charros, and a crisp cabbage slaw with a lime-cilantro dressing. For beverages, pair with margaritas (frozen or on the rocks), Mexican beer, or sparkling agua fresca. For a casual dinner, simply a platter of roll-ups with all the dipping sauces and a simple side salad is perfection.
Prep Time:
20 minutes
Cooking Time:
20 minutes
Total Time:
45 minutes (including rest time)
Nutritional Information:
*(Per roll-up, based on 16 roll-ups. This is an estimate and varies with specific ingredients.)*
- Calories: ~220
- Protein: 9g
- Sodium: ~480mg
- Sugar: 3g
- Fat: 14g
- Carbohydrates: 16g
- Fiber: 1g
FAQs about Fiesta Cheesy Chicken Roll-Ups:
Q: Can I use puff pastry instead of crescent dough?
A: Yes, puff pastry is an excellent, flakier alternative. Thaw one sheet, roll it out slightly, and proceed with the recipe. The baking time may be slightly longer—bake until puffed and golden.
Q: How do I store and reheat leftovers?
A: Store cooled leftovers in an airtight container in the refrigerator for up to 3 days. Reheat in an air fryer or toaster oven at 350°F (175°C) for 5-8 minutes to restore crispness. The microwave will work but will soften the pastry.
Q: Can I freeze these before or after baking?
A: Before baking is best. Assemble the logs, wrap tightly in plastic wrap and then foil, and freeze for up to 2 months. Thaw overnight in the fridge before baking as directed. You can freeze after baking, but the pastry may lose some texture upon reheating.
Q: My filling leaked out during baking. What happened?
A: This is usually due to overfilling or not leaving a sufficient border when spreading. Ensure you have a tight seal on the final seam and that the dough isn’t stretched too thin. A little leakage is normal and tastes delicious!
Q: Can I make these with homemade dough?
A: Absolutely. Any soft, rollable yeast dough or a homemade crescent dough recipe would work beautifully, though it will increase the prep time significantly.
Final Thoughts:
Fiesta Cheesy Chicken Roll-Ups are more than just a convenient recipe; they are a testament to the joy of creative, accessible cooking. They prove that with a little imagination, everyday ingredients can be transformed into a dish that feels like a party. They bring people together, encourage sharing and dipping, and deliver a burst of festive flavor in every handheld package. From the satisfying process of rolling them up to the delightful reveal of the colorful spiral interior, they are a culinary experience that engages all the senses. They are the perfect dish for when you want to inject a little fun and flair into mealtime without embarking on a complicated kitchen project. So gather your ingredients, crank up some festive music, and get ready to roll your way to a delicious, cheesy, crowd-pleasing triumph. Viva la fiesta!
Print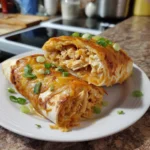
Fiesta Cheesy Chicken Roll-Ups: Easy, Flavorful Party Appetizer
- Total Time: 45 minutes
Description
These Fiesta Cheesy Chicken Roll-Ups are a guaranteed hit! Creamy chicken, corn, black beans & cheese wrapped in tortillas. Perfect for parties or snacks!
Ingredients
For the Fiesta Chicken Filling:
-
2 cups (about 10 oz / 280g) cooked chicken, finely shredded or diced (rotisserie chicken is ideal)
-
4 ounces (115g) block cream cheese, softened to room temperature
-
1 ½ cups (about 6 oz / 170g) freshly shredded Mexican blend cheese (a mix of cheddar, Monterey Jack, queso quesadilla, etc.)
-
1 (4 oz / 113g) can of mild diced green chiles, thoroughly drained
-
⅔ cup frozen corn kernels, thawed (or canned corn, drained)
-
⅓ cup finely diced red bell pepper
-
¼ cup finely chopped fresh cilantro, plus more for garnish
-
2 green onions, thinly sliced
-
1 tablespoon taco seasoning (store-bought packet or homemade—see Variations)
-
1 teaspoon ground cumin
-
½ teaspoon garlic powder
-
½ teaspoon smoked paprika
-
Juice of half a lime (about 1 tablespoon)
-
Salt and freshly ground black pepper to taste
For the Assembly & Baking:
-
2 (8 oz / 225g) cans of refrigerated crescent roll dough (the standard 8-count cans)
-
2 tablespoons unsalted butter, melted
-
1 tablespoon everything bagel seasoning, sesame seeds, or a mix of garlic powder and dried parsley (for topping)
For Serving (The Essential Fiesta Finishers):
-
Pico de Gallo or your favorite salsa
-
Sour cream or Mexican crema
-
Guacamole or sliced avocado
-
Fresh lime wedges
-
Pickled jalapeño slices
-
Extra cilantro leaves
Instructions
Step 1: Craft the Flavor-Packed Fiesta Filling
In a large mixing bowl, combine the softened cream cheese, lime juice, taco seasoning, cumin, garlic powder, and smoked paprika. Stir vigorously with a spatula until completely smooth and the spices are fully incorporated. This forms your flavor base. To this base, add the shredded chicken, 1 cup of the Mexican blend cheese (reserve ½ cup for topping), drained green chiles, thawed corn, diced red bell pepper, chopped cilantro, and sliced green onions. Gently fold everything together until the chicken and vegetables are evenly coated in the creamy, spiced cheese mixture. Taste and adjust seasoning with salt and pepper. Set aside while you prepare the dough.
Step 2: Prepare the Crescent Dough Canvas
Preheat your oven to 375°F (190°C). Line a large, rimmed baking sheet with parchment paper. Open one can of crescent roll dough. DO NOT separate the triangles along the perforations. Instead, unroll the dough into one large rectangle. Firmly press the diagonal perforated seams together with your fingers to seal them, creating one solid, seamless sheet of dough. Repeat with the second can of dough on a separate work surface or a second piece of parchment.
Step 3: Spread and Distribute the Filling
Divide the prepared fiesta chicken filling evenly between the two dough rectangles. Using an offset spatula or the back of a spoon, spread the filling into a thin, even layer over each rectangle, leaving a bare ½-inch border around all edges. This border is crucial for a clean seal. Sprinkle the remaining ½ cup of shredded Mexican cheese evenly over the filling on both rectangles.
Step 4: Roll, Seal, and Slice into Spirals
Starting from one of the longer sides of a dough rectangle, carefully and tightly begin to roll the dough and filling into a log, like a jelly roll. Use the parchment paper to help lift and guide the roll. Once fully rolled, gently pinch the final seam and the ends to seal in the filling. Carefully transfer the log, seam-side down, to one side of the prepared baking sheet. Repeat with the second dough rectangle, placing it on the other side of the baking sheet with ample space between them.
Step 5: Glaze, Score, and Season
Using a sharp serrated or paring knife, make very light, shallow scores across the top of each log at 1-inch intervals. This indicates where you will cut after baking and helps steam escape. Do not cut all the way through. Brush the top and sides of each log generously with the melted butter. Then, sprinkle the tops evenly with the everything bagel seasoning or your chosen topping for added flavor and visual appeal.
Step 6: Bake to Golden-Brown Perfection
Place the baking sheet in the preheated oven. Bake for 18-23 minutes, or until the dough is puffed and a deep, golden brown all over. The filling should be hot and bubbly (you might see some cheese peeking out). Oven temperatures vary, so start checking at 18 minutes.
Step 7: Slice, Garnish, and Serve with Dipping Fiesta
Remove the baked logs from the oven and let them cool on the baking sheet for exactly 5 minutes. This short rest allows the filling to set slightly, making for cleaner slices. Using a sharp bread knife, slice through the logs at the pre-scored marks, creating individual roll-ups. Transfer them to a serving platter. Garnish with additional chopped cilantro and serve immediately while warm and flaky, with an abundant array of dipping sauces like pico de gallo, sour cream, and guacamole on the side
Notes
-
Large rimmed baking sheet
-
Parchment paper
-
Large mixing bowl
-
Spatula
-
Rolling pin
- Prep Time: 20 minutes
- Category: Dinner
- Cuisine: American
Nutrition
- Calories: 220
- Sugar: 3g
- Sodium: 480mg
- Fat: 14g
- Carbohydrates: 16g
- Fiber: 1g
- Protein: 9g


